Gluten Free Danish Puff Pastry Recipe
Light, flaky gluten free Danish Puff Pastry just like you remember, only now you can make them for yourself anytime you have the craving! This easy gluten free recipe breaks down each step so you'll be a Danish making pro in no time!
Print
Pin
Servings: 12 -12 Danish, depending on size
Equipment

Ingredients
Gluten Free Puff Pastry Dough
- ¼ cup warm water
- 1 Tbs. granulated sugar
- 2 ¼ tsp. dry yeast (Red Star or Fleishmann's) – 1 packet
- 1/3 cup milk dairy or non-dairy, room temperature
- 1 egg room temperature or 1 Tbs. flaxseed meal steeped in 3 Tbs. warm water until thick
- 2 ¾ cup (371 gr) gfJules™ Gluten Free All Purpose Flour
- 3 Tbs. granulated sugar
- 1 tsp. sea salt
- 14 Tbs. cold butter or non-dairy substitute (e.g. Earth Balance® Buttery Sticks
Cream Cheese Filling
- 8 oz. cream cheese (dairy or non-dairy like Go Veggie® Violife or Kite Hill™ vegan cream cheese alternatives
- 1/3 cup + 1 Tbs. granulated sugar
- 2 tsp. lemon juice
- 1 tsp. pure vanilla extract
- 1 tsp. sour cream (dairy or non-dairy like Follow Your Heart® Vegan Gourmet® Forager, Tofutti or other vegan sour cream alternatives OR vanilla yogurt of choice
- 1 Tbs. gfJules™ Gluten Free All Purpose Flour
Raisin Filling
- ½ cup raisins
- 1/8 cup granulated sugar
- ½ tsp. cinnamon
- 2 Tbs. softened butter or non-dairy alternative (like Earth Balance® Buttery Sticks)
Other Toppings
- 1 egg for egg wash or mild flavored oil for vegan alternative
- demerara sugar
- confectioner’s sugar
- berrries
Instructions
Gluten Free Puff Pastry:
- In a small bowl, whisk together warm water, 1 tablespoon sugar and yeast. Set aside.
- Once the mixture becomes foamy, add 1 egg/sub and milk.
- In a separate bowl, whisk together the gfJules™ flour, 3 tablespoons sugar and salt.
- Cut cold butter into ½ tablespoon-sized pieces and toss with flour mixture. Using a paddle attachment on a stand mixer or a blender, food processor or two knives, cut the butter into the flour mixture until it resembles small pebbles. Do not over-process; it should still be a powdery mixture with small pieces of butter throughout.
- Slowly pour the yeast mixture into the dry mixture and mix just until dough has formed. The dough will be sticky but will hold together.
- Wrap dough in plastic wrap and refrigerate for at least 1 hour or freeze for 30 minutes.
- Once dough is cold again, place on a clean counter or pastry mat liberally dusted with more gfJules™ flour or gluten free starch.
- Roll gently in all directions until you have a rectangle of dough that is between 16-17 inches by approximately 14 inches. Add more flour as you roll to prevent the dough from sticking.
- Fold opposing ends in to the middle, as you would fold a letter in one direction, and then in another. You will be left with a square of folded dough. If it is very sticky, wrap and refrigerate or freeze again; if you are still able to work with it, repeat the rolling and folding steps 3 more times, then wrap the dough and refrigerate for 3 hours or more (overnight is fine).
- This process of gently rolling cold dough with cold butter distributed throughout, layering with flour between folds and re-rolling, will help to form yummy flakey layers in the baked pastry dough, so for the flakiest pastry, don’t skip these steps!
- Prepare your fillings while the pastry is refrigerating.
Cream Cheese Filling:
- Whisk all ingredients together, adding more gfJules™ Flour if the mixture is runny; different brands of non-dairy cream cheese and sour cream can be thinner and may need more flour to give the filling body so it won’t run out of the pastries. Refrigerate until ready to use.
Raisin Filling:
- Combine raisins, sugar and cinnamon with soft butter in a small bowl, mixing with a fork until the raisins are evenly coated. Refrigerate until ready to use.
Making the Gluten Free Danish:
- Cut the refrigerated dough in half and re-wrap and cover one half of the dough, returning to the refrigerator as you work.
- Prepare two baking sheets by covering with parchment and setting aside. Prepare a clean counter or pastry mat by liberally dusting with gfJules™ Flour.
- Roll out half of the dough gently in all directions until the dough forms a square or rectangle between ¼ – ½ inch thick. Measure squares between 4 ½ – 5 inches on each side and cut with a pastry cutter, bench scraper or butter knife. The sides of the squares should be equal (they are squares, after all), but the size can vary depending on the amount of dough you have to work with.
- Gather up the dough cut off from the squares and re-roll, cutting squares from the remaining dough as well. Repeat with remaining refrigerated dough.
- Cut even squares of dough from the rolled out pastry dough.
Choose a shape below:
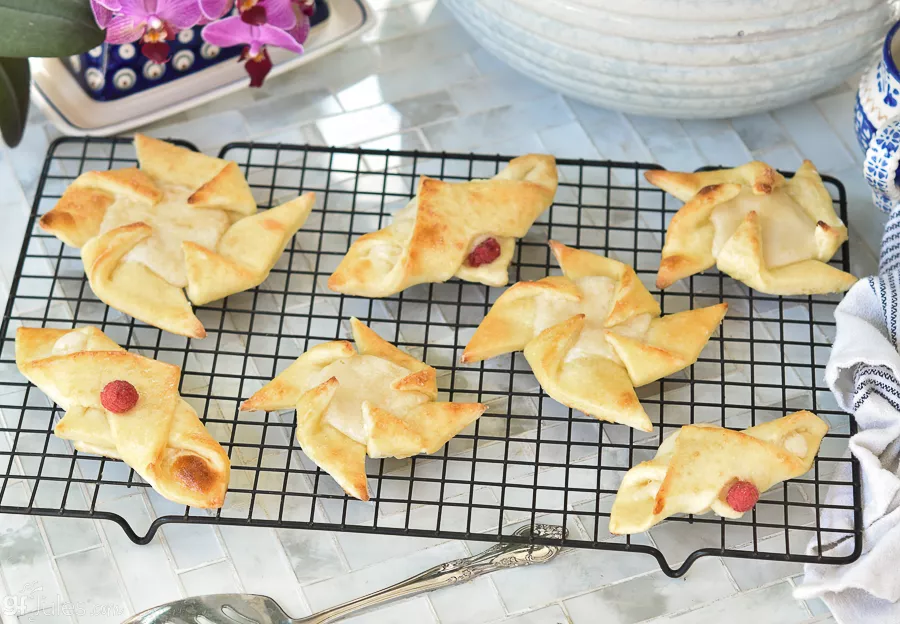
- To make pinwheel pastries, place a dollop of filling in the middle of each square, then cut in from the 4 corners just to the filling. Brush with egg wash.
- Pick up the left corner of one of the cut corners and fold into the middle of the filling; repeat with the same left corner of each of the cut corners.
- Wet the corners with more egg wash and gently press together in the center to help them stay together more during the rise. Place a berry in the center, if you wish. The dough will spread when they rise and bake – particularly if your dough is rolled thicker – but the twisted pinwheel shape is still pretty.
- Brush egg wash on the newly exposed sides of the pastry before setting aside to rise.
- Gently pick up the pastry with a spatula or bench scraper and transfer to the parchment lined baking sheet. Sprinkle with demerara sugar, if desired.
- To make Dutchess pastries, fold the square into a triangle by pulling one corner over to top the opposite corner. Cut into the triangle to almost form another smaller triangle in the middle, but don’t join the cuts, so they are still intact. The border outside of the smaller triangle should be about ¾ inch wide.
- Open the square back up and place a line of filling down the center. Fold one cut border over to the opposite side on top of the smaller interior square and filling. Repeat with the other side, folding overtop the opposite border, as pictured above. Brush with egg wash.
- Gently pick up the pastry with a spatula or bench scraper and transfer to the parchment lined baking sheet. Sprinkle with demerara sugar, if desired.
- To make Swiss roll-style pastries, roll the equivalent of two 5 inch squares of dough out to form a rectangle instead of a square, approximately 1/8 inch thick. Gently spread a thin layer of butter or non-dairy spread on top of the entire rectangle, then sprinkle with brown sugar, cinnamon, raisins, or any combination you desire.
- Starting at one long side of the rectangle, gently roll up the pastry into a long log. Twist the log around itself to form a bun, then press gently in the center to form a well. Place a dollop of filling into the well. Brush with egg wash.
- Gently pick up the pastry with a spatula or bench scraper and transfer to the parchment lined baking sheet. Sprinkle with demerara sugar, if desired.
Baking Pastries:
- Cover pastries and allow to rise for 15-30 minutes in a warm spot.
- Preheat oven to 400º F.
- Bake pastries in preheated oven for 9 minutes. Particularly with pastries like the pinwheel which have smaller points, do not over-cook or they will become crunchy and dry. Swiss rolls generally need a bit longer to cook. Because of the egg wash, the pastries will brown nicely, so watch to make sure they are not getting too dark before you remove from the oven.
- Remove to cool on a wire rack once baked.
- Sprinkle with confectioner’s sugar or a simple mixture of confectioner’s sugar and your milk of choice, drizzled as icing on top of the Danish, if desired.
- Makes 10-12 Danish pastries, depending on size.
Video
** Please keep in mind that nutrition information provided is per serving, which may vary. While we have taken care to provide you with the most accurate nutritional values possible, please note that this information may differ significantly depending on the exact ingredients and brands that you choose to use to make this recipe. Additionally, where options are given for ingredients, the resulting calculation may include all ingredient options instead of only one per line, skewing the totals significantly.