Gluten Free Pie Crust Recipe and Tips
Light, flaky, buttery ... these are all the adjectives you want associated with your gluten free pie crust, and they're what you'll get with this no-fail recipe!
Print
Pin
Servings: 1 1 crust crust
Calories: 181kcal
Equipment

Ingredients
1 Gluten Free Pie Crust (double for 2-crust pie)
- 1 (135) cup (grams) gfJules® All-Purpose Gluten Free Flour
- 1/2 teaspoon sea salt
- 2 (1) Tbs (ounce) shortening OR lard OR cream cheese/vegan cream cheese (1 1/8 ounce) (I recommend Spectrum® Organic Palm Shortening*
- 3 (1 ½) Tbs (ounce) COLD butter or non-dairy alternative
- 3 Tbs vodka** (OR white vinegar)
- 1-2 Tbs cold water add more or less to get the dough to hold together but not be sticky
- egg wash (1 egg + 1 Tbs. water) OR milk (dairy or non-dairy) for brushing on crust
Instructions
To Make the Dough:
- In a large bowl, whisk together the dry ingredients.
- Cut in the shortening/cream cheese and cold (not frozen, but very cold) butter using a pastry cutter (or the flat paddle attachment on a stand mixer or a food processor).
- Add the vodka & water gradually to make the consistency you need to form a ball -- err on the side of it being wetter rather than crumbly, but only add the liquid you need to get it to hold together, not too much! Do not over-work the dough, or it may become tough when baked.
- Form a disc with the dough, wrap in plastic and set aside on the counter for 30 minutes or refrigerate while you make your filling.
Rolling the Dough:
- After allowing the dough to rest, roll the pastry out onto a surface dusted well with gfJules All Purpose Gluten Free Flour.
- Use a flexible pastry mat (e.g. Silpat or cloth mat) and rolling pin covers or a pie crust bag for rolling and transferring your gluten free crust easily.
- Gently roll in each direction — do not press down on the pin while rolling — to a circle with a diameter at least 1 inch larger than that of your pie pan.
- Click on the pictures above the recipe card for quick videos on how to easily transfer a gluten free pie crust into the pan.
To Transfer the Crust:
- 1- Gently lift an edge of the rolled out crust over your rolling pin. 2 -With one hand under the baking mat, use the pin in the other hand to lift the crust so that it is supported by the rolling pin as you pull the crust gently off of the baking mat. 3- Transfer gently over the pie plate to center. 4- Drop gently into the plate and allow crust to slump into pan. 5- Pat into your pan. (See photo above recipe card)

- For a One Crust PieCut the edges of the crust to an even length of approximately 1-inch larger than the diameter of your pie plate.
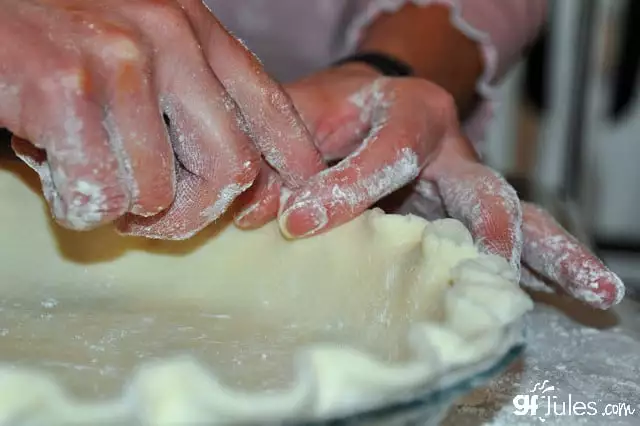
- Gently fold the edges under, then press with a fork or spoon or pinch into a fluted design between your fingers. Cover with plastic wrap and freeze while you make your fillings.
- Fill with your desired filling.
- For a Two-Crust PieDouble the ingredients and divide the doubled pie crust dough before setting aside. Shape each half into a disc and wrap each in plastic wrap. Repeat the rolling out steps for the first crust and cover with plastic wrap, then freeze for 30 minutes or while you prepare the fillings. Fill the pie and lay the second crust gently onto the top of the filled pie pan.
- Cut off all but 1/2 – 1 inch of excess pie crust from around the edge of the pan. For fruit pies, cut small slits in the center of the top crust to allow the hot steam to escape. Brush the crust with egg wash or your milk of choice – this step helps it to brown nicely.

- If there are any tears in your top crust, never fear! Simply take leftover crust and use decorative cookie cutters to cut out leaves, pumpkins, etc. Wet the backside of each cut-out with a dab of milk, then lay on top of any tears to cover the flaw.
- Use pie crust shields to prevent crust edges from over-cooking.
- Fold approximately 1/2 inch of excess pie crust over all around the edge to form the crust, then using your fingers, press a fluted design or use a fork to go around the crust to finish.
- Your pie is now ready to bake or to freeze for later baking. For directions on how to freeze the pie dough and bake later, hop to my post on that method. To bake now, follow the instructions below.
- Single-Crust: Preheat oven to 400º F (static). Brush the crust with egg wash or milk, then cover edges with foil or pie crust shields to minimize burning. Bake for 15 minutes. Reduce heat to 375º F (static) and bake an additional 20 minutes, remove the pie crust shields, and bake an additional 10 minutes, or follow directions for your specific pie recipe.
- Double-Crust Pie: Preheat oven to 400º F (static). Brush the crust with egg wash or milk, then cover edges with foil or pie crust shields and bake for 15 minutes.
- Reduce heat to 375º F (static), remove foil and brush again with egg wash or milk. Bake an additional 35-45 minutes, or until the juices are bubbling, or follow directions for your specific pie recipe. (Cover again with foil if the crust is browning too much during the bake).
- Unfilled Pie Crust (Blind Bake): Cover crust in pie plate loosely with plastic wrap and refrigerate for 30 minutes. Preheat oven to 375º F (static).
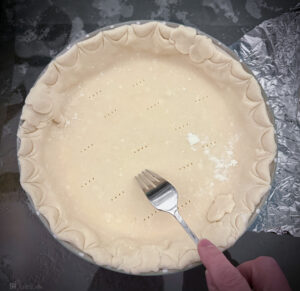
- Prick the bottom of pastry all over with tines of a fork. Cover the pastry with parchment paper and pour pie weights, dry rice or dried beans on top to cover 1 inch. Brush the crust edges with egg wash or milk, then cover crust edges with foil or pie crust shields. Bake for 15 minutes or until the bottom of the crust no longer looks raw.
- Remove the parchment paper and weights. Return to bake for 6-8 minutes if filling with quiche, pumpkin or key lime type filling which will be baked further; for cream pies and refrigerated fillings, bake 10-15 minutes more. Don’t wait for the crust to turn brown before removing or it will have over-cooked. Cool completely on a wire rack before filling for refrigerated pies.
Notes
* Both butter and shortening/lard or cream cheese are recommended. If you do not have or want to use shortening, another option is coconut oil, however the dough will be quite fragile to work with and difficult to transfer into the pie plate. Lard is suitable if that fits with your diet. Otherwise, liquid oil is another option. You may use all cold butter for the crust as well, but the flakiness in the pastry will be reduced.
**Vodka or other distilled alcohol is recommended for added tenderness in the crust. Distilled alcohol is gluten free. For more information, hop to my article all about it! Use white vinegar as another option.
Nutrition Facts
Gluten Free Pie Crust Recipe and Tips
Serving Size
1
Amount per Serving
Calories
181
% Daily Value*
Fat
12
g
18
%
Saturated Fat
6
g
38
%
Trans Fat
1
g
Polyunsaturated Fat
2
g
Monounsaturated Fat
4
g
Cholesterol
18
mg
6
%
Sodium
213
mg
9
%
Potassium
54
mg
2
%
Carbohydrates
14
g
5
%
Fiber
1
g
4
%
Sugar
0.01
g
0
%
Protein
1
g
2
%
Vitamin A
208
IU
4
%
Calcium
7
mg
1
%
Iron
0.01
mg
0
%
* Percent Daily Values are based on a 2000 calorie diet.
** Please keep in mind that nutrition information provided is per serving, which may vary. While we have taken care to provide you with the most accurate nutritional values possible, please note that this information may differ significantly depending on the exact ingredients and brands that you choose to use to make this recipe. Additionally, where options are given for ingredients, the resulting calculation may include all ingredient options instead of only one per line, skewing the totals significantly.