
This gorgeous gluten free Challah Crown is definitely a show-stopper, and it’s not difficult to make! Really. Just make sure you’re not using a dry, gritty, rice-based flour — so it’ll hold together!
It’s another recipe where my award-winning gfJules Gluten Free Flour really shines because it’s so fine and light, but it also adds stretch to doughs like this, allowing you to actually braid gluten free bread dough!
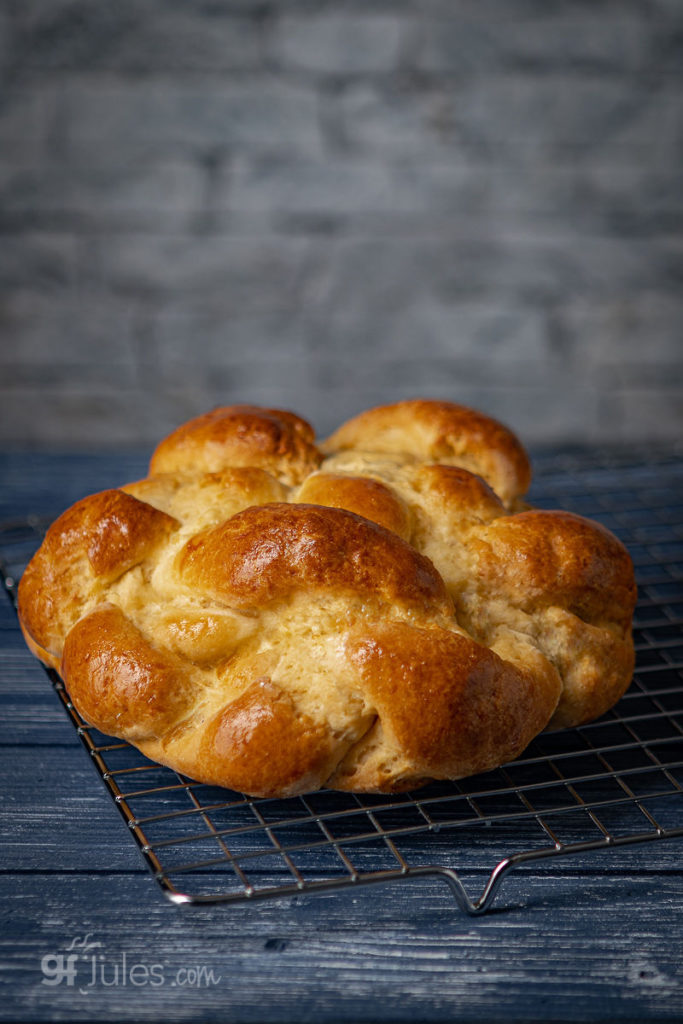
Yes, you read that right: YOU CAN BRAID THIS GLUTEN FREE CHALLAH! It’s all about the gluten free flour, people.
My award-winning gfJules Gluten Free All Purpose Flour is the secret ingredient to making this gorgeous loaf. Now you know.
Although associated with important Jewish holidays like Rosh Hashanah (the Jewish New Year), Yom Kippur and Hanukkah, challah is not only a culturally significant bread at these times of year, but is also a delicious and impressive bread to serve at your table any time.
We had friends over last weekend and I served these yummy round loaves because it’s one of our family’s favorite bread recipes, but it also happened to be the days leading up to Rosh Hashanah. They were blown away by my gluten free challah, having made their own GLUTEN-FULL challah the week before, and not loving the results.
It’s true folks: gluten free bread can be better than gluten bread. It happens all the time with my gfJules Flour. I have a whole tab of recipes dedicated to homemade gluten free bread recipes that are arguably better than — or at least as good as! — their gluten counterparts and are certainly quicker and easier to make!
At Rosh Hashanah, challah takes on symbolic importance for those of the Jewish faith who partake of this honey bread as a representation of the sweet new year we all hope for. Add in the extra sweetness of raisins, and dip a piece of the braided bread in high quality honey, and it is even more fun to wish for sweet things in the coming year.
The challah is formed into a round shape at this time of year to symbolize the circle of life and the cyclical pattern of the seasons that shape a year. At Hanukkah (the Festival of Lights), challah feeds the body and the soul, as families gather over the course of 8 days to light the Menorah, savor wonderful meals together, and to exchange gifts in celebration.
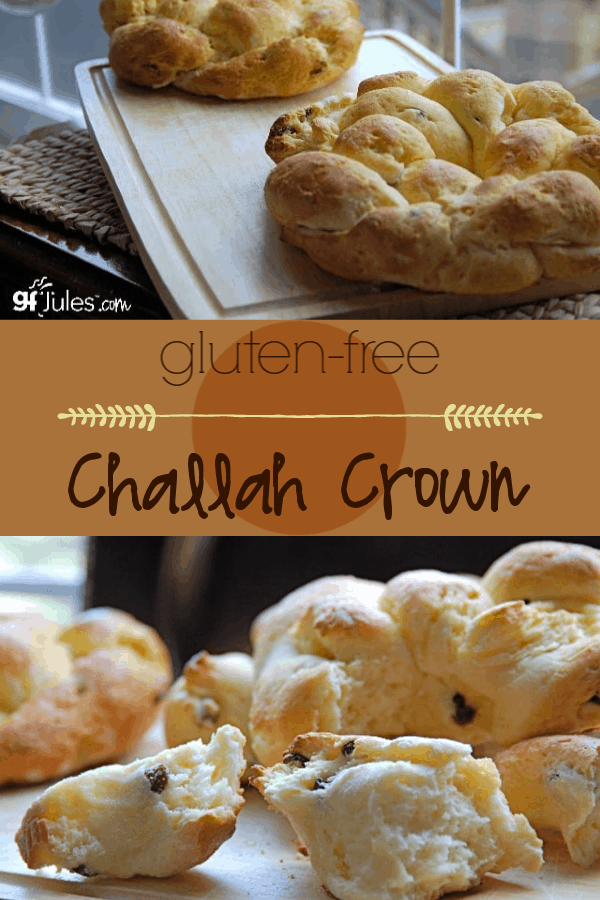
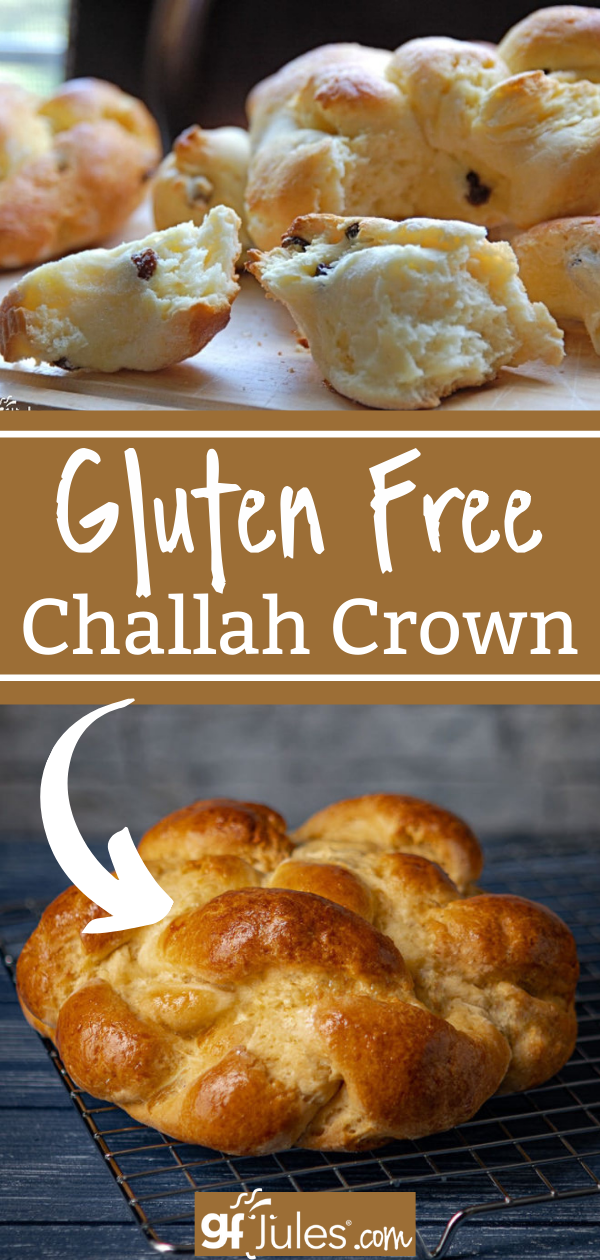
To see this bread in braided loaf form, hop to this recipe.

All of you who have seen me at gluten-free cooking classes or demonstrations making yeast breads already know the dirty little secret about gluten-free bread. Shhhh…. don’t tell the gluten-eaters! Seriously!
The secret is that compared to making gluten breads, it is super quick and shockingly easy to make homemade gluten-free bread! Impress your friends and shock the neighbors with this recipe too: not only is gluten-free challah delicious and fast, it’s almost too beautiful to eat!
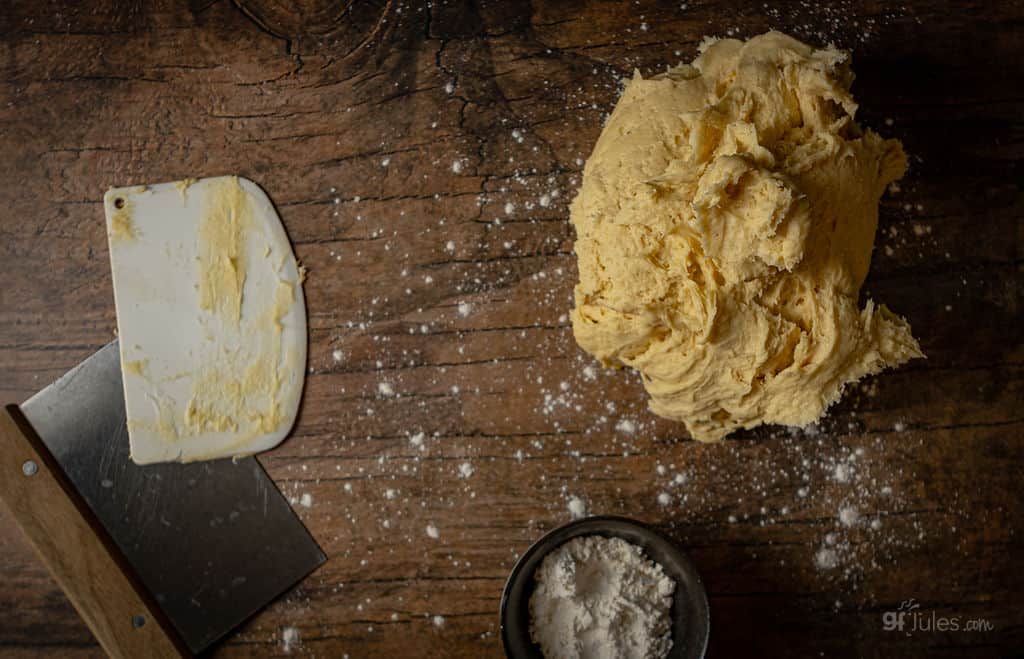
The dough starts out thick and sticky, but rolled in a light dusting of my gfJules Flour, it’s easy to form long strands to braid.

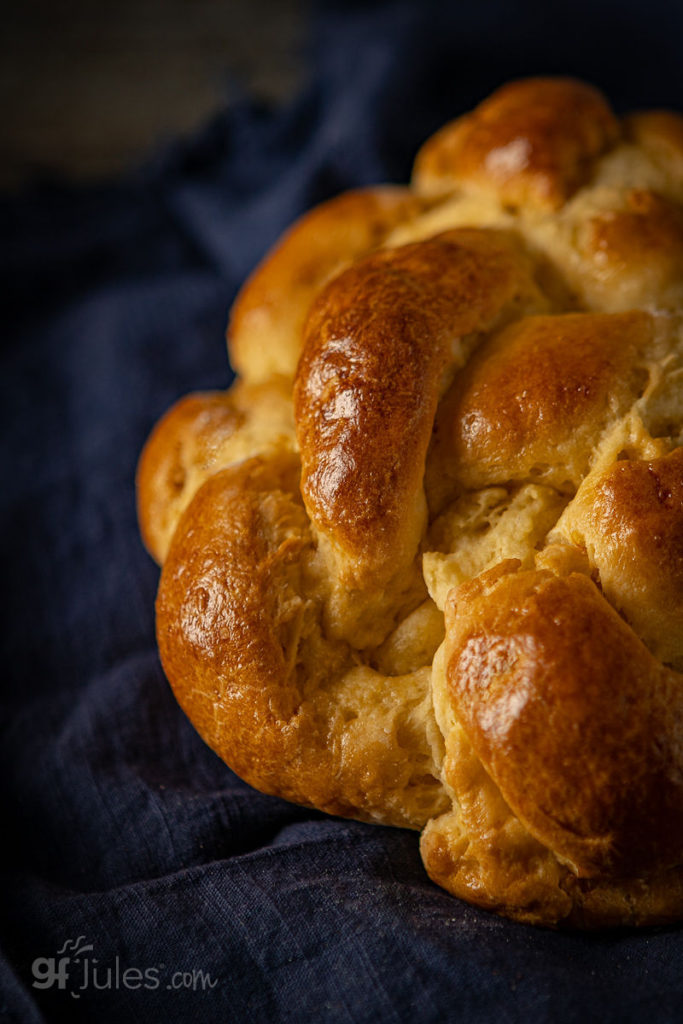
The final ball twist is stunning.
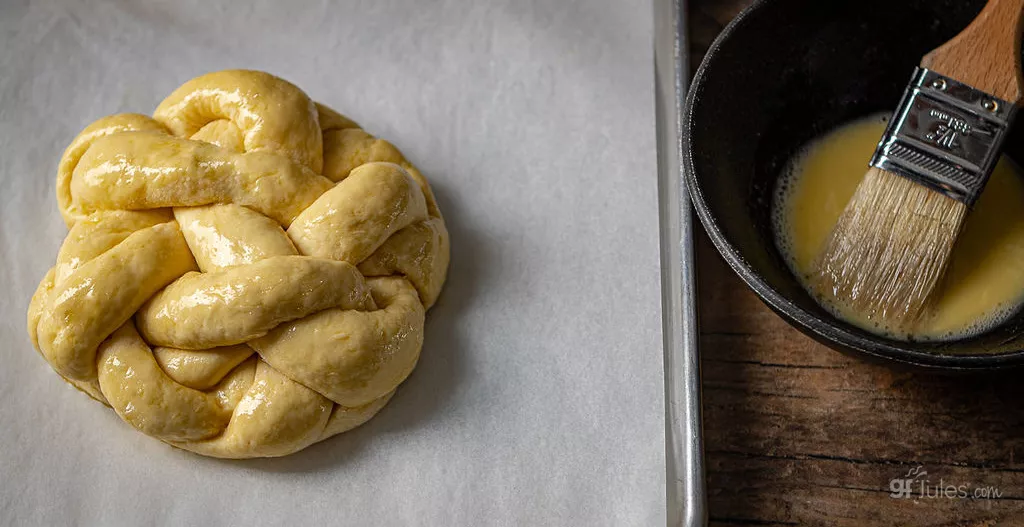
Then brush with egg wash to help keep the dough soft and moist and for that luscious golden color.
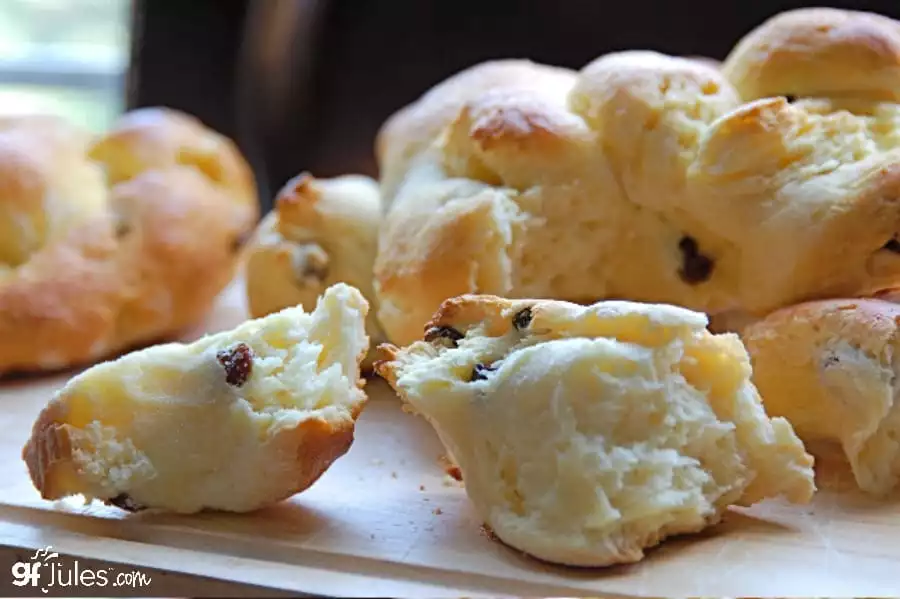
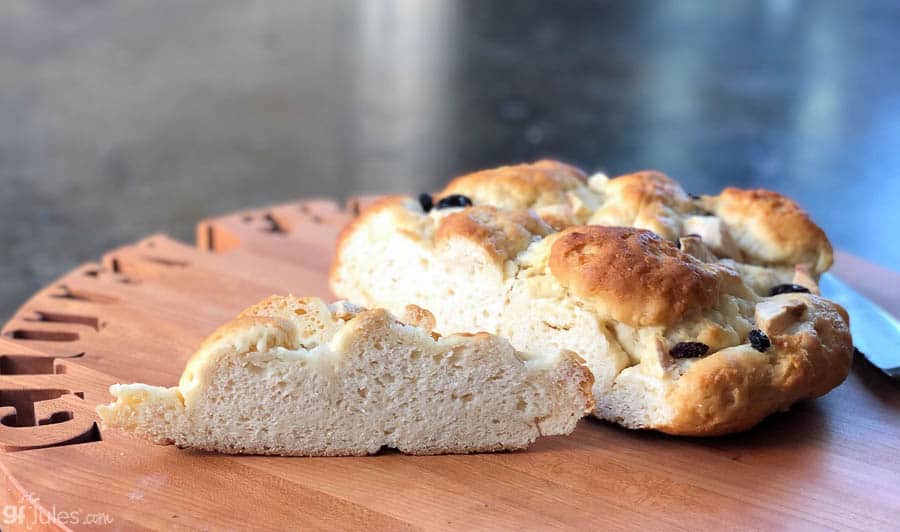
And of course, once baked, it’s hard to resist!
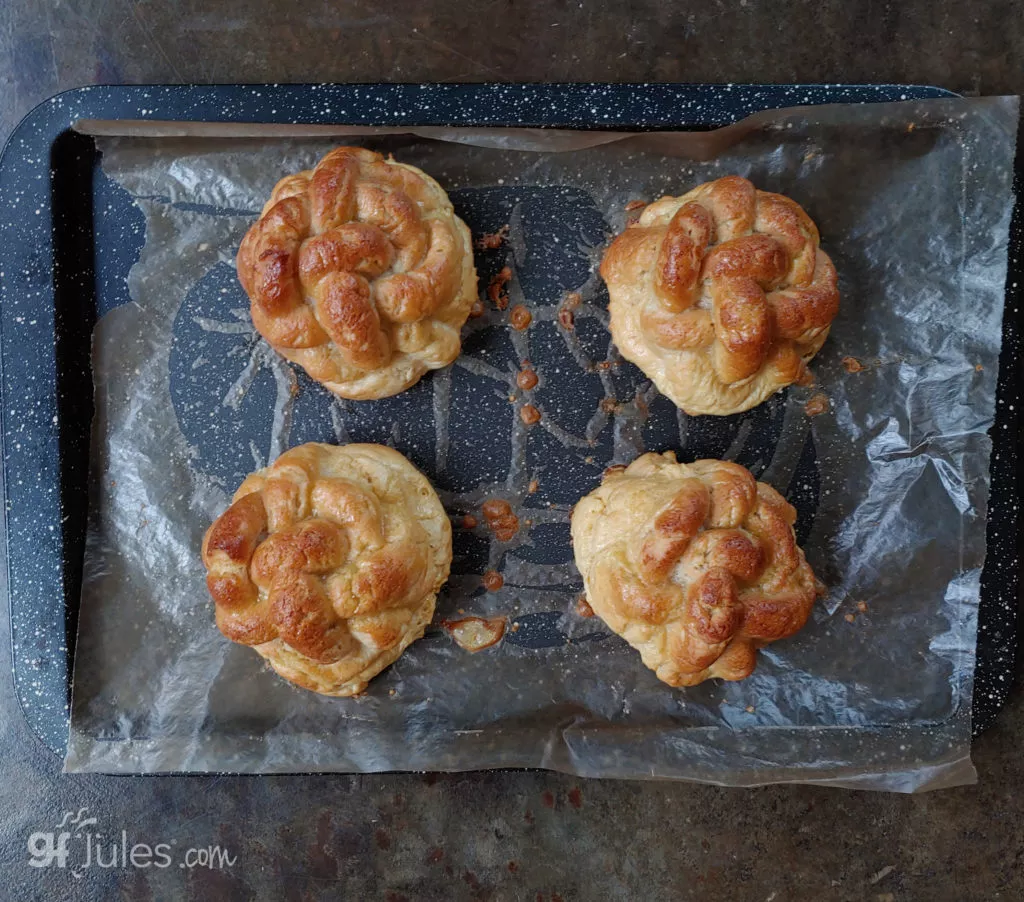
Hamotzi & Baking with a Challah Mold
If you’re looking to make this gluten free challah crown hamotzi (made from the five species of grains — wheat, barley, rye, spelt or oat — oat being the only one that is gluten free) by using 51% oat flour, I would recommend using a molded challah pan since it will be more difficult to braid without using all gfJules Flour.
I have heard from readers that even at only 49% gfJules Flour though, they have been able to braid this dough, just not quite as easily.
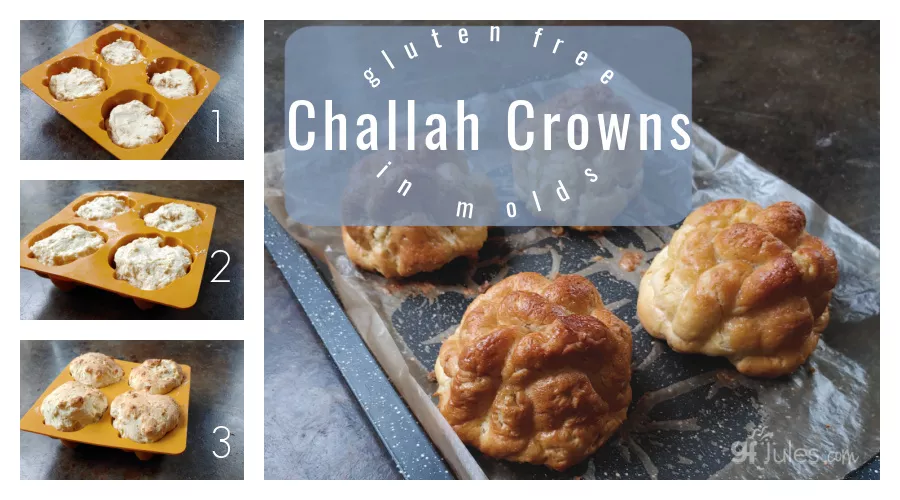
2) rise in pan
3) bake 15 minutes in pan then turn out to bake 5 minutes on baking sheet
If you do choose to use a molded challah pan, you may have too much dough for the pan, so plan to put the extra dough in a loaf pan or even in muffin pans to make extra rolls with it.
Incidentally, I make my own gluten free oat flour when I do use oat flour. It’s super easy to do and that way you can use purity protocol oats which are easier to find in full oat form than in oat flour form.
No matter what your reason for making this delicious bread, celebrate that this impressive recipe is at your gluten-free fingertips any time you feel like having a sweeter day.
Gluten Free Challah Crown Recipe

Gluten Free Challah Crown
Ingredients
Gluten Free Challah Bread Ingredients
- 1/2 cup + 2 Tbs. warm water
- 1 Tbs. gluten free yeast like Red Star -- not platinum! -- or Fleishmann's
- 1 tsp. granulated cane sugar
- 1 cup vanilla dairy or non-dairy yogurt at room temperature (So Delicious® Vanilla Coconut Yogurt)*
- 2 tsp. apple cider vinegar
- 5 large egg yolks at room temperature slightly mixed**
- 1/3 cup sunflower oil OR non-GMO canola oil OR extra virgin olive oil
- 4 Tbs. honey OR agave nectar OR maple syrup
- 4 cups (540 grams) gfJules™ All Purpose Flour
- 1 Tbs. psyllium husk powder (added for smoother texture, but if not using, reduce total water by 2 Tbs.)
- 3 Tbs. + 2 tsp. granulated cane sugar
- 1 1/4 tsp. kosher salt
Toppings
- 1 large egg mixed
- poppy seeds sesame seeds, raisins, diced apples or other toppings or mix-ins (optional)
Instructions
- Preheat your oven to 200º F, then turn it off; if you have a warming drawer, you may set that to low/moist setting instead. Prepare a baking sheet by lining it with parchment paper.
- In a small bowl, mix together ~1/3 cup (5 Tbs) warm water, yeast and 1 teaspoon of sugar to prove the yeast; set aside.
- In the bowl of your stand mixer, add the remaining wet ingredients (remaining 5 Tbs water, yogurt, cider vinegar, egg yolks, oil, honey) and mix until combined.
- Whisk together the dry ingredients in a separate bowl (gfJules Flour; psyllium, 3Tbs + 2 tsp. sugar; salt).
- After 5 minutes of proofing, stir in the bubbling yeast-water mixture into the wet ingredients (note: if your yeast isn’t bubbling at this point, throw it out and start again with fresh yeast).
- Gradually stir the dry ingredients into the wet until fully integrated, adding more warm water by the tablespoon only as needed to get the dough soft and so that the dough is not tight or stiff — you should be able to pull the dough gently without it feeling tight or like it would bounce back — if it’s stiff, add more warm water then mix 1-2 minutes more on medium speed to integrate the additional water. The dough should be workable; keep in mind you will be braiding it, so it can't be too loose or too tight (think of Goldilocks dough!)
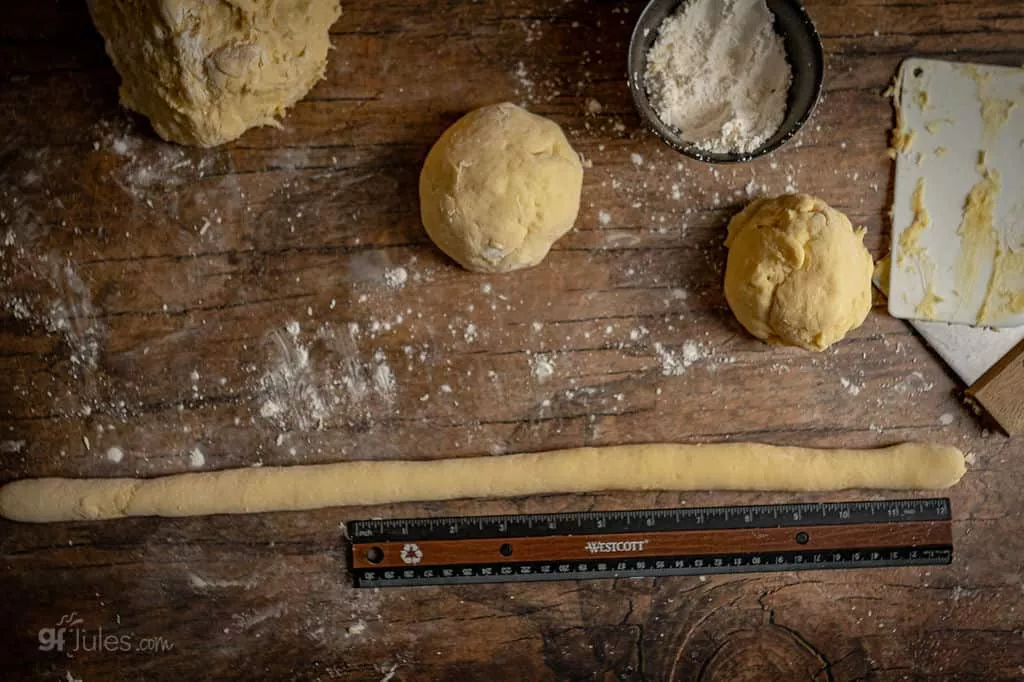
- Once the dough is combined, divide it in half and divide each half into three equal-sized balls. The dough will be sticky, so use extra gfJules Flour on your hands and rolling surface (I like using a bench scraper like this one to help me cut and roll the sticky dough).
- Roll each ball out into an 18-inch coil or log on a clean, flat surface dusted lightly with gfJules Flour. If you have trouble rolling because you've used too much flour, dab a bit of water onto the counter or mat.
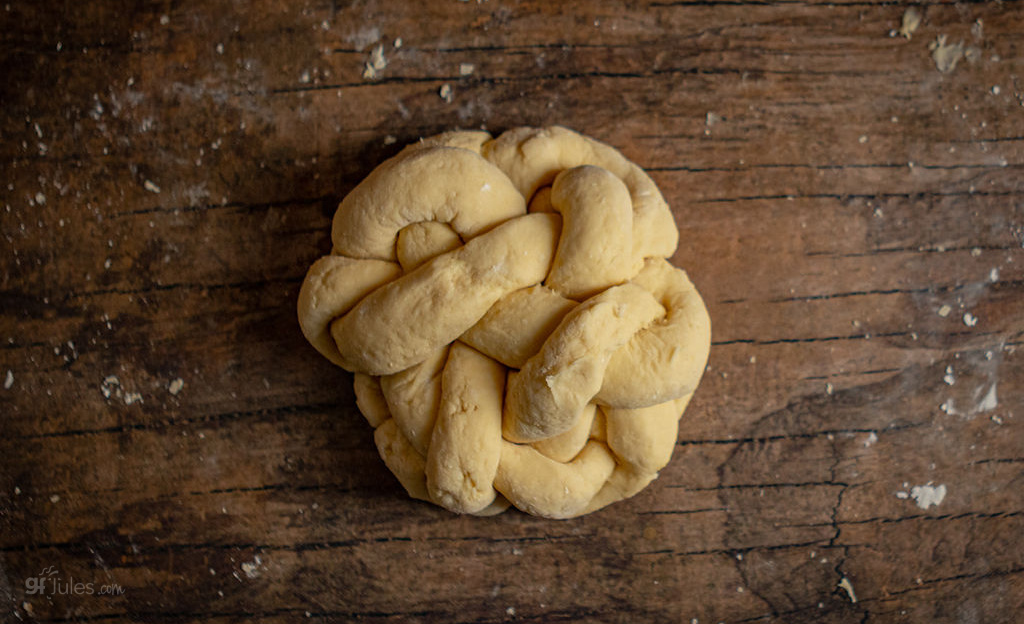
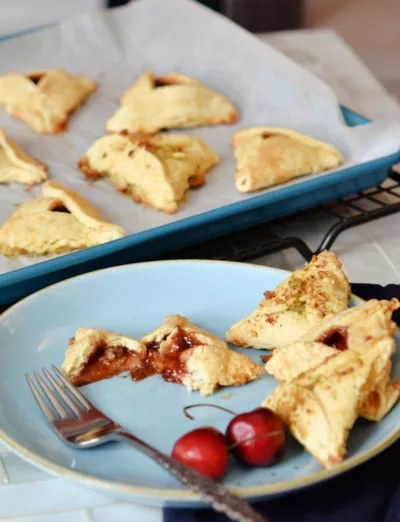
- Pinch together one end of each coil, wetting them slightly with water to help them join together at the top, then braid them, finishing by connecting them to the top of the other end in order to form a crown, or circular shape, or simply leave as a long braid.
- Gently transfer to the parchment-lined baking sheet. Repeat for the second set of three balls. In the alternative, you can simply divide the dough in half, roll out into a flattened coil, then twist the coil upon itself and join at the ends to form a circular loaf; repeat with the other half of the dough ball.
- In a small bowl, mix the extra egg (at room temperature) together and brush over each loaf, coating the entire surface. Sprinkle the seeds or any toppings at this point, then place the tray (covering the loaves with wax paper sprayed with cooking oil) in a warming drawer set to low heat, or into a warm location for 20 – 30 minutes. (Don’t expect the bread to rise much at this stage).
- Once risen slightly, place the uncovered tray in an oven preheated to 350º F (static) or 325º F (convection) for 20 minutes or until a toothpick inserted into the center of the bread comes out dry, or with some crumbs attached but no wet dough.
- Remove to cool on a wire rack.
Video
Notes
** Please keep in mind that nutrition information provided is per serving, which may vary. While we have taken care to provide you with the most accurate nutritional values possible, please note that this information may differ significantly depending on the exact ingredients and brands that you choose to use to make this recipe. Additionally, where options are given for ingredients, the resulting calculation may include all ingredient options instead of only one per line, skewing the totals significantly.
Pin it for later!


 Based on 33 Review(s)


So I thought everything was going really well, but when then moment of truth came and we finally tasted it… we realized we had a big braided biscuit. It was just as crumbly as a biscuit. Could I have just used too much flour to dry it up so it wasn’t too sticky to knead?
Thank you!!
Hi Miche – was the dough so wet that you had to use lots of flour in order to braid it? How much liquid did you end up using when you made the recipe, do you recall? It definitely shouldn’t have been dry or crumbly at all — did you use any other ingredients substitutions (GF flour, for example?)? What kind of yogurt did you use? Any other variance from the recipe? Let me know and I’ll do my best to help for next time!
~jules
Hi Jules, I tried it last night and I REALLY struggled with the dough – can you help troubleshoot? I only had regular yeast, not rapid rise, so I let it proof in the oven a bit longer and that seemed to be okay. I used a 6-oz container of vanilla Trader Joe’s yogurt (I didn’t realize it wasn’t 8 oz until I got home), and I did forget the baking soda…now, I also put it in the food processor as I don’t have a stand mixer (liquids first, then gradually added the dry mix) but it still came out SO wet and batter-like and it stuck to everything, including my floured hands! I have experience with regular baking, so I tried the old “add more flour or water” trick and added more flour in hopes that it would firm up the dough, but it only seemed to get stickier and gloopier. Eventually, I could roll it out only when each ball/log was coated in your flour, but then the logs started to fall apart in chunks and refused to braid. Other logs just stuck to the floured board like glue. I did manage to bake it up and while it’s not half bad, it’s more powdery (obviously) than I’d like – but I couldn’t justify scrapping it after all that effort! I would like to try again but would love to know what I did wrong so I can not repeat it! Thanks!
Hi Jessica, I’m sorry that you had some issues with the dough when you tried the recipe by my, you are resourceful!! And I totally know what you mean about not scrapping the fruits of your labor after all that! I have to ask the obvious question: did you use my gfJules Flour? That’s always the first step. Were there any other ingredient substitutions? What oil/fat did you use?
The food processor should work, provided you don’t over mix the dough. Using 2 more ounces of yogurt rather than extra water would also help give the dough body, rather than pure wetness. Beyond that, I would have to say it sounds like there was just too much liquid in the recipe — did you start out with only 1/3 cup of water? Rather than continuing to add more flour, when you make it next time, add only 1/3 cup water and see how it turns out, adding only more water if and as needed to get the dough to be pliable. Let me know what you think and when you try it again, how it goes!
~jules
Hi Jules, thanks for the quick response! Yes, I used your flour – I was saving it specifically for the challah recipe. And I only used the 1/3 cup of water with the yeast, and since it seemed so wet, I didn’t think it was necessary to add any more liquid. The only oil I used was melted coconut. The only things I did differently were the regular yeast usage, the 6 oz of yogurt instead of 8 oz, and the omission of the baking soda. But like I mentioned, it was SO wet that I kept adding more flour, expecting it to solidify somewhat, but it seemed to have the opposite effect – it just grew larger but stayed wet and sticky, like the Swamp Thing! 🙂 It seems counter-intuitive, but should I have added more yogurt or some other liquid at that point? Do you think it would have helped bring it together? I was jealous that yours rolled out so easily in your video! I definitely want to try it again, but I’ll have to order more flour, first. Thanks!
Hi Jessica, that’s really an odd result, I agree! I don’t usually use melted coconut oil, so I suppose you could try another fat option listed. The dough is rather wet and sticky until rolled in more flour. I’m eager to hear how it goes next time. There’s always the possibility that you forget an ingredient or measured wrong and never know until it works like it’s supposed to the next time (at least that’s what happens to me!).
~jules
Also – If I used this recipe but braided little mini roll size chalk it, how would I need to change the cooking times to account for smaller rolls?
Hi Tikva, you’re going to have to keep checking on the progress, as the size of the rolls you make will completely determine the bake time. I would start testing the rolls with a toothpick at about 12 minutes. Enjoy the recipe!
~jules
Is mixing everything by hand an issue? Will it work? Or with a hand mixer?
Hi Tikva, you can mix this dough by hand, but it can be a challenge. I would recommend using your actual hands, rather than simply using a wooden spoon, when it gets down to really mixing it all together at the end. A handmixer won’t be a good option, but using your hands should work.
~jules
My son is not only GF but also allergic to corn, so I can’t bake with your GF flour mix. This Challah looks great. Any suggestions for a flour mix that can be braided without corn flour? Thanks.
Hi Jules,
This looks amazing! Is it possible to 1/2 this recipe? It’s just the two of us.
Thanks!
Sarah
Hi Sarah, I’m so glad the recipe looks good to you – it really is amazing!!! As for halving it, you could do that but it’s a little tough to cut an egg yolk in half so you’re going to have to measure it by volume. One egg yolk is between 1 and 1 1/4 tablespoons so you’ll want 2 1/2 yolks, or around 2 3/4 tablespoons yolk. I will say that the bread is so good that you might want to go ahead and make a whole recipe, though. It’s amazing as French Toast a few days later if it’s not all gone already!
~jules
Hi Jules, can I ask why you add baking soda/powder to the dough? Will it not rise enough with just the yeast, or is it more for additional browning?
Hi Stephen, it’s for additional rise since this bread is on the heavy side with the yogurt and eggs. Also because GF yeast doughs don’t need extra rise time to support gluten, it can help to add chemical leaveners so the bread can be prepared and baked more quickly, yet still rise nicely. I hope that helps explain it!
~jules
That explains it, thanks!
no problem!
~jules
Hi Jules! This recipe looks awesome. I want to try for Rosh Hashanah on Sunday but don’t have time to buy your flour. Is there a way I can mimic yours? I see other people had failed using GF flours they bought at the store…
Hi Sarah, it can be tricky with other flours because they don’t stretch in the dough like mine does, so it’s difficult to braid the dough, and some other flours can be gritty and not as soft. It’s only Tuesday, depending on where you live, I don’t think it would be a problem to get flour to you before Rosh Hashanah – we ship quickly! Hope that works out for you!
~jules
To the OP, I have been making this challah for a couple of years now for rosh hashannah. When we haven’t been able to get this flour we use Pamela’s all purpose blend or Pamela’s pancake and baking flour and it always comes out great.
Hi 🙂 where in Australia can i buy a similar type of gfjules flour?
Is there any way to substitute your bread mix in this recipe? I have the bread mix and don’t have the flour on hand. Thanks.
Wow, Linda, I haven’t thought about that before! It would be TOTALLY different, but you could use my bread mix and use yogurt as the ingredient so that it would be more braid-able. Pinch off pieces for the pieces of braid and then roll in corn starch if you don’t have my flour (to help keep it from sticking) then roll as directed. It won’t taste like traditional egg bread, but it ought to be able to be braided for something different! The outside of the bread will also get crunchier (more like the artisan bread recipe) than challah, but it’s an intriguing idea for something new! Let me know how it goes!
~jules
My daughter and I made the GF
challah today. To say we were excited by the way it turned out would be an understatement. Thank you for posting this wonderful recipe!
I tried the recipe tonight for the first time and my child devoured the challah! I think the chocolate chips helped, but the challah has a hint of sweetness already. Great recipe 🙂 Thank you Jules best GF challah we found to date!
YAY! That warms my heart to hear, Roni. Thanks so much for letting me know. I’m so happy to know that your family has a delicious GF challah recipe to turn to now!
~jules
Hi Jules,
What ingredients are in your GF flour? Is your flour certified kosher?
Thanks so much!
Baking Angel
Hi Tina, YES! My flour and all my mixes are certified kosher by the Orthodox Union. You can read more about it and see all the ingredients on the flour page in the shop linked here. Hope that helps!
~jules
Can I buy Jules GF flour in any store in Toronto or
nearby locations? Do you ship to Toronto and how long from order to delivery time?
Impatient But Enthusiastic Baking Angel
We have shipped into Canada, but the extra taxes and such make it nearly prohibitive. When I lived there, I’d have things shipped to Buffalo, and we’d make a day of it to go fetch our stuff. Maybe if you and some gluten free friends in T.O. could gang up a purchase, it’d be worth the drive ’round the lake to fetch it? If you are willing to pay the extra fees and such, we can arrange for shipping into Canada. Just let us know!
Hello,
Thank you for the recipe. The directions aren’t clear to me..
What is the stander bowl, do you put wet ingredients in one bowl , yeast in another bowl , dry in another bowl then combine.
my yeast didn’t bubble. and you said to put 1/3 cup but my dry yeast the one you recommend said 1/4 cups….must have got someting wrong here.
jew in the city says to let the bread sit for an hour before you make into the balls…..Do we not do that here because it is gluten free? THanks,
Hi Isa,
The bowls should look like this: one small bowl with the yeast, sugar and water; one large bowl with remaining liquids; one other bowl with all dry ingredients (except yeast) whisked together. If your yeast doesn’t bubble in 5 minutes, you need to use a fresh packet of yeast. Each yeast packet is 2 1/4 tsp of instant yeast.
Your question about letting the bread sit for an hour before making it into balls is a good one. Those directions are for GLUTEN breads. When making gluten-free breads like this one, you want to shape them THEN let them rise, because shaping them after the rise can knock the air/rise out of the dough. Very different directions than working with gluten doughs.
Hope this information helps!
~jules
I do have another question, what would you recommend if I am using a little denser flour as the one I stated above, should I use less eggs?
Thank you for you help
Hi Jules,
I found this GF challah recipe and was really looking forward to trying it. Unfortunately it cam out inedible as far as taste and was fairly dense which I expected to a certain degree from a GF recipe. After reading everyones posts, I see that the flour probably makes a big difference. I used a GF all purpose flour from Premium Gold that had flax and ancient grains in it, which I think accounted for the darker color and maybe even the density. The other mistake I made was I added the last whole egg into the wet ingredients then realized later it was for brushing onto the braids. Would the extra egg have made a difference because it seemed as though it smelled funny when I pulled out of the oven, and the taste was very weird. I felt like it tasted too much of egg. I also used the brand of yogurt you suggested but mine was plain ( I don’t think that should have made a difference). In spite of all this, I am willing to try it again, I am inspired by all the positive posts. I am thinking that I should try with your flour : )
Hi Donna,
As you suspected, the difference in gluten-free flours is the culprit here. My flour is designed to mimic all-purpose wheat flour, and therefore is higher in starches than the flour you were using, meaning that the bread would turn out much heavier and more dense. Adding an extra egg contributed to the problem by adding too much moisture, further weighing the dough down. I am not entirely sure how to guide you on making this recipe again with the flour blend you were using because I’m not familiar with it. If you really want to have the loaf turn out like pictured and described (and loved by all the other people who have commented), the easiest way to do that is just to use my flour instead. It will save you the headaches of experimentation when the results are so different. I wish I had another answer for you but with gluten-free flour blends, they are all so very different that it’s best to stick to the recipes they’re written for, or, in the case of my flour, use it in regular all-purpose wheat flour recipes as it was designed to work in those. I hope you do try again and get a chance to try my flour, as I know you will love, love, love the results!!!
~jules
1-Does it have to be flavored yogurt?
2-can I use just baking powder, or must I purchase gluten-free, never knew there was any difference.
Hi Bernice,
You may use plain yogurt, and anymore, baking powder brands should all be GF, but I recommend checking the labels every time just in case. Hope that helps!
I made this for my best friend who is allergic to gluten, wheat, and rice. Mine also came out with a cake batter consistency. I believe this is because I used Red Mill gluten free all purpose flour. I couldn’t find the flour you listed. But hey, bread is bread.
Hi Jolene, as you suspected, the cause is using the other gluten-free flour. Unlike regular wheat-based all purpose flour, gluten-free flour blends are all quite different. The one you used is bean-flour based and doesn’t include any binders in it, so it would be more of a batter consistency. I hope you can try the recipe again with my flour sometime, so you’ll get results like the photos!
~jules
I have had great success with your bread for a year now. It is my husband’s favorite! Usually the loaves are not very high, but that’s alright. Today I was surprised and pleased to see both loaves tall in the bread pans (plain loaves, not braided). But after I took them from the oven, they deflated some. They still taste delicious, but I was hoping for full sized slices for a change. Any suggestions?
Hi Dee, so happy that you and your hubbie are loving my challah bread recipe! I wonder what was different about the loaves this time that they rose higher and then deflated some. Did you rise them in a different way, for longer/shorter, use any different ingredients, what was the temperature of the ingredients before you added them, did you use a different brand of yeast or rapid rise vs. regular yeast …? Any of these variables could have contributed to the difference, but generally if a loaf falls, it’s because it rose too quickly (it was in too warm of a place) or for not long enough. I hope those ideas help for next time!