Grandma’s pie crust was always best, but now that you’re gluten free, what will you do? Make a gluten free pie crust just like grandma used to make!
It seems odd to talk about the latest “fashion” in food, but there really are seasonal and trendy food fashions! Pick up any home or female-focused magazine in any waiting room or grocery store check-out lane and you’ll see that “Rustic Pie Crusts” are IN!
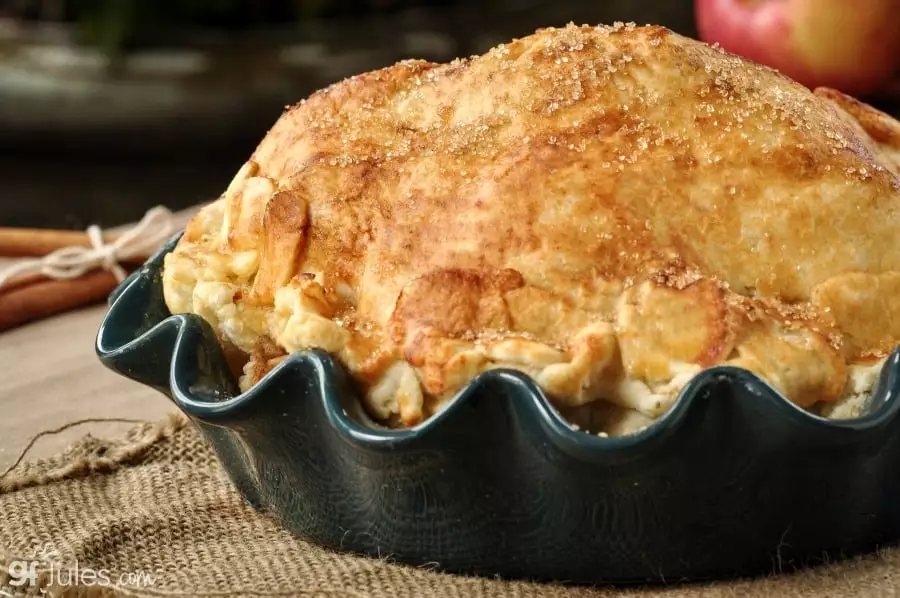
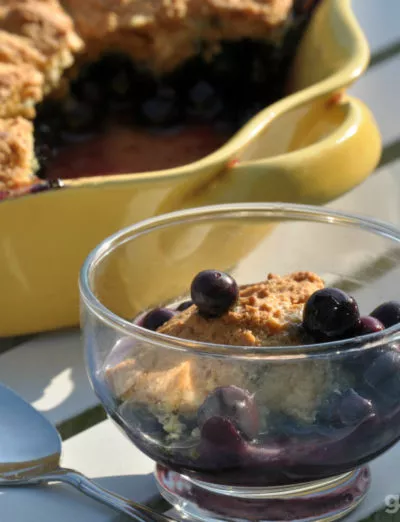
This is a great thing, because they are so EASY! No need to double the pie crust recipe, and for those of you who are nervous about lifting the top crust onto the pie filling or fussing with lattice-work, all you do for a rustic crust is roll out your bottom crust, lay it in the pie plate, fill with your favorite fruit, then fold over the edges.
Seriously … that’s it. Couldn’t be easier, and with this recipe, you’ll be baking delicious pies all year long!
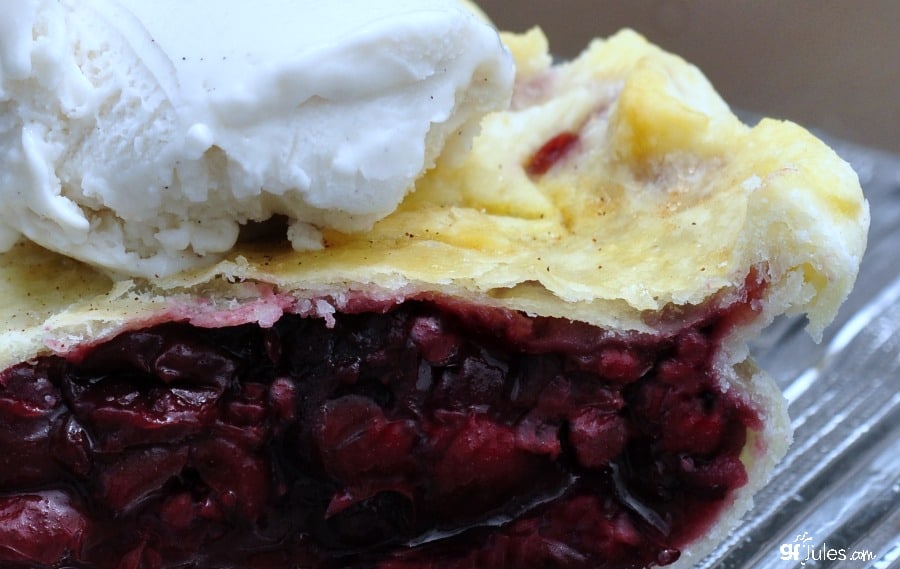
My crust recipe is literally my grandma’s famous flaky pie crust… with only one very important substitution – the flour! Makes one 8- or 9-inch pie crust; double amounts for a two-crust (slightly more labor-intensive!) pie.
I used to recommend refrigerating this crust before rolling, but I’ve learned through much trial and error that it is actually much easier to work with the dough if it is allowed to rest at room temperature for about 30 minutes before rolling out.

I’ve also experimented with different ingredient temperatures, and where I’ve netted out is that the best, flakiest, easiest to work with crust comes from using super cold (not frozen though) butter + shortening (I like the mixture of both, since they have differing melting points) and very cold water.
*Recently, I’ve been using vodka for half of the liquid in the recipe and it works even better! Very easy to roll out, transfer and pinch, and the alcohol bakes out, leaving a flaky crust!

For even more pointers on making pie crusts, watch my video how-to or listen to my Blog Talk Radio show all about pie crusts! See below for step-by-step photos! (See this pie on FOX News DC!)
Gluten Free Pie Crust Like Grandma’s
Gluten Free Pie Crust like Grandma's
Ingredients
- 1 cup (16 Tbs.) gfJules™ All Purpose Gluten Free Flour – 135 grams
- 1/2 teaspoon salt
- 2 Tbs vegetable or palm shortening*
- 3 Tbs cold (not frozen) butter or non-dairy alternative ( e.g. Earth Balance® Buttery Sticks)
- 2 Tbs vodka + 1-2 Tbs cold water OR 3-4 Tbs. cold water total
- egg wash (1 egg + 1 Tbs. water9 OR milk (dairy or non-dairy) for brushing on crust
Instructions
- To Make the Gluten Free Pie Crust Dough:In a large bowl, whisk together the dry ingredients. Cut in the shortening and cold butter using a pastry cutter (or the flat paddle attachment on a stand mixer or a food processor). Add the vodka/water gradually to make the consistency you need to form a ball – err on the side of it being wetter rather than crumbly, but only add the liquid you need to get it to hold together.
- Form a disc with the dough, wrap in plastic and set aside on the counter for 30 minutes while you make your filling.
- Rolling the Gluten Free Pie Dough:After allowing the dough to rest, roll the pastry out onto a surface dusted well with gfJules™ All Purpose Gluten-Free Flour. A flexible pastry sheet (e.g. Silpat) is ideal for rolling and transferring a crust.
- To Transfer the Gluten Free Pie Crust:1- Gently lift an edge of the rolled out crust over your rolling pin. 2 -With one hand under the baking mat, use the pin in the other hand to lift the crust so that it is supported by the rolling pin as you pull the crust gently off of the baking mat. 3- Transfer gently over the pie plate to center. 4- Drop gently into the plate and press in with floured fingers. 5- Pat into your pan.
- For a One Crust Gluten Free Pie:Cut the edges of the crust to an even length of approximately 1-inch larger than the diameter of your pie plate.
- Fill with your desired filling.
- For a Gluten Free Rustic Crust:Fill with your desired filling, fold the edges over toward the center of the pie, and you’re done!
- For a Two-Crust Gluten Free Pie:Double the ingredients and divide the doubled pie crust dough before setting aside. Shape each half into a disc and wrap each in plastic wrap. Repeat the rolling out steps and lay the crust gently onto the top of the filled pie pan. Cut off all but 1/2 – 1 inch of excess pie crust from around the edge of the pan. For fruit pies, cut small slits in the center of the top crust to allow the hot steam to escape. Brush the crust with egg wash or your milk of choice – this step helps it to brown nicely.
- If there are any tears in your top crust, never fear! Simply take leftover crust and use decorative cookie cutters to cut out leaves, pumpkins, etc., wet the backside of each cut-out with a dab of milk, then lay on top of any tears to cover the flaw. Fold approximately 1/2 inch of excess pie crust over all around the edge to form the crust, then using your fingers, press a fluted design in the crust to finish. Cover crust edges with foil or a pie saver to minimize burning. Remove the foil with 10 minutes left of baking.
- Gluten Free Single-Crust or Rustic Pie:Preheat oven to 400º F (static).
- Brush the crust with egg wash or milk, then cover edges with foil and bake for 15 minutes. Reduce heat to 375º F (static), remove foil, brush again with egg wash or milk and bake an additional 30 minutes, or follow directions for your specific pie recipe. (Cover again with foil if the crust is browning too much during the bake).
- Double-Crust Gluten Free Pie:Preheat oven to 400º F (static). Brush the crust with egg wash or milk, then cover edges with foil and bake for 15 minutes. Reduce heat to 375º F (static), remove foil and brush again with egg wash or milk.
- Bake an additional 35-45 minutes, or until the juices are bubbling, or follow directions for your specific pie recipe. (Cover again with foil if the crust is browning too much during the bake).
Notes
** Please keep in mind that nutrition information provided is per serving, which may vary. While we have taken care to provide you with the most accurate nutritional values possible, please note that this information may differ significantly depending on the exact ingredients and brands that you choose to use to make this recipe. Additionally, where options are given for ingredients, the resulting calculation may include all ingredient options instead of only one per line, skewing the totals significantly.
Pin for later!


does this recipe work with the corn free baking flour?
It does! 🙂
~jules
I was craving my mom’s easy pie crust this past weekend. Her recipe was an unusual one as you put all the ingredients in
a pie plate (no rolling out the crust and suitable for one crust pies only). It worked beautifully with your GFJules Flour! I had
not dared making a pie with her recipe since being told I was gluten intolerant.
The quiche was spectacular! Thank you for your fab products!
Ann (C. Hermes)
Mom’s Pie Crust:
1 1/2 c. flour
1 t. salt
2 t. sugar (optional)
1/2 c. oil (canola or corn)
2 T. milk
Put flour, salt, and sugar (if using) in pie plate; mix well. Beat oil and milk together until cloudy and pour into pie plate.
Mix and form as a shell. Prick with fork tines before baking at 400 F. for 12 minutes. Or prick with a fork before filling with for a pie where the filling needs to bake.
I love this idea, Ann! I have never tried making a pie pastry like this, but it sure does sound easy! So glad you tried your mom’s recipe with my gfJules Flour and it turned out so well. Thanks for sharing her recipe – I’m certain others will want to try it for themselves!!!
~jules
BRILLIANT CHEMISTRY!
Why thank you! I hope you put it into play soon!
~jules
I love your flour. My husband has Celiac and a sweet tooth and your flour AND recipes have been such a help. I’ve had problems moving the pie dough to the pan even though I wrap it around the rolling pin, so I put it in the gallon zipper bag. I put a couple of tablespoons of your flour in the bag, zip and shake to coat the inside of the bag, put the dough in the bag and zip. roll it out in the bag and, after resting the dough, cut the bag open, place the pie pan on the dough and turn it over and the dough falls into the pan.
Hi Deborah, I’m so happy to hear that you are able to satisfy your husband’s sweet tooth with my gfJules Flour and recipes! That makes me so happy to hear!
And your gallon bag trick is wonderful – it’s like you’re making your own gluten free pie crust bag! Have you seen my quick video using this bag – if you haven’t, then you’re a genius to have figure it all out on your own!!! However you figured it out, if it works for you, then keep it up!!!! Congrats and happy baking!
~jules
This is a must Bake as soon as my new shipment of flour arrives! I have the filling. Been making my own flour for years but I am so happy with this blend! Can’t say enough good about it!
It’s been my experience (and I’m no expert) that if you form the bottom crust in the pan, brush it with egg white and let it dry for a few minutes before adding the filling, that it will better resist getting soggy from wet ingredients like pie fillings. As it bakes, the egg white will further set and form somewhat of a protective coating. I also prefer using a cheap, metal pan for better and more substantial bottom crusts.
OOOh good tips, Dave! I haven’t been having problems with soggy crusts using my gfJules Flour blend and this recipe, but I will absolutely keep these tips in mind if others write in that they are having issues. Thanks so very much for taking the time to share your tips! Be sure to check out my full post on gluten free pie crust recipes and tips — your soggy bottom tips would be a great addition there, too!!!
~jules
I don’t have veg or palm shortening can I use 5TBS of butter instead?
Hi Eileen, if you read my full recipe (for more details on exactly why I recommend using two fats go to my gluten free pie crust tips) I highly recommend using both butter and shortening, but yes, in a pinch you can use just butter. Make sure it’s very cold when adding to the gluten free flour mixture.
~jules
This made me chuckle: *Recently, I’ve been using vodka for half of the liquid in the recipe and it works even better! Very easy to roll out, transfer and pinch, and the alcohol bakes out, leaving a flaky crust!
At first I thought you meant take a shot of vodka before making pie crust. This made total sense to me since making pie crust does tend to make me what to drink aahahha. Will definitely try out this recipe. Thank you!
I think the recipe could work either way, Marni! 😉 I used to need a shot of vodka before I attempted to bake a gluten free pie crust, for sure! But now I really don’t need the shot anywhere but IN the dough – it works much better that way, now that I use my gfJules Flour and the dough stretches like it should. No more tears or shots needed! LOL
Enjoy either way though, and happy baking!
~jules
Can’t wait to try this recipe today.
Is there anyway you could come up with a Pour Over Crust Recipe.
I’ve been trying to figure out one myself. I’ve tried several different ways and they always seem to Doughy.
Thanks Diann
Tried this recipe yesterday for a traditional Tourtiere pie. I have to say it came out pretty fantastic for a first try! Didn’t have any vodka on hand and used gin instead and it worked fine; no trace of the gin taste at all. Also used a combination of lard and butter (only because that what was in the fridge) but, next time, will use vegetable shortening and butter to see how that works. Pie crust was still light and flaky enough and tasted delicious. Thank you, Jules, again for another great recipe!
Oh Carrie that’s so fantastic to hear! I’m thrilled that you gave it a go and now you get to enjoy the fruits of your (hopefully not too arduous) labor! Glad you went with the gin; I’ve used bourbon before when I was out of vodka and it works too, but adds color. Congrats on a successful gluten free pie baking future!!!
~jules