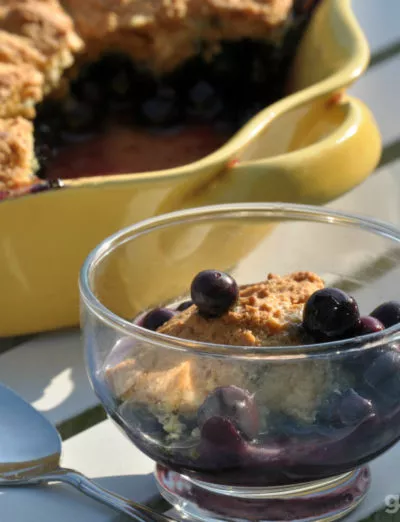
Grandma’s pie crust was always best, but now that you’re gluten free, what will you do? Make a gluten free pie crust just like grandma used to make!
It seems odd to talk about the latest “fashion” in food, but there really are seasonal and trendy food fashions! Pick up any home or female-focused magazine in any waiting room or grocery store check-out lane and you’ll see that “Rustic Pie Crusts” are IN!
This is a great thing, because they are so EASY! No need to double the pie crust recipe, and for those of you who are nervous about lifting the top crust onto the pie filling or fussing with lattice-work, all you do for a rustic crust is roll out your bottom crust, lay it in the pie plate, fill with your favorite fruit, then fold over the edges.
Seriously … that’s it. Couldn’t be easier, and with this recipe, you’ll be baking delicious pies all year long!
My crust recipe is literally my grandma’s famous flaky pie crust… with only one very important substitution – the flour! Makes one 8- or 9-inch pie crust; double amounts for a two-crust (slightly more labor-intensive!) pie.
I used to recommend refrigerating this crust before rolling, but I’ve learned through much trial and error that it is actually much easier to work with the dough if it is allowed to rest at room temperature for about 30 minutes before rolling out.

I’ve also experimented with different ingredient temperatures, and where I’ve netted out is that the best, flakiest, easiest to work with crust comes from using super cold (not frozen though) butter + shortening (I like the mixture of both, since they have differing melting points) and very cold water.
*Recently, I’ve been using vodka for half of the liquid in the recipe and it works even better! Very easy to roll out, transfer and pinch, and the alcohol bakes out, leaving a flaky crust!

For even more pointers on making pie crusts, watch my video how-to or listen to my Blog Talk Radio show all about pie crusts! See below for step-by-step photos! (See this pie on FOX News DC!)
Gluten Free Pie Crust Like Grandma’s
Gluten Free Pie Crust like Grandma's
Ingredients
- 1 cup (16 Tbs.) gfJules™ All Purpose Gluten Free Flour – 135 grams
- 1/2 teaspoon salt
- 2 Tbs vegetable or palm shortening*
- 3 Tbs cold (not frozen) butter or non-dairy alternative ( e.g. Earth Balance® Buttery Sticks)
- 2 Tbs vodka + 1-2 Tbs cold water OR 3-4 Tbs. cold water total
- egg wash (1 egg + 1 Tbs. water9 OR milk (dairy or non-dairy) for brushing on crust
Instructions
- To Make the Gluten Free Pie Crust Dough:In a large bowl, whisk together the dry ingredients. Cut in the shortening and cold butter using a pastry cutter (or the flat paddle attachment on a stand mixer or a food processor). Add the vodka/water gradually to make the consistency you need to form a ball – err on the side of it being wetter rather than crumbly, but only add the liquid you need to get it to hold together.
- Form a disc with the dough, wrap in plastic and set aside on the counter for 30 minutes while you make your filling.
- Rolling the Gluten Free Pie Dough:After allowing the dough to rest, roll the pastry out onto a surface dusted well with gfJules™ All Purpose Gluten-Free Flour. A flexible pastry sheet (e.g. Silpat) is ideal for rolling and transferring a crust.
- To Transfer the Gluten Free Pie Crust:1- Gently lift an edge of the rolled out crust over your rolling pin. 2 -With one hand under the baking mat, use the pin in the other hand to lift the crust so that it is supported by the rolling pin as you pull the crust gently off of the baking mat. 3- Transfer gently over the pie plate to center. 4- Drop gently into the plate and press in with floured fingers. 5- Pat into your pan.
- For a One Crust Gluten Free Pie:Cut the edges of the crust to an even length of approximately 1-inch larger than the diameter of your pie plate.
- Fill with your desired filling.
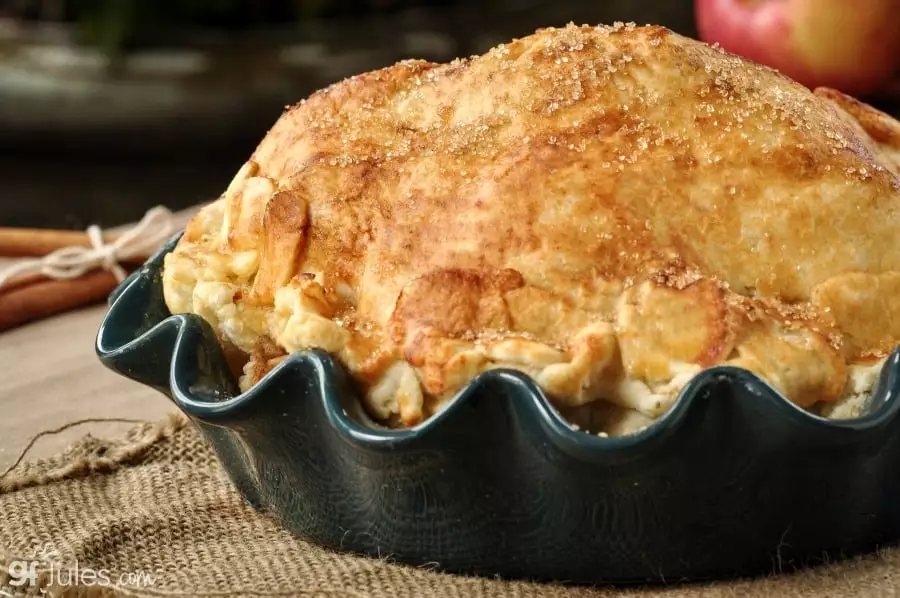
- For a Gluten Free Rustic Crust:Fill with your desired filling, fold the edges over toward the center of the pie, and you’re done!
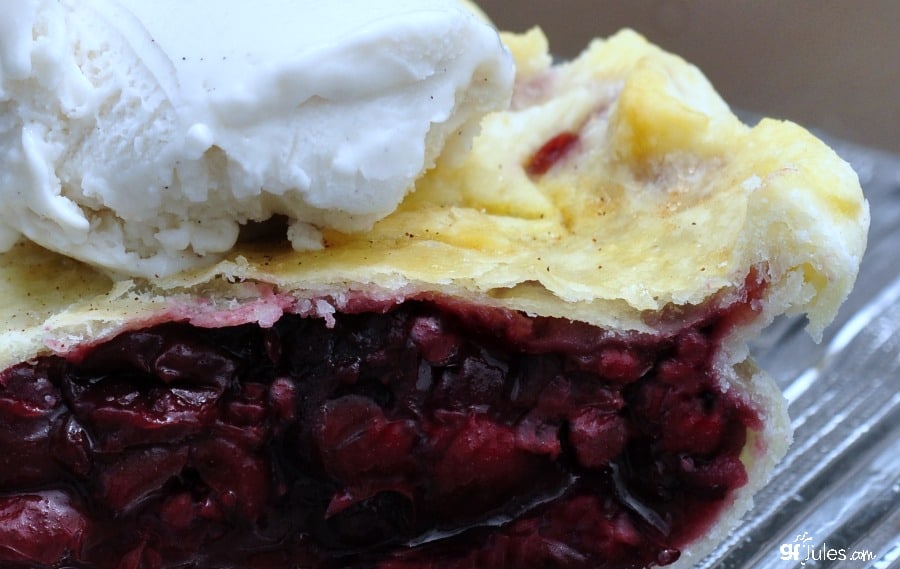
- For a Two-Crust Gluten Free Pie:Double the ingredients and divide the doubled pie crust dough before setting aside. Shape each half into a disc and wrap each in plastic wrap. Repeat the rolling out steps and lay the crust gently onto the top of the filled pie pan. Cut off all but 1/2 – 1 inch of excess pie crust from around the edge of the pan. For fruit pies, cut small slits in the center of the top crust to allow the hot steam to escape. Brush the crust with egg wash or your milk of choice – this step helps it to brown nicely.
- If there are any tears in your top crust, never fear! Simply take leftover crust and use decorative cookie cutters to cut out leaves, pumpkins, etc., wet the backside of each cut-out with a dab of milk, then lay on top of any tears to cover the flaw. Fold approximately 1/2 inch of excess pie crust over all around the edge to form the crust, then using your fingers, press a fluted design in the crust to finish. Cover crust edges with foil or a pie saver to minimize burning. Remove the foil with 10 minutes left of baking.
- Gluten Free Single-Crust or Rustic Pie:Preheat oven to 400º F (static).
- Brush the crust with egg wash or milk, then cover edges with foil and bake for 15 minutes. Reduce heat to 375º F (static), remove foil, brush again with egg wash or milk and bake an additional 30 minutes, or follow directions for your specific pie recipe. (Cover again with foil if the crust is browning too much during the bake).
- Double-Crust Gluten Free Pie:Preheat oven to 400º F (static). Brush the crust with egg wash or milk, then cover edges with foil and bake for 15 minutes. Reduce heat to 375º F (static), remove foil and brush again with egg wash or milk.
- Bake an additional 35-45 minutes, or until the juices are bubbling, or follow directions for your specific pie recipe. (Cover again with foil if the crust is browning too much during the bake).
Notes
** Please keep in mind that nutrition information provided is per serving, which may vary. While we have taken care to provide you with the most accurate nutritional values possible, please note that this information may differ significantly depending on the exact ingredients and brands that you choose to use to make this recipe. Additionally, where options are given for ingredients, the resulting calculation may include all ingredient options instead of only one per line, skewing the totals significantly.
Pin for later!


In a single-crust pastry, I use 1/2 teaspoon of butter flavoring as part of the liquid to give a nice buttery taste. Also, to avoid the crust over-baking before the filling bakes, I’ve found it works really well to put a HOT filling into the crust, giving the baking process a kick-start. For a pumpkin pie, I pre-bake the crust 10 minutes to prevent a soggy crust, meanwhile microwaving the filling during the last 2 to 3 minutes of the crust’s pre-baking, give a quick stir to blend any thickening that may have started, pour it into the crust, and protect edges with foil. For a fruit pie, I cook or preheat the filling a bit in a saucepan before pouring into the crust. On deep-dish apple pies, that also helps to prevent the air space you sometimes get when the raw apples cook down from the top pastry.
Thanks for sharing your tips, Barbara!
I made 4 pies at Thanksgiving in Golden Colorado with your recipe — which had been very succseful in Arkansas and becaucuse I did not consider the altitude we had to cut the crust with a kitchen scissors. Fortunately — everyone had a very good since of humor. We need some advice on what to do in this situation. I love your recipes and your blog
Judy Osmun
Hi Jules:
I’m living in Canada and was so disappointed to see that you do not ship to Canada. Would I be able to get your e-books via email? Do you think your recipes would work with other gluten free flours?
Regards,
Jane
Hi Jane, yes it’s been a huge source of frustration for us not to be able to ship to Canada yet. The logistics & costs are just prohibitive at this point, but we’re working on it! To answer about the ebooks, yes, we can definitely email the ebooks to you – just send an email to Support@JulesGlutenFree.com indicating that you want to order an ebook and they’ll get back with you. They have to put the order through for you because the system wants to automatically say that a Canadian address is ineligible. We do it all the time though, so just send an email. As for using my recipes with another GF flour, I can’t say for sure because they’re all different, but the flour must already have the xanthan gum in it. I have lots of recipes for making a good all purpose mix containing xanthan gum, so I’d recommend going that route for sure. I hear from lots of folks who follow my recipes to make flour & then use it in my food recipes with great success! Check out any of my books for those recipes!
FINALLY I made a successful pie crust! Followed your directions to the letter! The resting time is one thing I didn’t do – as well as using lard in it too – but this time I used butter and shortening and only your flour. Even though it was nearly IMPOSSIBLE to handle (it was more like sugar cookie dough in consistency and not like a standard pie crust) it baked up just fine! And my patching of the tearing and holes was easy to do as well….
Pam – way to go! The most important part is that it tasted great when it was baked and sounds like you nailed it! The resting time may help make it easier to handle next time, and it will get easier and easier the more times you make it. Three cheers!
Jules, I love your flour and recipes! Have you or anyone else made Grandma’s Pie Crust recipe using a food processor? I have been successful with regular flour recipes using a processor, but am afraid to try it with your Grandma’s recipe!
Many thanks,
Kris
Kris – I have made this recipe with a food processor, just be careful not to over-process it. The shortening/butter should be worked into the flour + salt but should still be like tiny pebbles throughout. It’s easy to over-process using the food processor, but a couple pulses should do it!
ok.. I always used good old lard that I buy from the Amish community… nice and fresh… have you ever used it in your pie crust? That is how I always made pie crust in the pre-celiac days… and would love to try it with your flour.. any suggestions?
April, I haven’t tried lard in my crusts, but this is essentially my grandmother’s crust recipe and she used to use lard. I remember it being delicious! As long as it’s cold, the directions should be the same and I’m sure it will be lovely for you!
This looks so beautiful! I have never had mesquite flour, but definitely excited to try it:-) Take care, Terra
Thanks Terra! Let me know how you like it if you try with the mesquite!
I have made this crust 3 times and I can’t get it to turn out right. I planned on making the rustic crust all three times and each time I have to assemble it in a pie pan. It falls apart and after I bake it it is very tough. What am I doing wrong? Not enough liquid?
Thanks
Hi Jules,
Have you used this crust to make individual pot pies? I have a craving and was hoping you had a recipe.
Tami – I actually have a delicous Pot Pie recipe in my book, Free For All Cooking. I haven’t tried this pie crust in that recipe, but it’s certainly worth a try! Please let me know how it turns out if you use it; if not, try my Pot Pie recipe in the cookbook! I love pot pie, and this recipe did not disappoint!
I am looking for a pie crust recipe that can be baked and then filled any help I tried the rustic pie crust and it turned out tough.Thanks john
Jules, thanks for the great recipe–and of course, for your killer flour! I tried one dough disk refrigerated and one on the counter, but found that they both fell apart rather easily when I tried to transfer them to the dish. No matter, they patched up fine and tasted GREAT with some fresh rhubarb!
Eva – so glad you liked it with the rhubarb! Taste and texture are by far the most important things to get right in any recipe, but I’d also love to see the recipe be easier for you. Take a look at some of the comments here from others who have had success with the recipe, and their tips. We all do things a little differently – especially when it comes to pie crusts! – but maybe one of these suggestions will make it easier for you to get it into the pan without patching! LOVE your attitude though, girl! It’s all in how you approach the prize! ; )
Hi, I made my first pie crust Christmas eve and filled with pumpkin. However, the crust that was exposed around the edge of the pie pan was rock hard. The crust on the bottom was quite “tough” and noticeably “tougher to hard” as I neared the edge of the pie toward the outer edge. Also, my pumpkin pulled away quite a bit from the crust when cooled. Help please. Love the flour with everything else I have cooked but my pie was so sad. Thanks.
Hi Tina, there are lots of things that can go wrong with a pie crust to make it less than perfect, but don’t despair! Look through some of the other comments to this recipe for help as well, but here are a few ideas for you:
First, you could try mixing the crust in a food processor instead of by hand – it helps to get the cold shortening & butter integrated without melting it or over-working it. Also, brush your crust with milk to help it brown but keep it moist. Cover your crust edges with foil so they do not over-bake (excessive pulling away from the sides often means the pie is a bit over-done as well). You may also want to explore what brands of shortening you are using; some work better than others in pie crusts. I like Earth Balance Shortening sticks.
Try some of these tips and don’t give up! Crusts can be difficult for anyone to make, even with wheat flour, but they are not impossible and when you get a crust right, it’s an amazing achievement!
Thanks so much. Attempting again tomorrow. My sister and family are here for holidays and she is gluten intolerant so we will enjoy. The 1st pumpkin pie was good but I needed advice for the crust. And, now I have it so again thanks. And of course …. Happy 2011.
Jules, I am so appreciative of your work. I’m working on pie crust. I could bake a wonder with wheat flour, consistent, light, flaky, tender, perfect. I find that my best gf efforts so far (these were your recipe, to a T) are, while tasty and flaky, somewhat heavy and tough, reminiscent of Pillsbury wheat crusts (at which I used to turn my expert nose up). Do we ever get that light, tender, flaky quality again? Or should I realize that a crust that holds together and CAN be cut with a fork is as good as it gets? Trying not to get too depressed here . . .
Hi Helen – thanks so much for your kind words! Don’t let the crusts depress you – it sounds like you are exactly the kind of baker who could perfect gluten-free crusts and teach us all a thing or two! My problem is that I make so many different types of things, that I cannot spend as much time as I’d like on every particular type of recipe! Here are some of pie crust learnings (also look below at comments and see if any of those help you!):
-I only use Earth Balance products anymore for my crusts. I find that they produce a lighter crust
-I use part butter (EB Buttery Sticks) and part shortening which have different melting points and thus help produce a flakier crust
-I have tried every different temp for ingredients and go back to having all my pie crust ingredients be really cold; I do not refrigerate the dough before rolling though (it becomes too brittle); instead, I wrap the dough in a disc shape and let it sit out for about 30 min while I make the filling
-Try using a food processor to work the fat into the dry ingredients to help keep it cold and not over-worked
-Don’t over-work the dough — no kneading! This will also cause the crust to be more tough and dense
-Brush the exposed crust with milk (dairy or non-dairy) before baking to help it brown – many folks overbake their pies, waiting for them to brown (an overcooked crust is dry and tough)
-Cover crust edges for most of the baking time to prevent them from over-baking
I hope these tips help and please come back and share any you devise with us … we’re all perfecting gluten-free baking, together!
I often have trouble getting the rolled pastry to release from the surface I roll on, regardless of how much flour I dusted with. My son in law told me this method. Lay plastic wrap on a surface that can be moved. (I use my silpat, but a cutting board or cardboard would work.) Dust the plastic wrap with Jules flour. Place the dough on that, and cover with another layer of wrap that has been dusted with flour…then roll. NOW….move the rolled crust to the freezer for 5-10 minutes! Remove from freezer, and immediately remove top wrap. For bottom crust, invert pie plate on rolled crust and flip. For top crust, lift pastry by the bottom wrap, and invert over pie filling. Peel wrap off pastry. It works for me. (Try to brush excess flour off your rolling surface etc. before you flip, or it will go all over.)
Love Love Love!!!!
This recipe
Thank you Jule:)
~Grace
Hi Jules!
I am using your crust recipe to make both a pumpkin pie and a french silk. How long do I bake this pie crust with nothing in it to get an empty pie shell? Any suggestions so it doesn’t get to hard baking it solo?
Happy Thanksgiving!
It’s ok to follow the directions for the pie recipe contemplating a wheat flour crust.
On more question – can the dough be made in a food processor as opposed to by hand?
Yes – certainly! It’s actually super easy in the food processor!
Hi Jules,
I bought your flour and am planning on making apple pie and pumpkin pie for the holidays. One question that I have is in your video on making the crust you say to use warm water and on the recipe it says cold water. I know with traditional crust you use ice cold water, but maybe with the GF flour its different? Can you please clarify? Thank you,
Adit
Yes, it’s hard to edit over the videos, but I’ve done lots of experimenting: cold, cool, warm, hot … refrigerate or not… I’ve determined that the best method is cold water but let the dough sit, wrapped, for 30 minutes before rolling out — don’t refrigerate. Hope that helps!
thank you for your prompt reply. The house is quiet now (finally with the baby in bed) and am going to make a pumpkin pie. Thanks again
Thank the Lord for people with the patience to figure out a good flour!!! I ordered the sample of your flour and made pumpkin pie – I’ve been experimenting with pie crusts for Thanksgiving. I’ve been texting my gluten free friends all night… my pie crust came out a little hard too… I’m having problems with the needed time to come out with a good pumpkin pie vs. over cooking the crust. I will try some experimentation here with the foil and saver. But I don’t care if it’s a little hard… I’m going back to the kitchen for another slice!!!! If you haven’t guessed… I’m doing the happy dance because of your flour and recipe for pie crust. Placing an order for the big bag tonight!
Hi Jules,
I am 15 and am gluten free.I met you at the gluten free fair at the Jefferson County fair grounds this spring/summer with my mother. This is our first gluten free thanksgiving. I have not yet made any of your products but have bought your flower and cookie mix.I do all the cooking/baking in the family. Do you first cook your pie crust and then put in the filling or make the crust and put the filling on top or the raw crust and then bake.
Hi Ruby,
So glad you wrote in and glad we got a chance to meet this summer! Do you have my Thanksgiving ebook? That’s got loads of great tips, especially if this is your first gluten-free Thanksgiving! About pies, for pumpkin pie, you simply make the crust, fill it with your pumpkin pie filling and bake all at once. The only time you’d really bake the crust first is for summer-time kinds of frozen pies and things like that. Treat my pie crust recipe like a regular pie crust recipe and follow the directions for your particular pie.
All the best to you and your family this Thanksgiving! I’m sure they’re super proud of you doing all the baking in the family – imagine how excited they’ll be when you bake awesome foods for them … gluten free!
Thank you so much Jules I plan to make your pie crust this Thanksgiving and share it with my friend at school who is also gluten free. I also have put on my wish list for Christmas for some of your E-books.
It sounds great thank you again
Hi Jules!!
To get a jump start on my first gluten-free Thanksgiving, I did a test run of your pie crust today- the videos were extremely helpful. My pies LOOK perfect (hooray!!) however, they were hard as a rock. My two-crust pie was filled with apples and lots of sugar and I originally thought that I created a candy coating on the crust (but this hasn’t happened in gluten attempts). Is it possible that I have stumbled on a common error that you have also encountered? Thanks!!
Hi Beth,
I was just discussing this phenomenon this morning (while eating a piece of pumpkin pie for breakfast -don’t tell!). I’m glad you had success with the pie crusts in terms of rolling them out and how they looked when you were done – that’s usually the hardest part!
When I have had crusts turn out too hard, I have typically baked them too long. The exposed crusts on my pumpkin pies, for example, are beautiful and flaky, but not nearly as soft as the part of the crust that is touching the moist pie filling. I always cover my exposed crust edges with a pie saver or aluminum foil to prevent over cooking, but sometimes that’s not even enough. One thing to try is covering your entire two-crust pie with foil to help lock in the moisture. I also brush the crusts with milk (dairy or non-dairy) to help them brown, so you may want to remove the cover just at the end of baking if you really want a browner-looking crust. Another tip is to examine the fat you are using. Many folks use Crisco, which may be better or worse for crusts – it just takes some experimenting. I use vegan Earth Balance Buttery Sticks and Shortening Sticks, usually 3 Tbs. buttery sticks to 2 Tbs. shortening sticks. I find that combination helps my crust to be flakier.
Luckily, you’ve got plenty of time before Thanksgiving to perfect that crust! Experiment with these tips and let us know what works for you!!
Thanks Jules!
I tried the pie crust recipe using the Earth Balance products today, and noticed quite an improvement (previously I used Crisco). It also helped to cover loosely with tin foil. I think, with a bit more practice, that I will have a winning pie to serve for Thanksgiving. Thanks for your help!
Yay! Way to go!
I make gingerbread and give it as christmas gifts,can you please try to blog a recipe for gluten free gingerbread??
Thank you so much for this blog I really enjoy it.
Absolutely! Gingerbread is definitely on my list of recipes to make for the holidays!
Hi Jules! I noticed your recipe says to let the dough rest on the counter for 1/2 an hour. Most crust recipes say to let the dough rest in the fridge for 1/2-1 hour, is there a reason you suggest the counter or would the fridge be ok to? I to am going to practice my pie crust for my first GF thanksgiving. And any help would be greatly appreciated!!
Sorry! I didn’t read the first part all the way! I tend to get excited about recipes that I forget the read anything else. I usually skip right to the ingredients to make sure I can eat it, long history of other food allergies/aversions. I am making the pie crust now and that’s when I read everything in great detail!
Thank you for sharing all your recipes and tricks, it really has made this process so much easier. I truely appreciate your kindness and I boast your products and website to everyone I meet!
Hi Liz,
Glad you saw my note in the intro – I definitely have found the crust dough to be less crumbly when I leave it on the counter to rest than if it’s refrigerated. Wishing you and your Thanksgiving pies all the best!