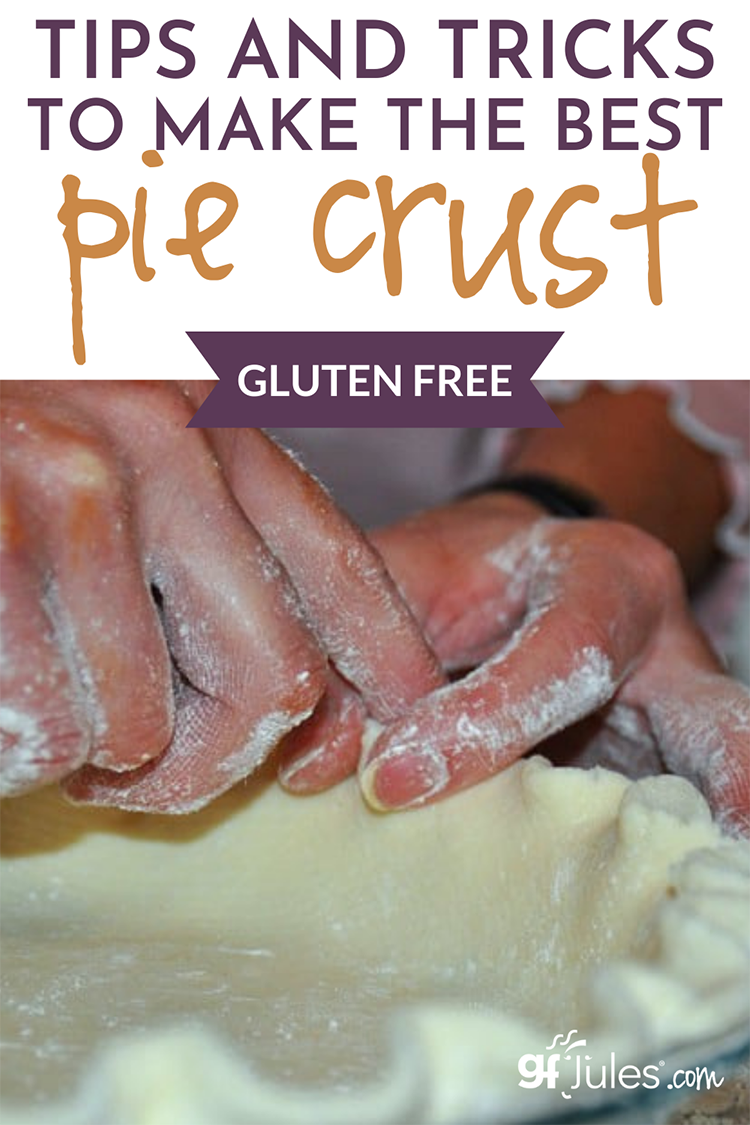
Amazingly flaky, light and tender gluten free pie crust recipe isn’t difficult to make when you use the right ingredients and follow some easy how-to steps with this recipe. In fact, this is THE BEST GLUTEN FREE PIE CRUST RECIPE because it’s the simplest gluten free pie crust recipe and it turns out so well every time.
Only 5 ingredients, one bowl and the confidence to believe in grandma (I mean, grandma is always right), you can’t go wrong with this recipe!

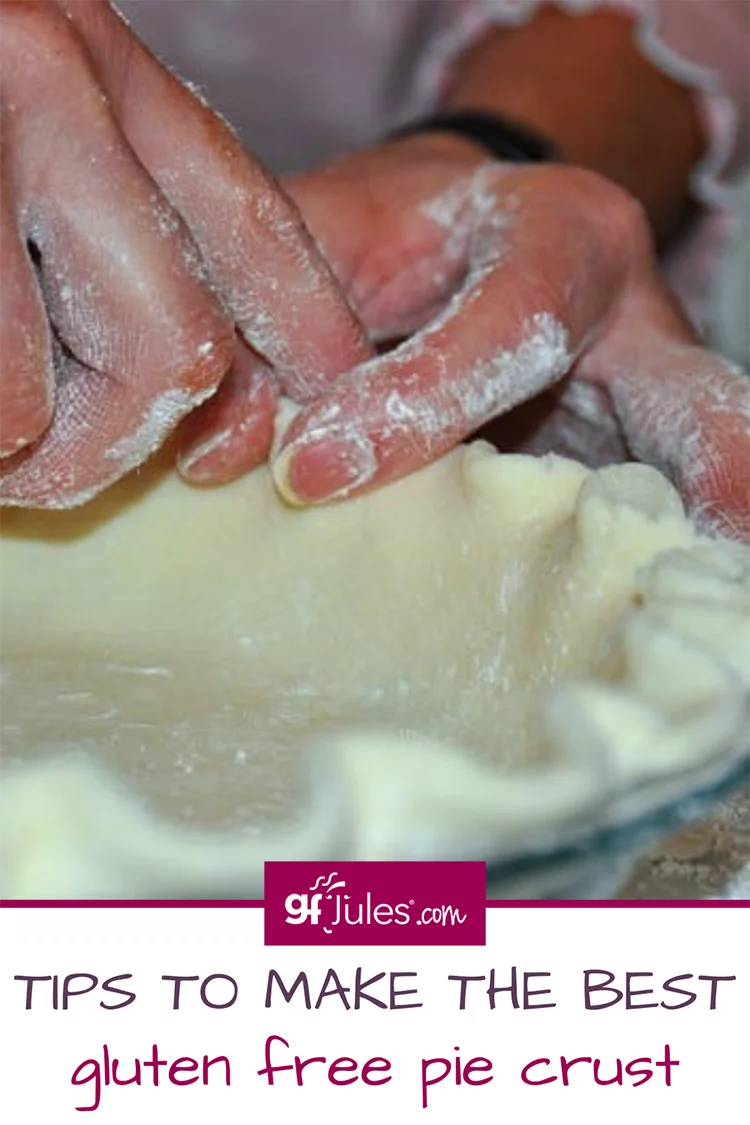
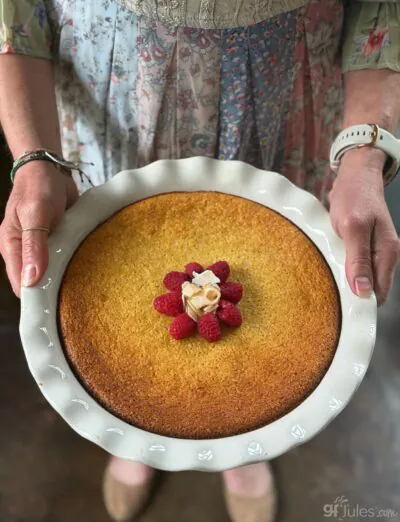
Light and flaky gluten free pie crusts are possible with gfJules Flour!
What’s The Secret to the Best Gluten Free Pie Crust?
I’ll let you in on a little secret: lots of other gluten free pie crust recipes tell you that you have to press the crust in the pan. That’s because you can’t roll their crusts.
Lots will tell you that you have to add sugar. That’s because they’re covering up for gritty tasting gluten free flours.
Lots will tell you that it’s difficult to make a good gluten free pie crust. That’s because … well, because they haven’t tried the best gluten free pie crust recipe — this gluten free pie crust recipe.
Fair warning: the intro to this recipe is l-o-n-g, NOT because it’s difficult to make a great gluten free pie crust, but because I want to REASSURE you in every possible way (photos & videos) that it’s really quite easy to make the best gluten free pie crust and that YOU can do it!
If you already trust me, then just jump right to the recipe and do exactly as I say. Don’t substitute ingredients and don’t skip any steps. You won’t regret it!
I’ve written out my secrets and tips, I’ve shared my fool-proof gluten free pie crust recipe, I’ve included videos of the steps, I’ve recorded a podcast to walk you through everything you need to know to make a great gluten free pie crust, and I’ve shared step-by-step photos so you can consult this post as you make a pastry for yourself.
Don’t let the length of the post scare you — it’s all here to help!
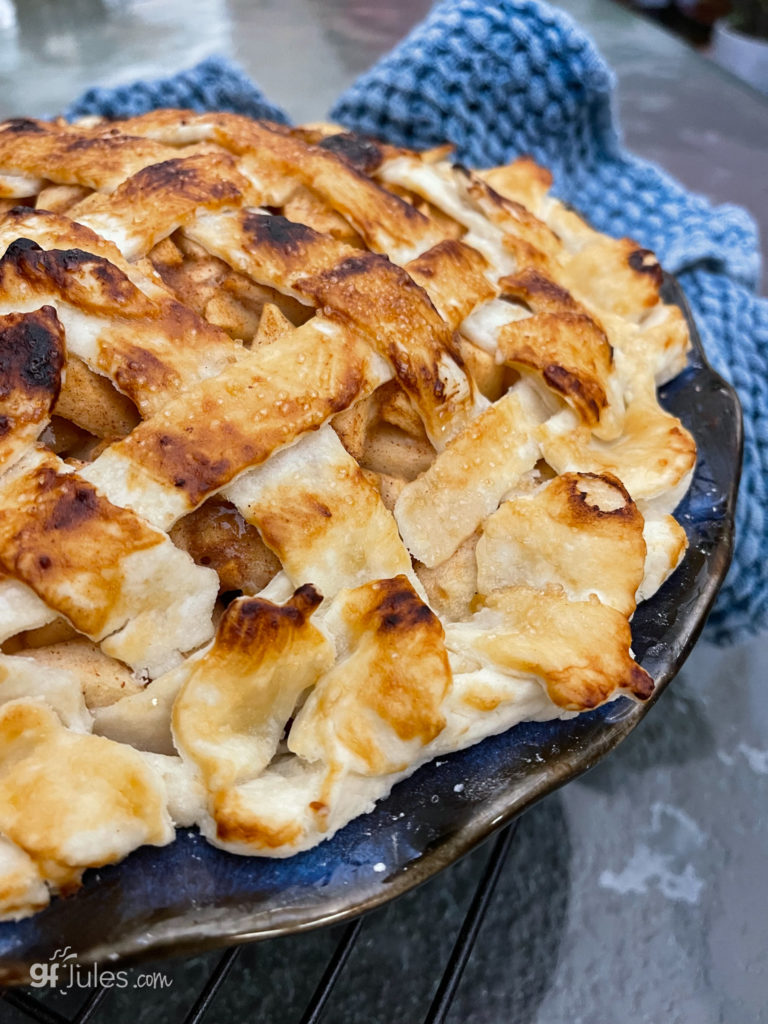
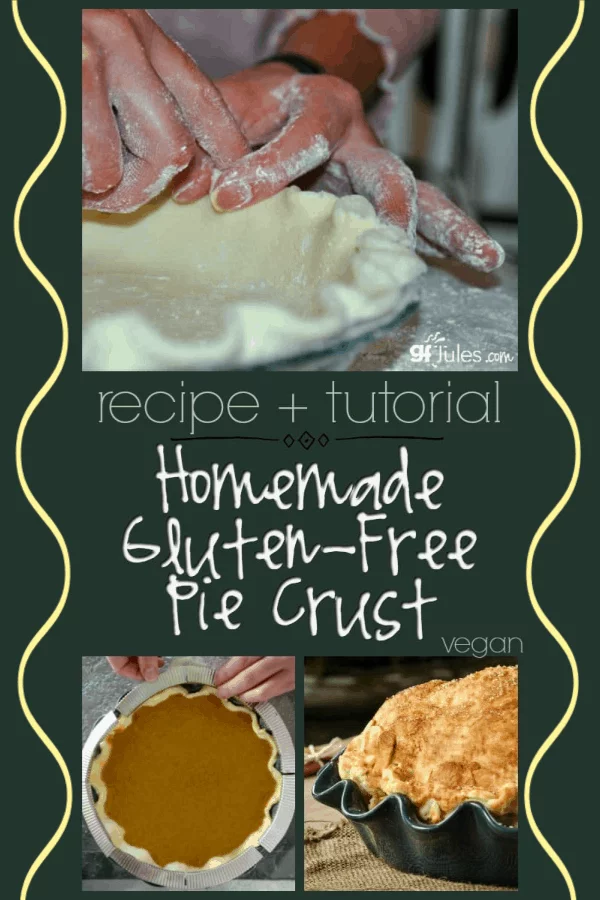
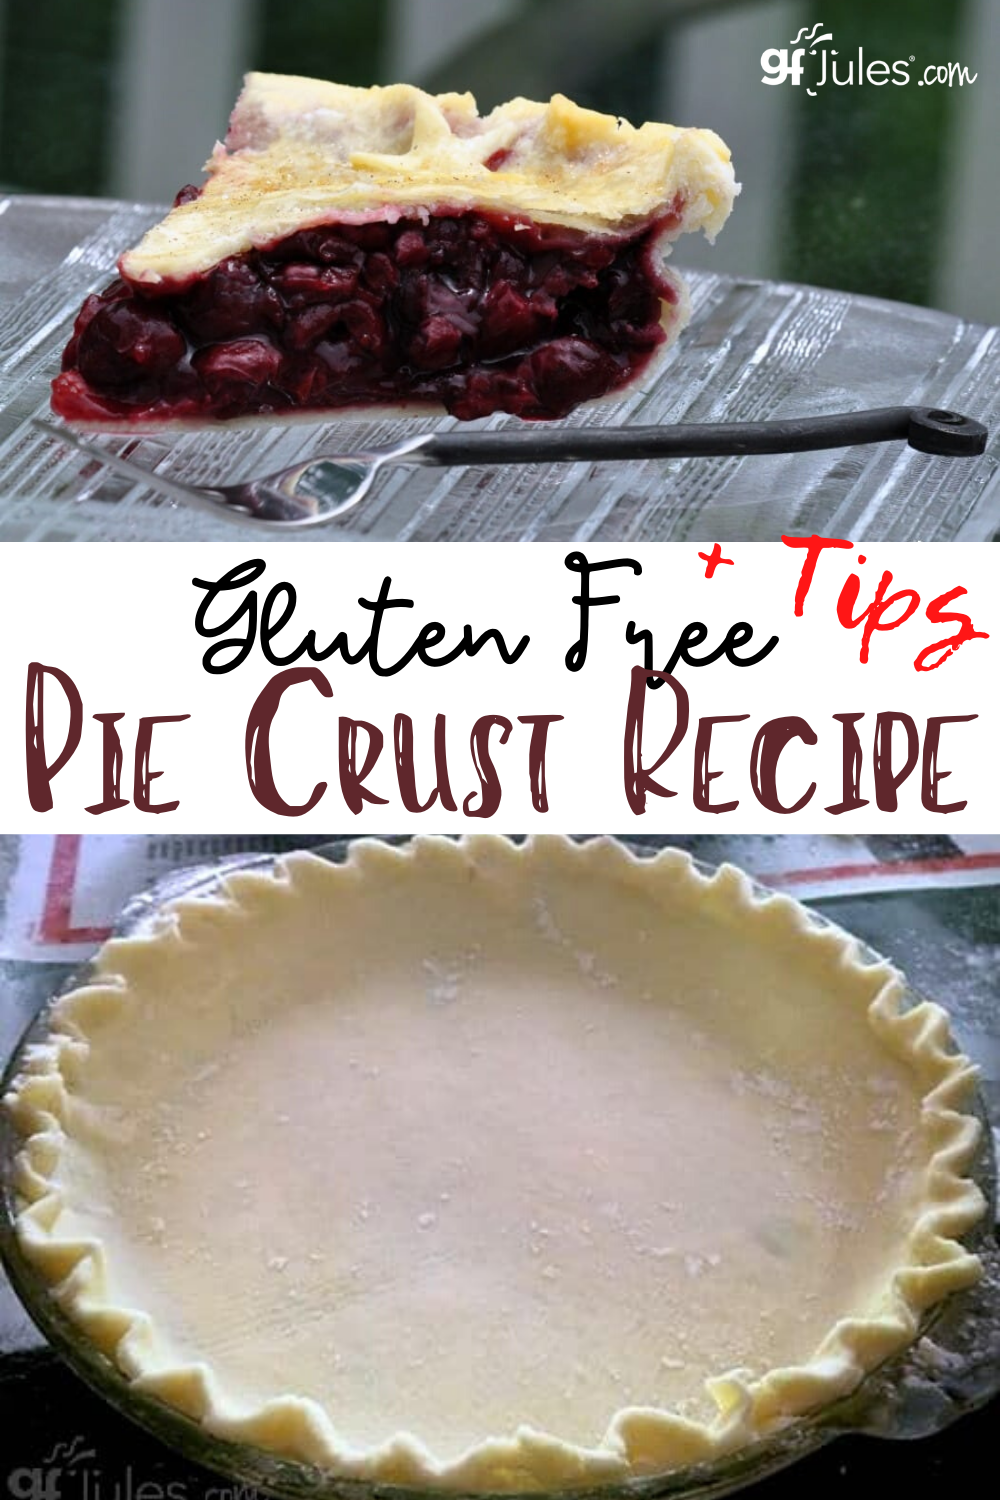
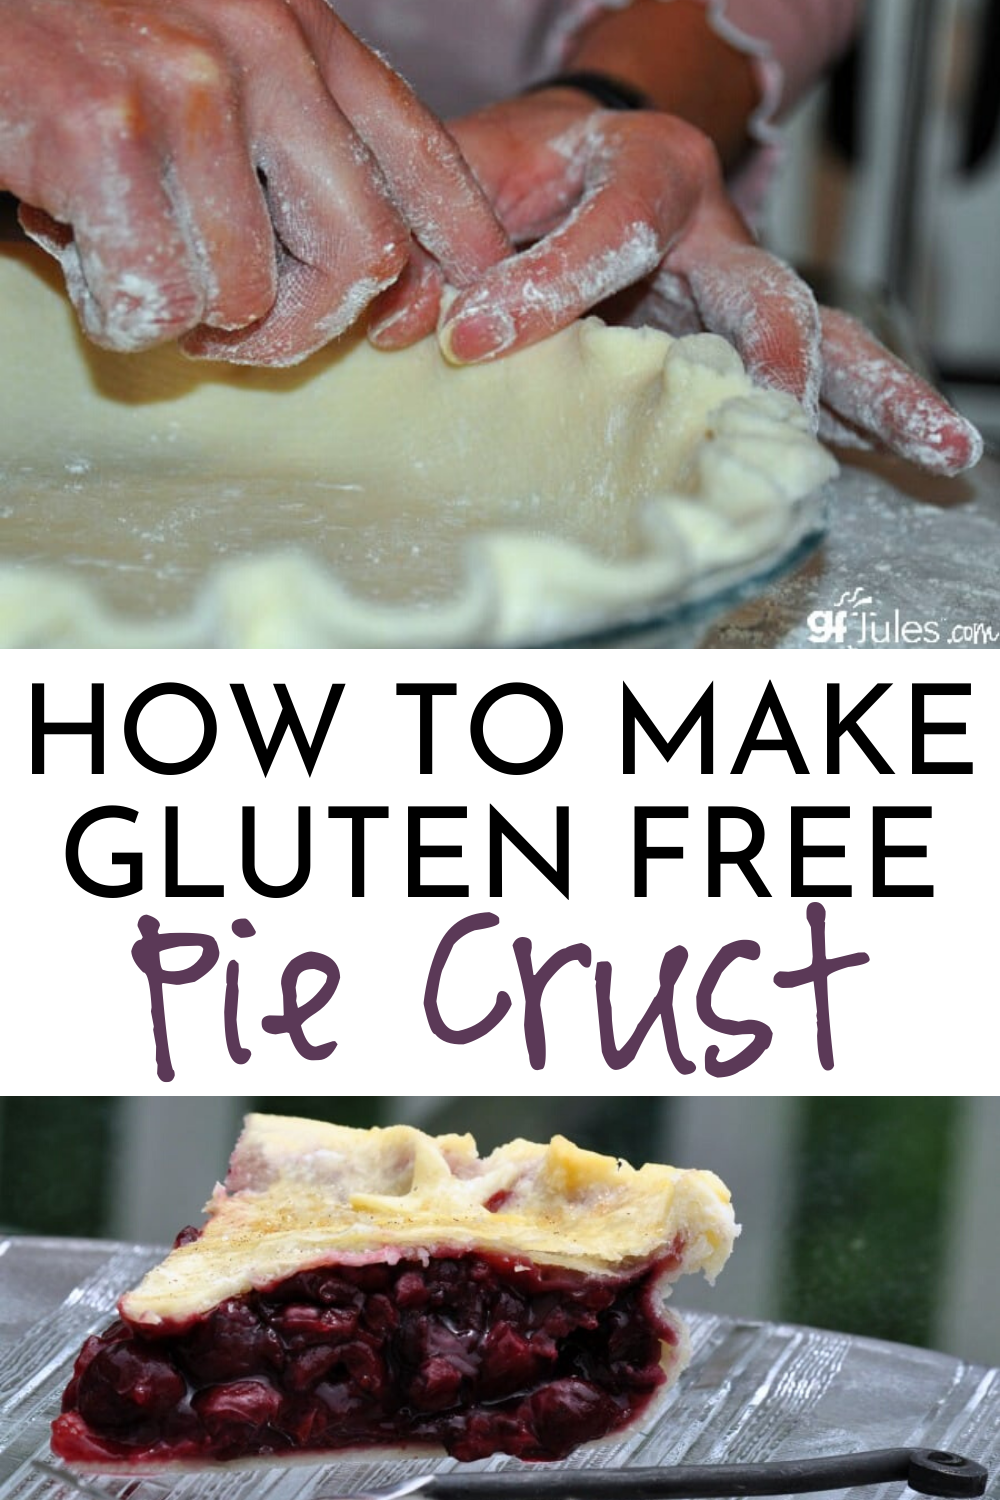
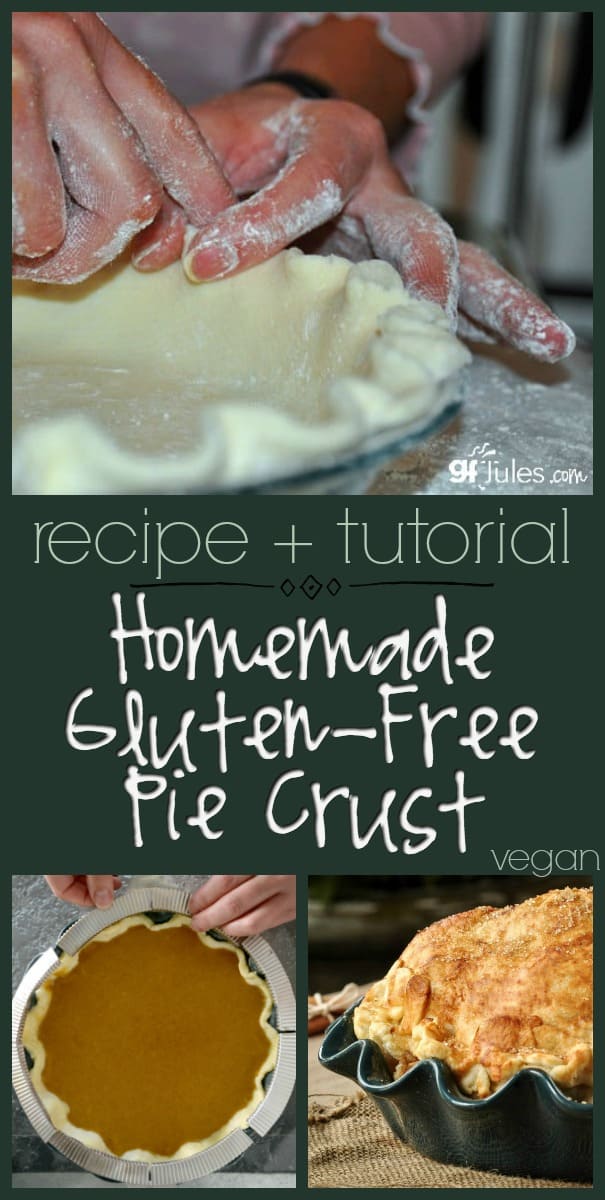
Just look at this gorgeous, flaky gluten free pie crust. It’s within reach, and YOU can make it, even if you’ve never made a homemade pie crust in your life!
How Do I Make the Best Gluten Free Pie Crust?
I’m here to SHOW you how to make the best gluten-free pie crust with a simple recipe, photos, video and even a podcast! I’ve traveled the country speaking to gluten-free groups and teaching gluten-free cooking classes, and it seems that rolling out pie crusts is the one thing that scares people the most about baking gluten free. There are many techniques I’ve developed over the years, and I’ve gotten it down to quite a science!
One way many folks find it easy to roll out and transfer crusts is by using a pie crust bag.
Check out this video below.
If you haven’t seen one of these handy kitchen accessories, take a look at my video showing how to use them! (You can also find these in my store)
Another favorite of mine is using a silicone or cloth pastry mat and my favorite rolling pin covers. Together, they are so versatile and make it easy to transfer gluten-free pie crusts or to roll out sugar cookies or ravioli or or or … you get the idea!
Here’s a quick video of how to transfer a gluten free pie crust using a rolling pin and a silicone mat.
I also have a video showing how to use these mats and rolling pin covers for rolling out gluten-free pie crusts.
Consult my recipe below and be sure to look at the step-by-step photos at the bottom, where I show how to transfer the crust.
Because doughs made with my gfJules Flour actually have STRETCH to them, it makes it easy (yes, easy!) to transfer pie crust without tears! (Or maybe that was just me who cried over broken, crumbly gluten free pie crusts when I first got started???)
But the most important trick to making a deliciously flaky and remarkably easy-to-roll-out gluten-free pie crust, is to start with the right ingredients.

What Ingredients Make The Best Gluten Free Pie Crust?
gfJules™ All Purpose Gluten Free Flour hands-down makes the best gluten free pie crust. It’s already light and clean and grit-free. The special blend of gluten-free flours and xanthan gum gives doughs extra stretch, making it far easier to roll and transfer top and bottom crusts.
A combination of butter (or non-dairy alternative like Miyoko’s Vegan Butter or lactose free Green Valley Organics® Lactose Free Butter) as well as shortening makes for a flakier crust. Note: I do NOT like using coconut oil in place of shortening. It doesn’t play nicely with the flour and makes for an oily dough that is more brittle and sticky — no fun to work with!

Using cold water and a surprise secret ingredient that no one will ever taste (spoiler alert: secret ingredient is vodka or other distilled grain alcohol) also makes it easier to work with the dough, and yields an amazingly delicious crust that’s flaky and soft every time. (And yes, the secret ingredient is gluten-free, of course!)

This secret ingredient is IMPORTANT. Please use it, as well as shortening + butter, as well as gfJules Flour to achieve the lightest, softest, flakiest gluten-free pie crust. If you cannot use the secret vodka ingredient, use white vinegar in its place for the most tender crusts.
Why Don’t Gluten Free Pie Crusts Brown Like Gluten Crusts Do?
Gluten-free pie crusts don’t brown like wheat crusts because they have less protein in the flour. If you don’t add sugar to the crust or brush the top of the crust with egg wash or something with protein in it, there’s nothing to brown, but don’t let that fool you into thinking your crust isn’t cooked! DO NOT OVERCOOK YOUR PIES.
If you wait for your gluten-free pastry to brown before you take it out of the oven, it will become hard and over-cooked. This is one reason it’s important to brush your crust before baking with either egg wash (one whole egg, mixed, plus 1 tablespoon water or milk) OR milk so that the crust won’t dry out while cooking and will brown more.
The egg wash or milk will be what browns, not the flour crust. You can also sprinkle cinnamon-sugar on your crust for more color, if you like.
FAQs for Gluten-Free Pie Crusts
I find myself answering lots of emails in advance of pie baking season and folks are all worried that they’ll make a tough pastry crust.
In answer, I usually write pretty much the same things, so I’ll copy a note I wrote recently below, as it’s a good recap of the main tips for making the best gluten-free pie crust.
Top Tips for how to get the flakiest gluten-free pie crust:
- For the flakiest gluten free pastries, make sure the butter is super cold when adding it. I like to cut it into pieces and then put it in the freezer while I’m measuring the flour and getting everything ready. Be sure to measure your flour properly for this, and every gluten free recipe. It’s super important!

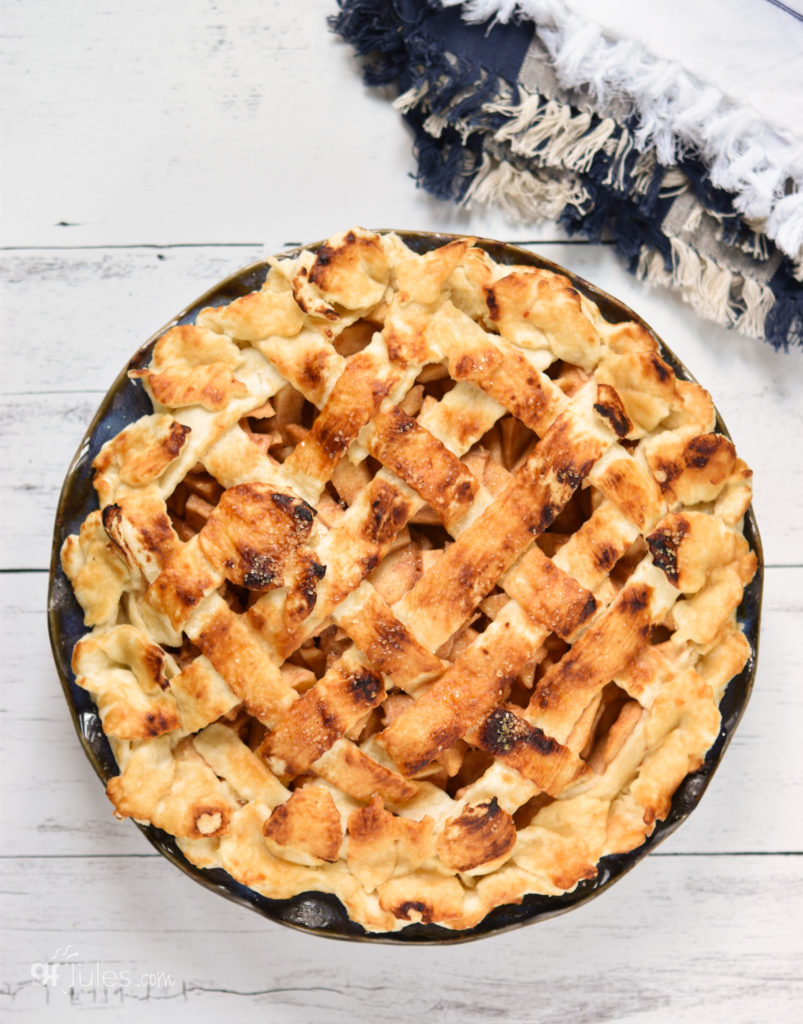
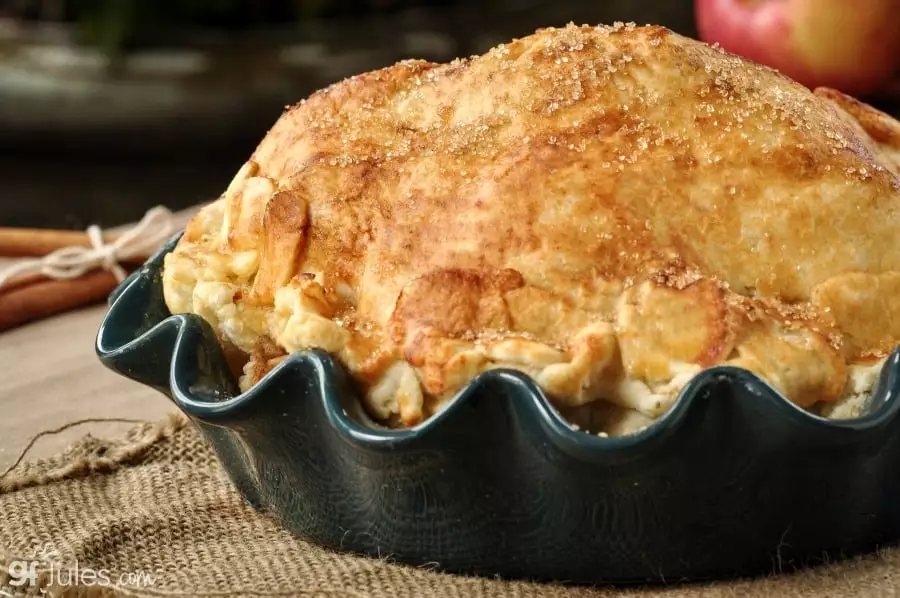
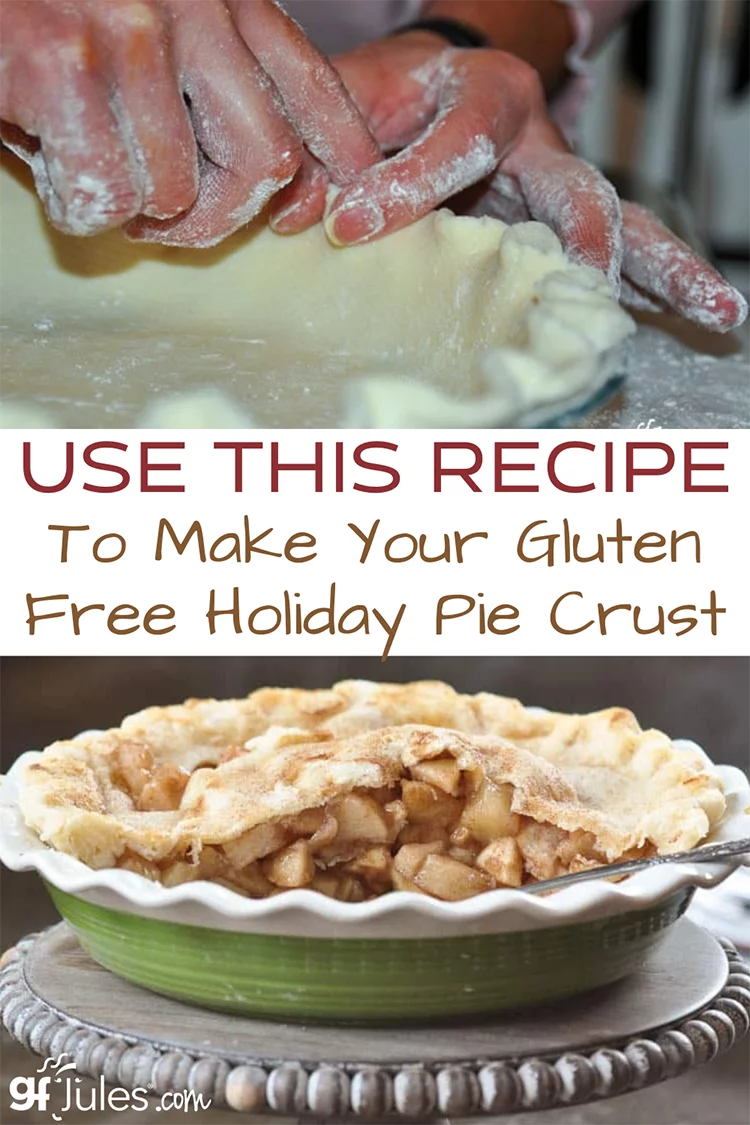
Gluten Free Apple Pie baked in Emile Henry Pie Plate. - When you add the butter, cut both it and the shortening into the flour/salt mixture with a pastry cutter or two knives cutting against one another, and only cut it as much as you need to integrate the fats into the flour into small balls, without working it too much. Then add the vodka or vinegar or cold water (start with only 3Tbs) and mix with a fork, adding only as much more cold water as you need to get the dough to hold together without being wet. A wet dough is a heavy dough and you don’t want that!
- Then wrap the dough in cling wrap and leave on the counter for 30 minutes if it’s not too warm in the kitchen, or refrigerate for about 10-15 minutes if you think you worked it too much or the kitchen is warm.
-
Roll it out and into the pie pan and then … I’ve found that covering the crust with wrap again in the pan and putting it in the freezer while you work on other things, THEN filling the crust, is a great way to keep those fats nice and cold before baking.
-
The steam that is generated from the fats melting in the oven is what causes most of the flakiness, so if you have lots of little balls of fat throughout the crust, as opposed to melty strands of fat, it creates more flakiness.
-
That being said, overcooking the crust can also make it tough, so brush the crust with egg or milk to help it brown so you aren’t tempted to leave it in the oven too long, waiting for it to brown.
See below for step-by-step photos!
Here are some videos showing the recipe in action
The BEST Gluten Free Pie Crust Recipe
Gluten Free Pie Crust Recipe and Tips
Equipment

Ingredients
1 Gluten Free Pie Crust (double for 2-crust pie)
- 1 (135) cup (grams) gfJules® All-Purpose Gluten Free Flour
- 1/2 teaspoon sea salt
- 2 (1) Tbs (ounce) shortening OR lard OR cream cheese/vegan cream cheese (1 1/8 ounce) (I recommend Spectrum® Organic Palm Shortening*
- 3 (1 ½) Tbs (ounce) COLD butter or non-dairy alternative
- 3 Tbs vodka** (OR white vinegar)
- 1-2 Tbs cold water add more or less to get the dough to hold together but not be sticky
- egg wash (1 egg + 1 Tbs. water) OR milk (dairy or non-dairy) for brushing on crust
Instructions
To Make the Dough:
- In a large bowl, whisk together the dry ingredients.
- Cut in the shortening/cream cheese and cold (not frozen, but very cold) butter using a pastry cutter (or the flat paddle attachment on a stand mixer or a food processor).
- Add the vodka & water gradually to make the consistency you need to form a ball -- err on the side of it being wetter rather than crumbly, but only add the liquid you need to get it to hold together, not too much! Do not over-work the dough, or it may become tough when baked.
- Form a disc with the dough, wrap in plastic and set aside on the counter for 30 minutes or refrigerate while you make your filling.
Rolling the Dough:
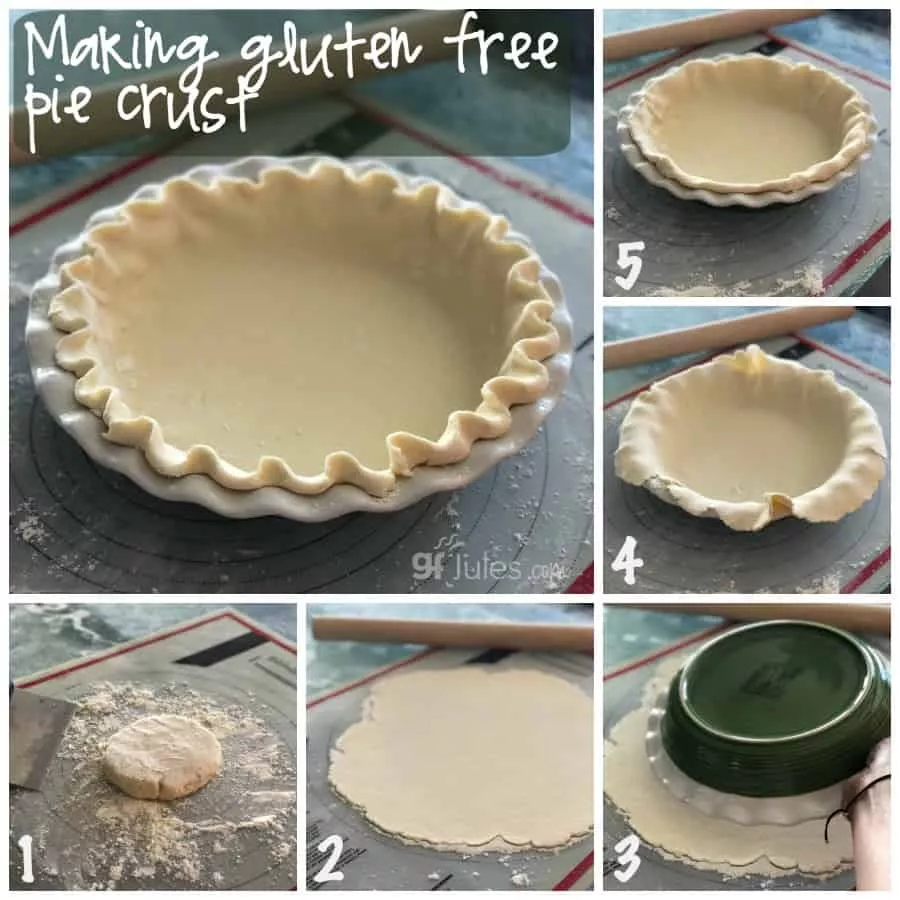
- After allowing the dough to rest, roll the pastry out onto a surface dusted well with gfJules All Purpose Gluten Free Flour.
- Use a flexible pastry mat (e.g. Silpat or cloth mat) and rolling pin covers or a pie crust bag for rolling and transferring your gluten free crust easily.
- Gently roll in each direction — do not press down on the pin while rolling — to a circle with a diameter at least 1 inch larger than that of your pie pan.
- Click on the pictures above the recipe card for quick videos on how to easily transfer a gluten free pie crust into the pan.
To Transfer the Crust:
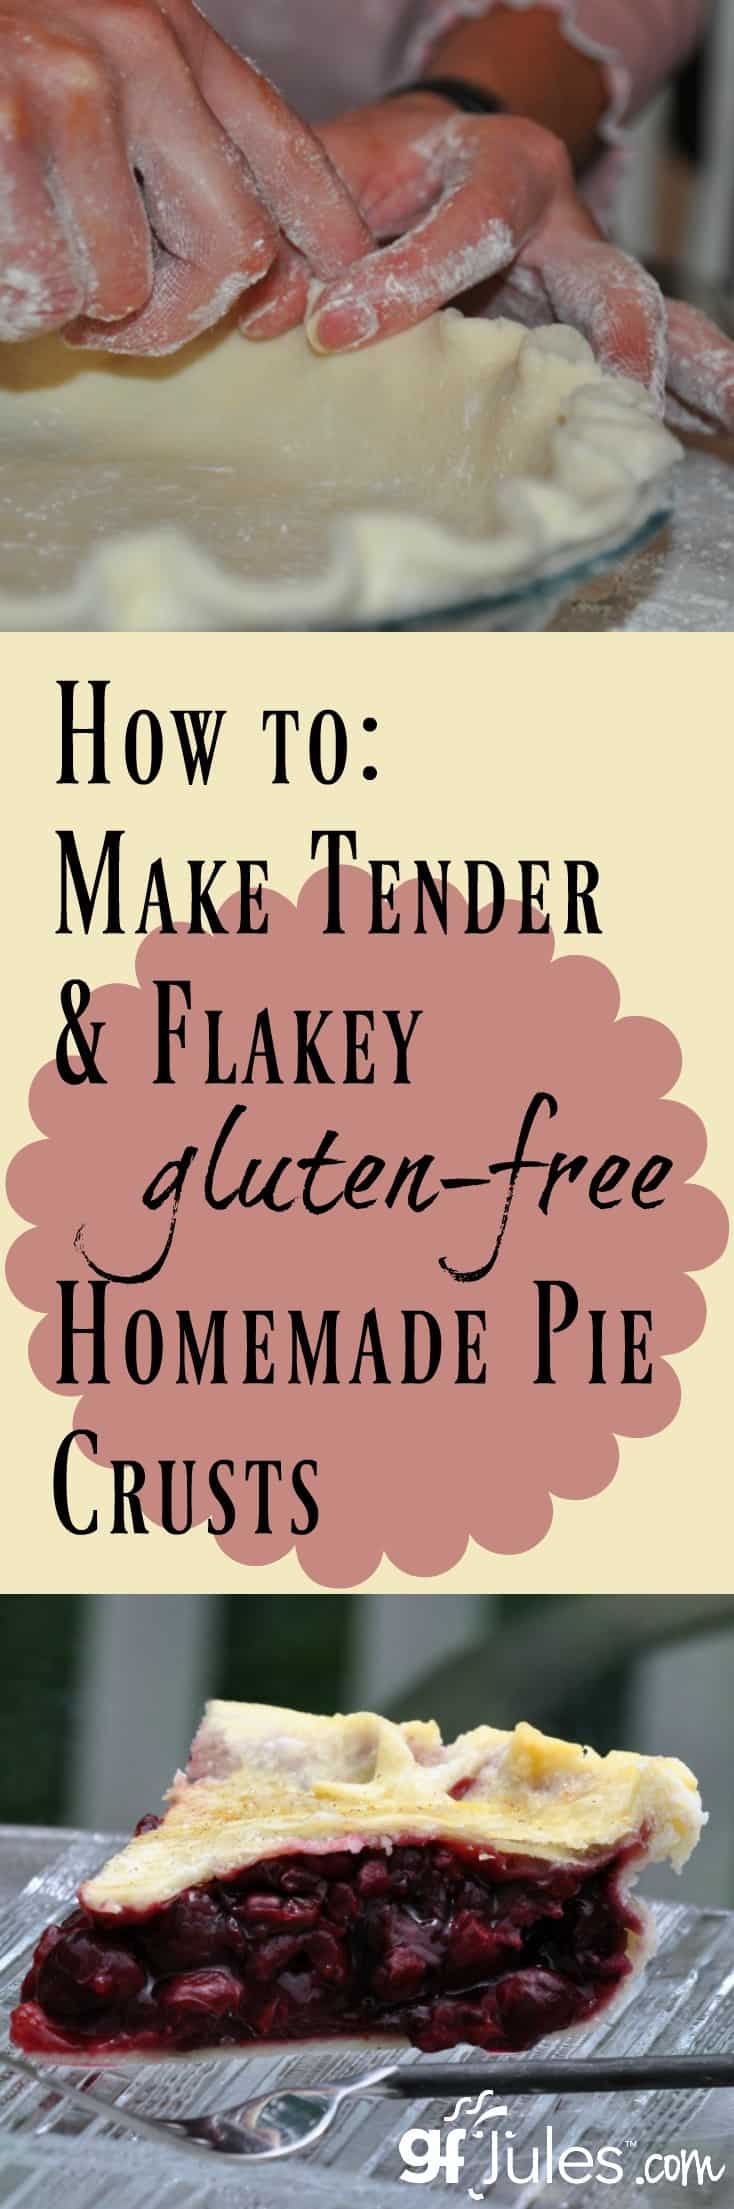
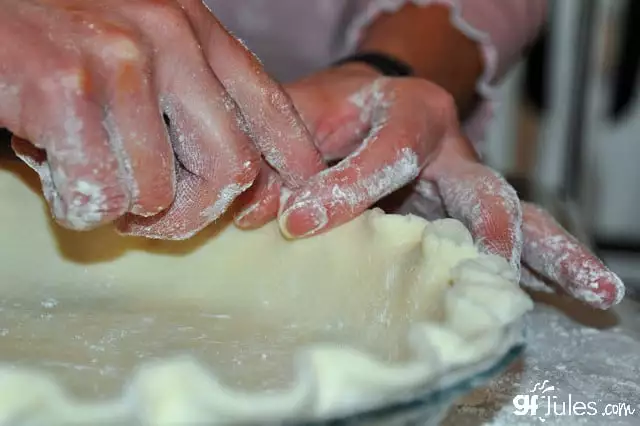
- 1- Gently lift an edge of the rolled out crust over your rolling pin. 2 -With one hand under the baking mat, use the pin in the other hand to lift the crust so that it is supported by the rolling pin as you pull the crust gently off of the baking mat. 3- Transfer gently over the pie plate to center. 4- Drop gently into the plate and allow crust to slump into pan. 5- Pat into your pan. (See photo above recipe card)
- For a One Crust PieCut the edges of the crust to an even length of approximately 1-inch larger than the diameter of your pie plate.
- Gently fold the edges under, then press with a fork or spoon or pinch into a fluted design between your fingers. Cover with plastic wrap and freeze while you make your fillings.
- Fill with your desired filling.
- For a Two-Crust PieDouble the ingredients and divide the doubled pie crust dough before setting aside. Shape each half into a disc and wrap each in plastic wrap. Repeat the rolling out steps for the first crust and cover with plastic wrap, then freeze for 30 minutes or while you prepare the fillings. Fill the pie and lay the second crust gently onto the top of the filled pie pan.
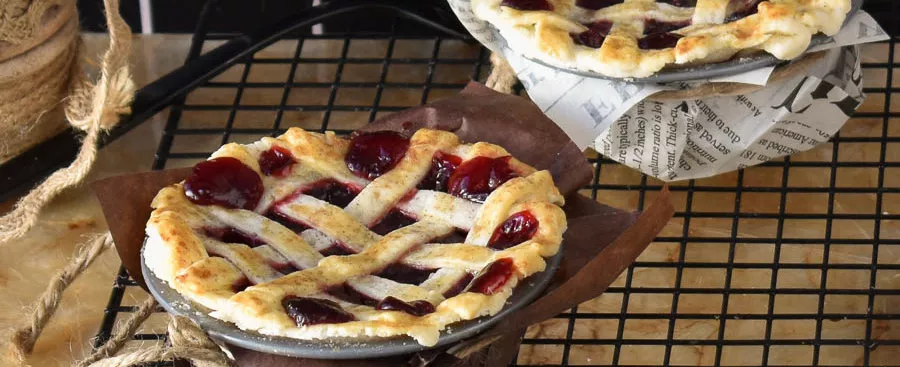
- Cut off all but 1/2 – 1 inch of excess pie crust from around the edge of the pan. For fruit pies, cut small slits in the center of the top crust to allow the hot steam to escape. Brush the crust with egg wash or your milk of choice – this step helps it to brown nicely.
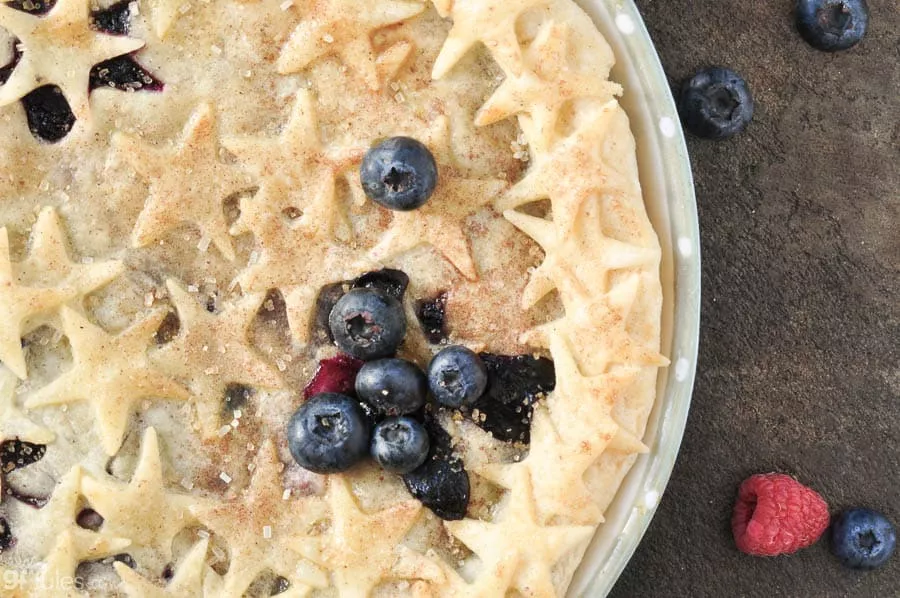
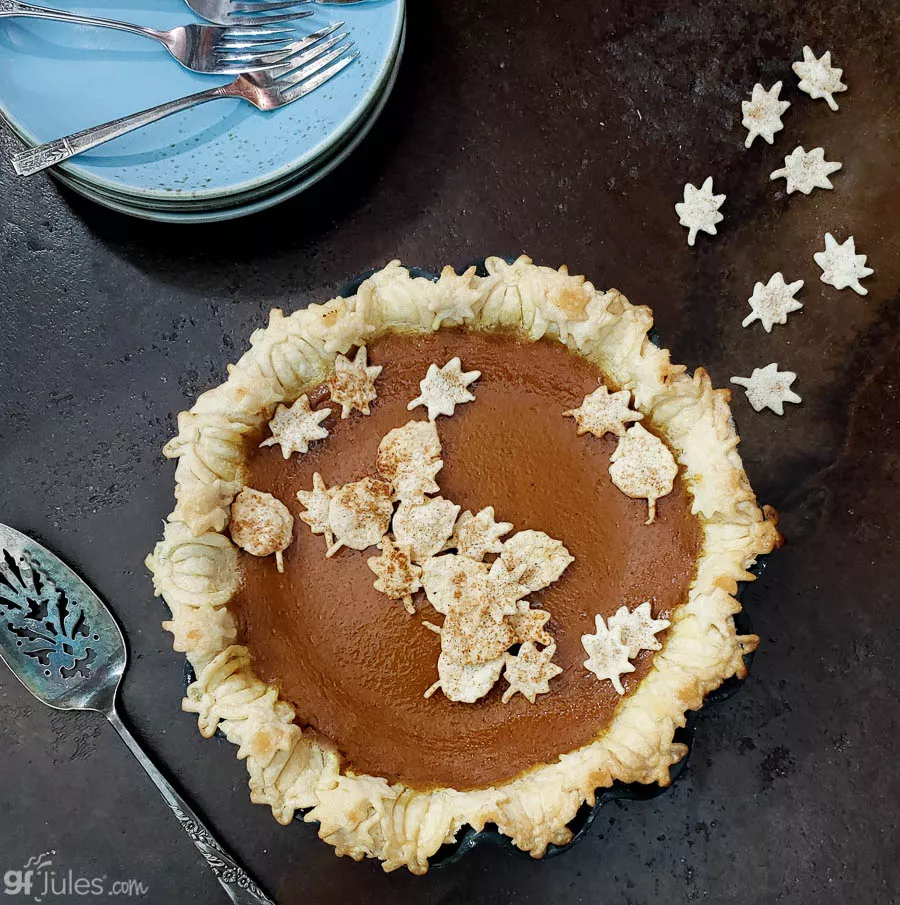
- If there are any tears in your top crust, never fear! Simply take leftover crust and use decorative cookie cutters to cut out leaves, pumpkins, etc. Wet the backside of each cut-out with a dab of milk, then lay on top of any tears to cover the flaw.
- Use pie crust shields to prevent crust edges from over-cooking.
- Fold approximately 1/2 inch of excess pie crust over all around the edge to form the crust, then using your fingers, press a fluted design or use a fork to go around the crust to finish.
- Your pie is now ready to bake or to freeze for later baking. For directions on how to freeze the pie dough and bake later, hop to my post on that method. To bake now, follow the instructions below.
- Single-Crust: Preheat oven to 400º F (static). Brush the crust with egg wash or milk, then cover edges with foil or pie crust shields to minimize burning. Bake for 15 minutes. Reduce heat to 375º F (static) and bake an additional 20 minutes, remove the pie crust shields, and bake an additional 10 minutes, or follow directions for your specific pie recipe.
- Double-Crust Pie: Preheat oven to 400º F (static). Brush the crust with egg wash or milk, then cover edges with foil or pie crust shields and bake for 15 minutes.
- Reduce heat to 375º F (static), remove foil and brush again with egg wash or milk. Bake an additional 35-45 minutes, or until the juices are bubbling, or follow directions for your specific pie recipe. (Cover again with foil if the crust is browning too much during the bake).
- Unfilled Pie Crust (Blind Bake): Cover crust in pie plate loosely with plastic wrap and refrigerate for 30 minutes. Preheat oven to 375º F (static).
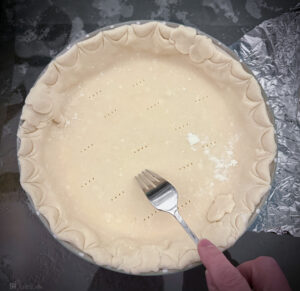
- Prick the bottom of pastry all over with tines of a fork. Cover the pastry with parchment paper and pour pie weights, dry rice or dried beans on top to cover 1 inch. Brush the crust edges with egg wash or milk, then cover crust edges with foil or pie crust shields. Bake for 15 minutes or until the bottom of the crust no longer looks raw.
- Remove the parchment paper and weights. Return to bake for 6-8 minutes if filling with quiche, pumpkin or key lime type filling which will be baked further; for cream pies and refrigerated fillings, bake 10-15 minutes more. Don’t wait for the crust to turn brown before removing or it will have over-cooked. Cool completely on a wire rack before filling for refrigerated pies.


Notes
** Please keep in mind that nutrition information provided is per serving, which may vary. While we have taken care to provide you with the most accurate nutritional values possible, please note that this information may differ significantly depending on the exact ingredients and brands that you choose to use to make this recipe. Additionally, where options are given for ingredients, the resulting calculation may include all ingredient options instead of only one per line, skewing the totals significantly.
I hope you love this recipe as much as we do!
Pin it for later!


What fantastic tips! You’re such a good instructor!
Ah, you’re such a sweetie, Elle. Thank you!!!
~jules
I’m so lucky I found your Guten free flakey pie crust recipe, never heard of using vodka to make pie crusts
Enjoy that recipe, Sandra! There’s almost nothing that a delicious flakey pie crust wouldn’t make better!
~jules
I need to follow your technique next time! I make pies so rarely that I definitely don’t have the process down smoothly!
It can feel daunting to launch into making a homemade crust, but it’s really so easy that once you make one again and refresh the steps, you’ll remember just how easy it is and you’ll be a pie making machine, Michelle!!!
~jules
Definitely keeping this in mind for the upcoming fall pie season! 🙂 Thanks for sharing all your tips, Jules!
Glad they’ll be helpful, Raia!
~jules
After a disastrous attempt at a pie crust a few years ago, I was ready to try again. Thanks so much Jules for this recipe. I think the combination of vodka and water as well as the egg wash for browning made all the difference in the world. My non GF family members deemed my Thanksgiving apple pie a success! Please keep doing what you do to make baking fun for all of us ;)!
Does this recipe work well for blind baking? How would you do this?
Hi Amy, it does! The directions are similar to those with my baking from frozen post.
~jules
can i make your crust in advance, fill the pie shell, and then freeze or refrigerate the uncooked shell for a few weeks (or in this case, just until Thursday)?
Hi Jane, you can absolutely make it in advance! I just published how to do that on Facebook. I’ll try to add the info here tomorrow, but in the meantime you can go here to learn how to do it. This method works wonderfully!!!
Just discovered your recipes and very interested …. new to the gf world. Is your flour available in Canada (live just north of Toronto in Ontario). My results with the flours (specifically Robin Hood) here have been less than stellar.
I have Celiac Dis-ease and have used your flour since my diagnosis. I get many compliments on my cooking….especially my crepes made with your flour. However, I was having a really hard time with pies. The crust simply fell apart. I tried the vodka trick you suggested and your pie crust recipe and the crust turned out beautifully. It was flakey and delicious and our little family of four at the entire pie in one sitting! Next on my to do list – buy your pie kit! Thank you, Jane Taylor Hardy
I commend you for not giving up, Jane! Delicious pies are back on the table – way to go! Thanks so much for letting me know these tricks and my flour worked for you!
Happy Pie Baking!
~jules
Hello Jules, I’ve been checking out all of your work and was going to order your GF Flour however, I am allergic SEVERELY allergic to Xanthan Gum. And upon reading your recipe for pie crust…saw Xanthan Gum listed as an ingredient. Is this accurate?
Thank you,
Claudia Estrada
Hi Claudia, yes, xanthan gum is in my flour mixture so I can’t recommend it for you. I’m sorry you won’t be able to try my flour blend, but stay tuned because I’m always creating new things! And enjoy my recipes in the meantime. All the best to you! ~jules
I made a chicken pot pie last night using your pie crust recipe and flour. We tried rolling it out, but it fell apart. So we ended up putting it in the pie pan and spreading it out with our fingers. We went ahead and did our best rolling out the top crust, and ended up having to piece it together over the filling. Do you think that happened because we didn’t use enough vodka and water? Also it was really salty (which was okay for the chicken pot pie beings that I tried a new recipe for the filling and it didn’t have enough seasoning). Could we decrease the amount of salt and still have a good crust? Other than that, we liked that the texture and flavor was so much like a regular pie crust. Thank you so much for having such great gluten free flour. You really have helped our transition into the gluten free life so much easier.
I just used your pie crust bag to roll out the crust. First 1 kept breaking. Top crust, I added a bit more water to and it worked much better. Can’t wait to taste it!
I love to make pies & homemade crust. I’m finding whether I use shortening or like this time, I used lard, they still want to crumble on me. I like to roll them on the thin side(especially the top crust) but I’m having to make these a little thicker. Even w/little handling they’re tough. (I also used water+vodka)
Hi Tammy, are you using my Jules Flour? Why don’t you send an email to us at Support@JulesGlutenFree.com and we can walk through it with you to see what might be going wrong. It shouldn’t be crumbly if you’re using my flour!
with the Living Social deal,
Jules Gluten Free Bake Your Favorite Holiday Treats, Gluten-Free,
can I get it with no sugar?
Hi Joel, my Jules Gluten Free All Purpose Flour contains no sugar, nor does my GF Cake Mix (add your own sweetener of choice). Hope that helps!
can I get the cookie mixes and other mixes with no sugar in them?
Jules,
another question- in your video for the pie crust you said that you used warm water. However, your recipe calls for cold water. Does it make a difference?
Thanks
Hi Kim – yes, that was an early video where I was using warm water but I’ve found that using cold water (and cold water + vodka is even better!) works better to keep the crust flakier.
Hi Jules,
I attempted to make empanadas using the pie crust recipe and they are almost a success. My question is, how do I make the crust a little less flaky and dry. They crust came out perfect for a pie, but I want to make turnovers and empanadas.
Thanks!!!!
P.S. Happy Birthday
Hi Kim – I’m so glad that you are experimenting and having success with the crust recipe for empanadas! To modify it and make it less flaky, I would suggest adding more butter or shortening. Did you use the vodka + water trick or just water when you made it? Oh and thanks so much for the birthday wishes!
Is any Gluten Free Flour ok for the recipe? Because here (Poland) i don’t think i could buy Jules Gluten Free™ All-Purpose Flour.
Hi – unfortunately we don’t ship our flour to Poland at this time. As a substitute, you could make your own AP flour blend that has more starches than whole grains in order to get the proportions right. You don’t want to use any bean flours or other GF flours with distinctive tastes or grit – that would ruin your crust!
Looking at recipe that 5T butter, is that correct. If so do you cut it in all at once. Did you ever consider coming to Columbus Oh for classes
Hi Marilyn, yes, you cut in the 5 Tablespoons of butter and/or shortening at the same time. And actually, I have been to Columbus to teach! It was about 4 years ago when I spoke at the Nationwide Children’s Hospital for their celiac conference. I’d love to get back again, though!
Jules,
What is a good recipe for making pasta w/your all purpose flour?
Thanks in advance,
Anita
Hi Anita – hop over to my ravioli recipe. It’s so easy and really delicious!