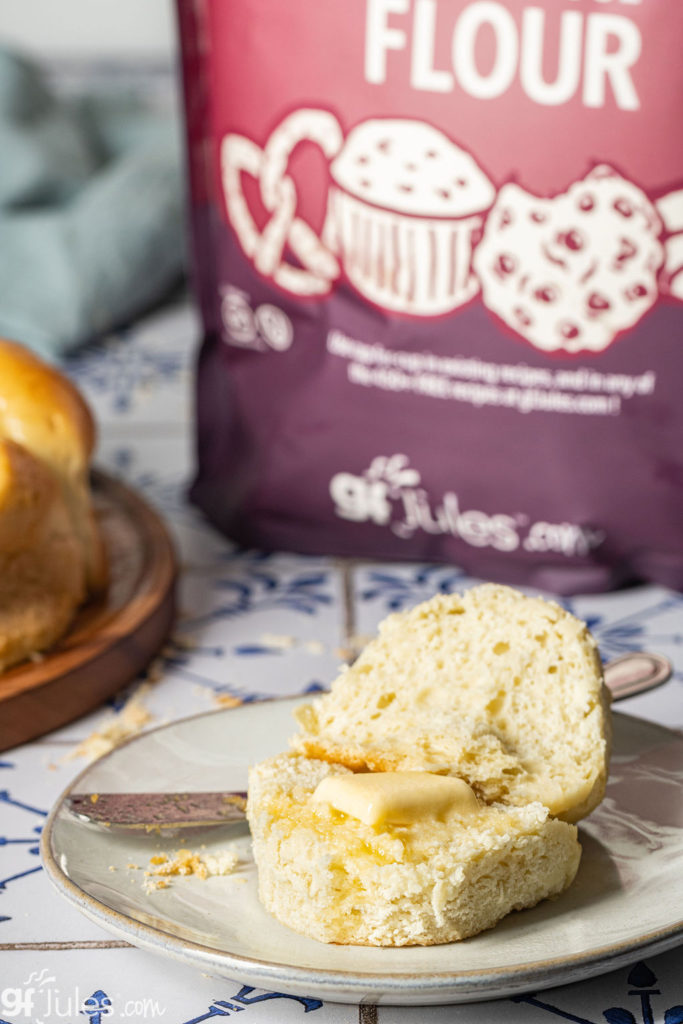
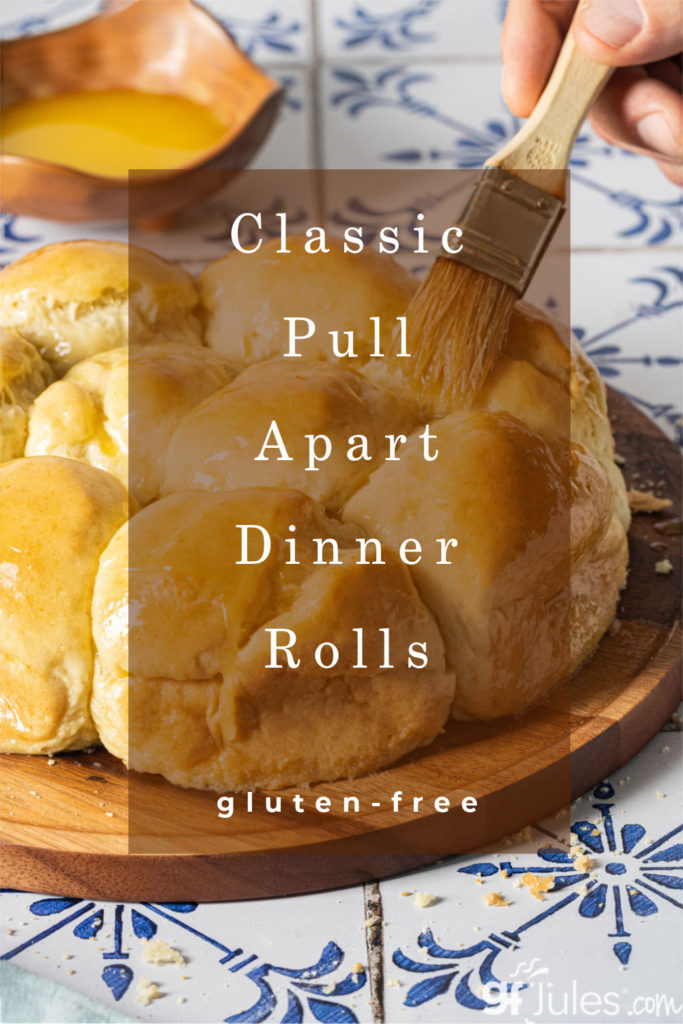
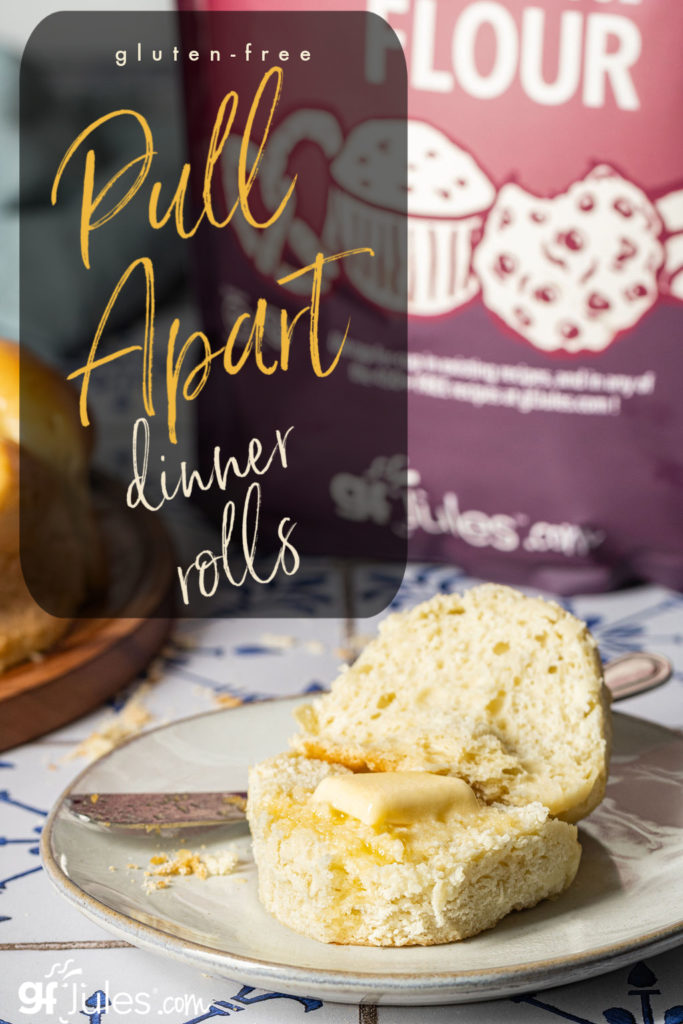
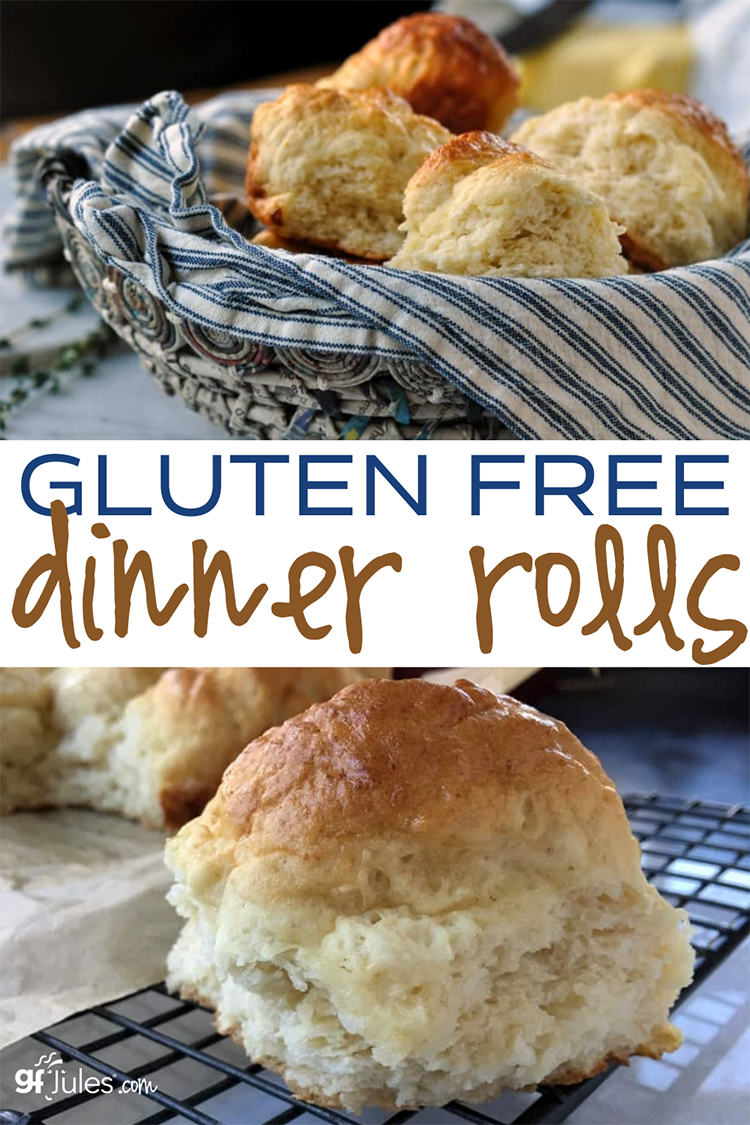
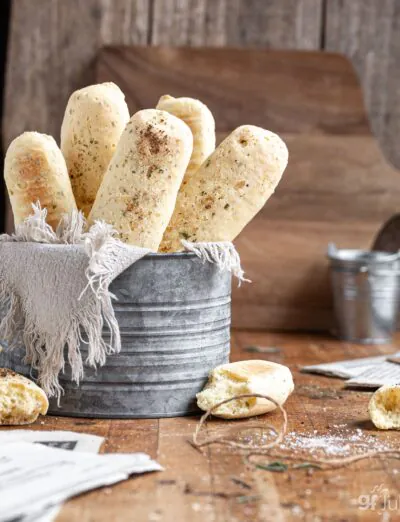
There are few universally loved recipes that scream “DINNER!” more than pull apart dinner rolls. You may think that heavenly soft, pillowy gluten free bread isn’t possible, but this gluten free pull apart dinner rolls recipe is here to prove you wrong — it makes quite possibly the best gluten free dinner rolls … ever.
Bold statement, yes, but once you try it, you’ll see why these airy gluten free rolls are what everyone’s talking about.
*NOTE: Please watch UPDATED RECIPE VIDEO to see changes to recipe if you’ve made the recipe before. See Recipe NOTES in Recipe Card, as well. Recipe changes were made to reduce the number of ingredients needed.
My barometer for a great gluten free recipe has always been one where everyone — even, or perhaps especially those who are not gluten free — loves it. After serving these gluten free pull apart rolls at Thanksgiving where my mother and I were the only ones out of 33 people who were gluten free, I knew this recipe was a winner.
They were gone in a flash and you know what? The GLUTEN rolls someone else brought were still left sitting there, looking lonely indeed.
Since then, I’ve heard from countless readers who have made this recipe and now swear by it.
Kristin Lee R.G.: These are literally one of my favorite things on the planet!!! And they are incredibly easy to make! I serve them and no one knows they are gluten (and dairy) free!! The first time you make them, it is helpful to follow Jules on her video while she makes them! So so easy and fool proof (if you use GF Jules flour).❤️
Geri H.: Love these! The best part is the leftovers, I turn them in to egg & bacon biscuits the next morning!
Perhaps my favorite comment about these rolls was from Raymond N.:
If you need to buy your way into Heaven, slip St. Peter one of these.
Did I mention they were heavenly? Just so you know!
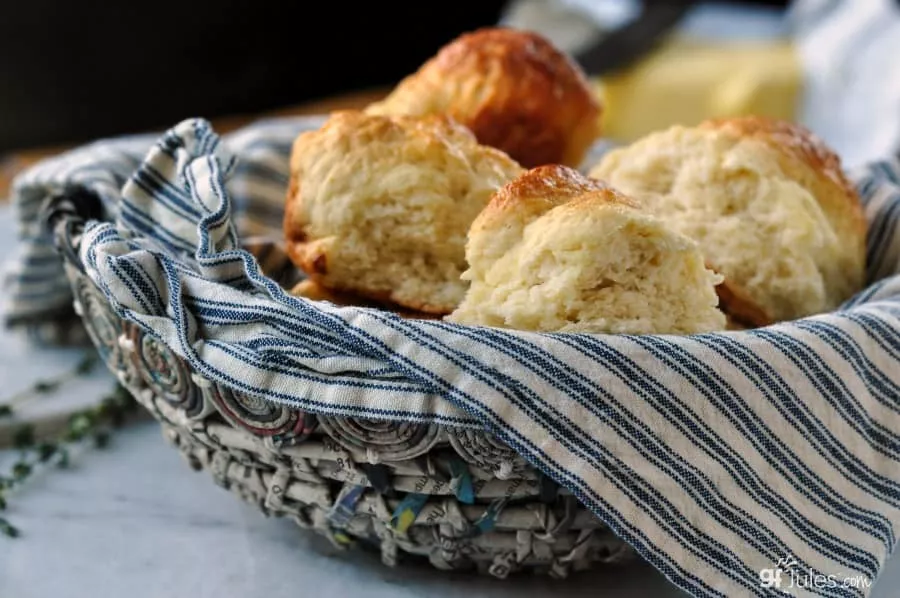
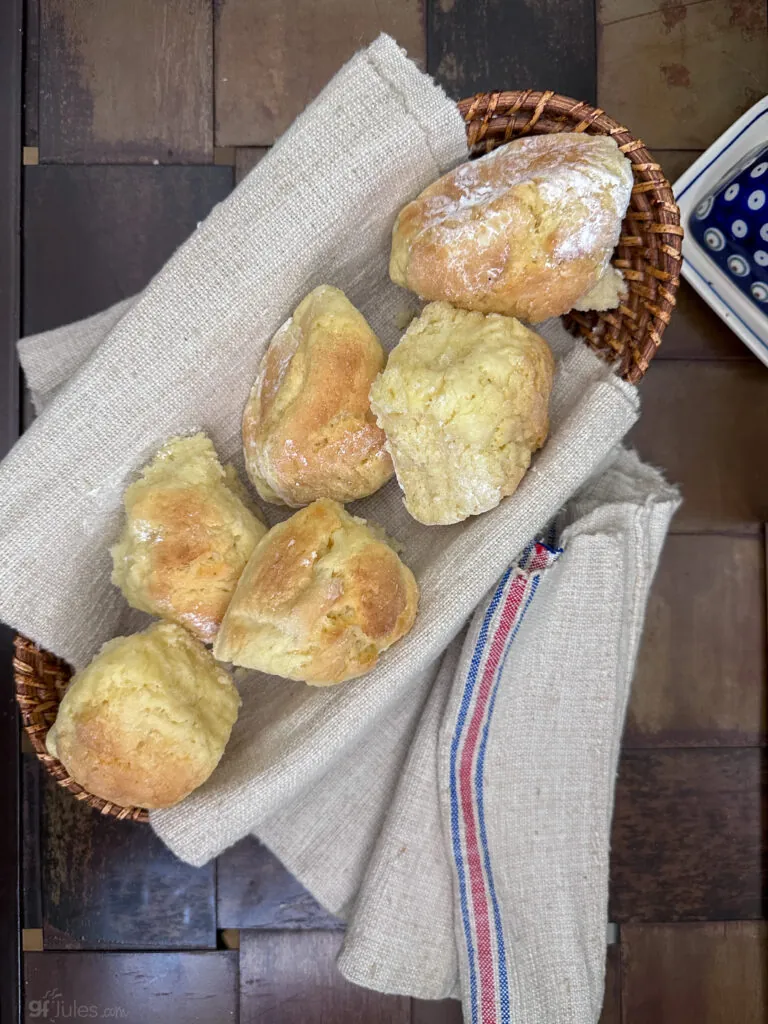
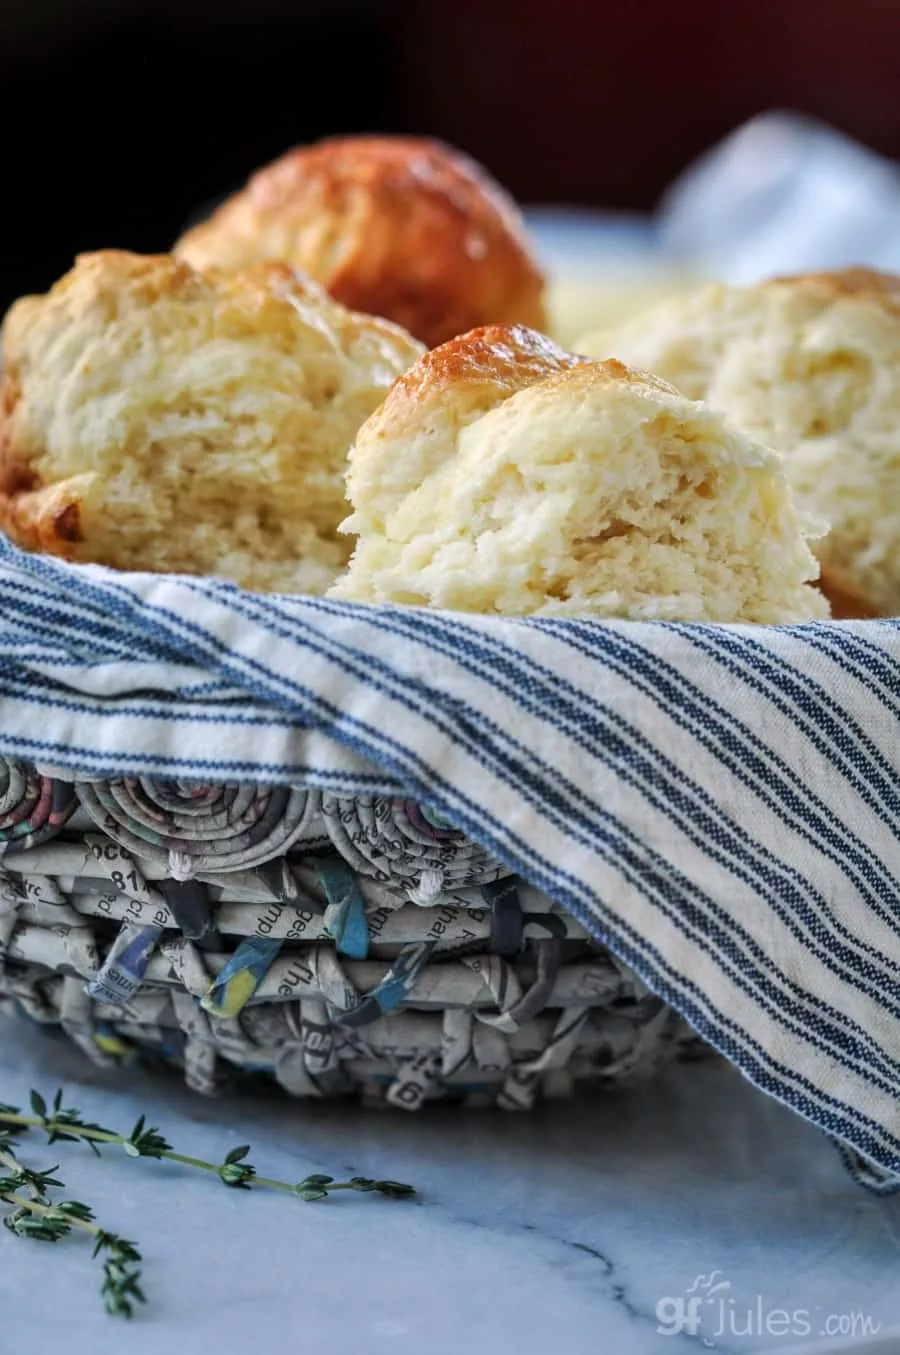
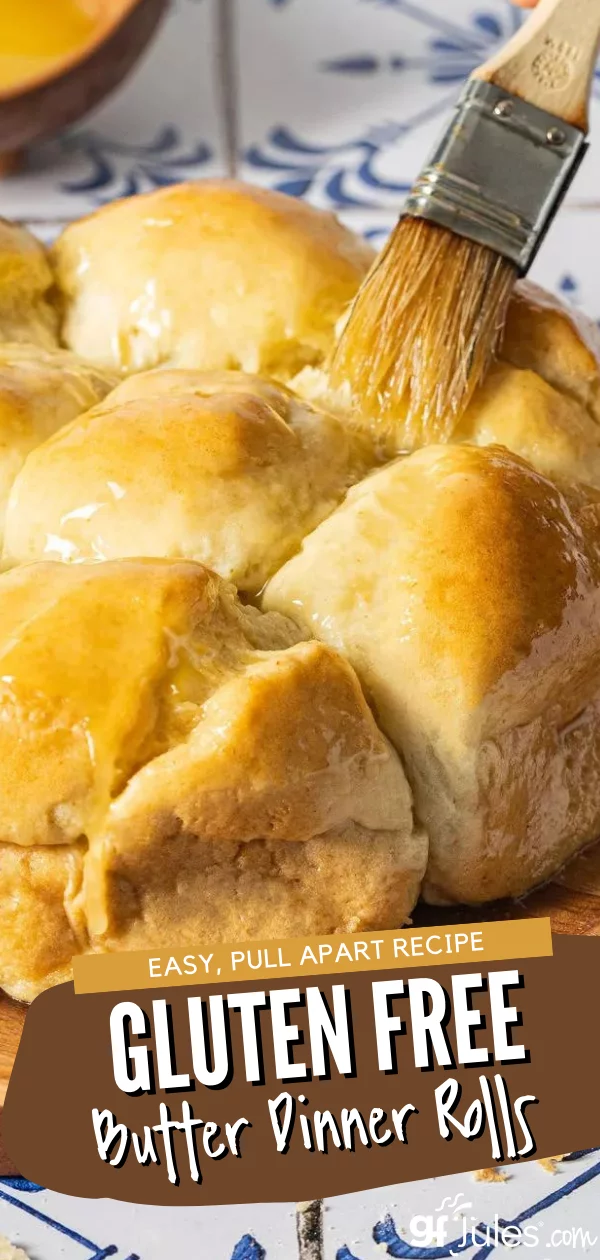
Seeing them in the pan or in a basket on the table means that something good is coming. That’s why I just had to share a recipe for these Parker House style Gluten Free Pull Apart Dinner Rolls with you — you deserve it! And none of us should be expected to go without these treasures just because we’re gluten free!
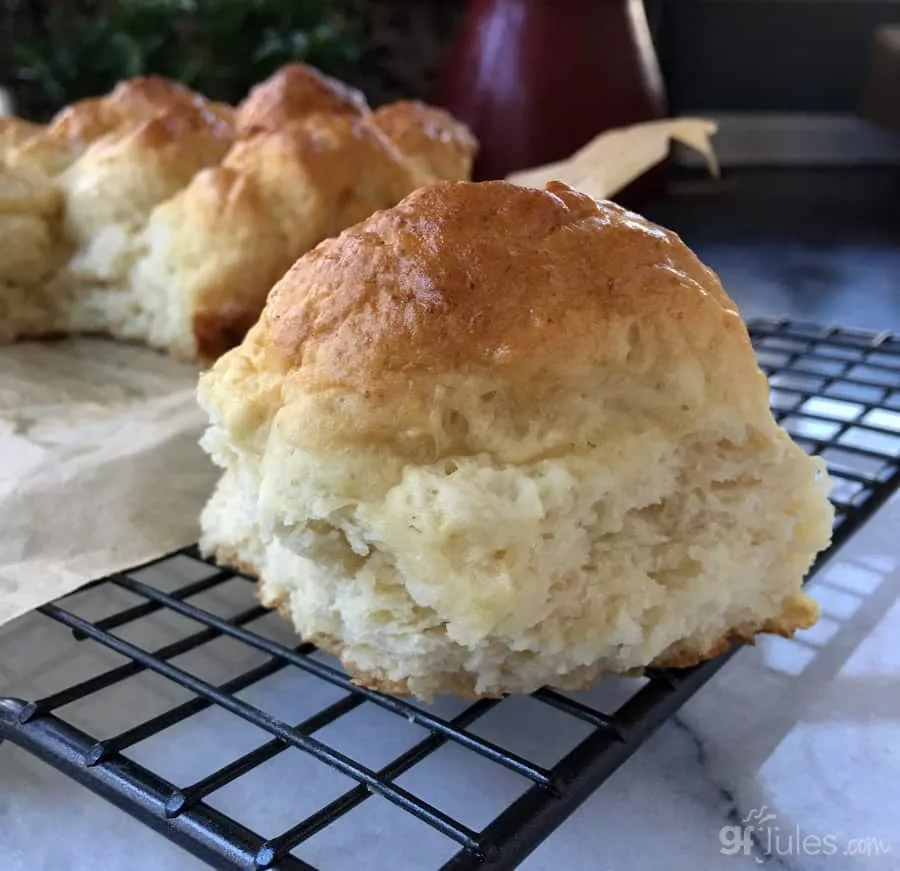
Looks delish, doesn’t it?
My dear friend Michelle over at My Gluten Free Kitchen was really the inspiration for this recipe, as her gluten-free rolls have made me drool every Thanksgiving since she published her recipe.
But Chef Patrick Auger is who I have to thank for taking my gfJules Flour and creating the foundation for this incredible recipe. He is a recipe developing machine, and luckily he loves using my flour! He has also been super excited about how fresh my flour can keep baked goods for days afterwards.
And lest you fear these are too difficult for you to make, check out my video showing how to make these soft and springy gluten free pull apart dinner rolls!
Here’s what one reader said about how valuable this video is:
Kristin Lee R.G.: The video made all the difference in the world in my willingness to try making them. It eased the intimidation factor (which was completely unwarranted) because they are so easy and nearly fool-proof! I just watched what you did, paused the video and did the same thing! They are incredible easy to make, take very little time and they are AMAZING! They are a staple around here, along with the bagels, the pumpkin chocolate chip muffins and coffee cake. And cinnamon rolls on special occasions! 😍
I’ve re-worked the recipe somewhat since he shared his with me, but the “bones” of the recipe are his, so thank you, Patrick!
How to Make Gluten Free Pull Apart Rolls
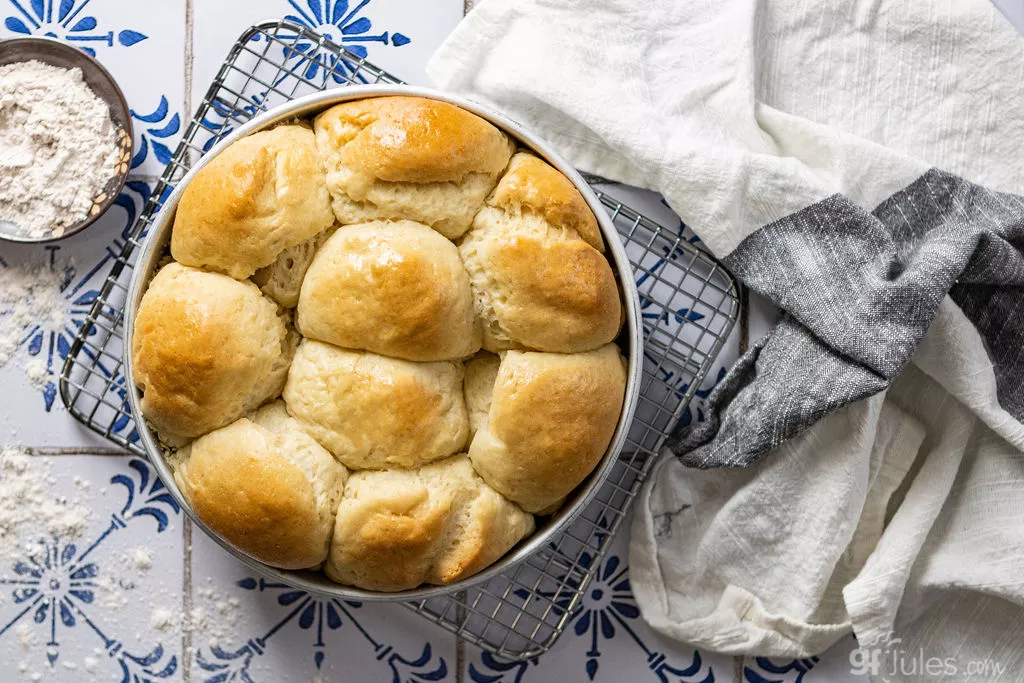
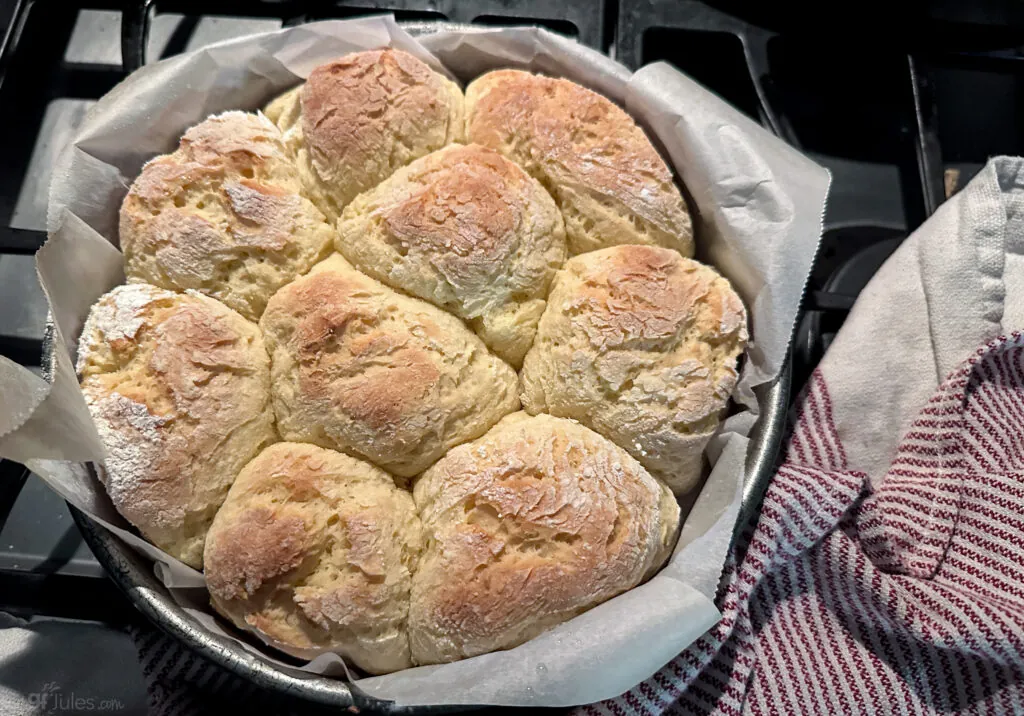
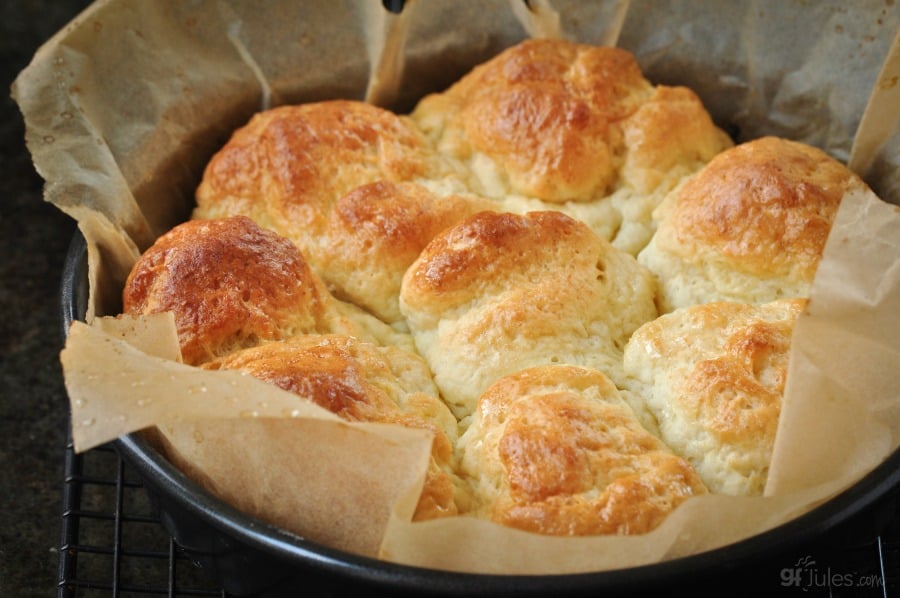
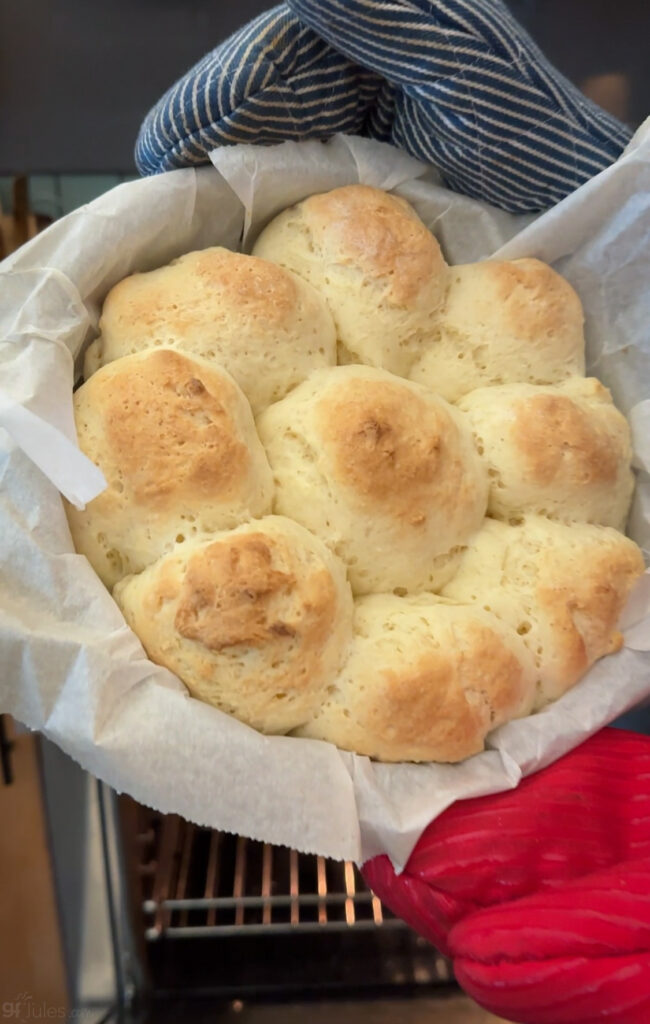
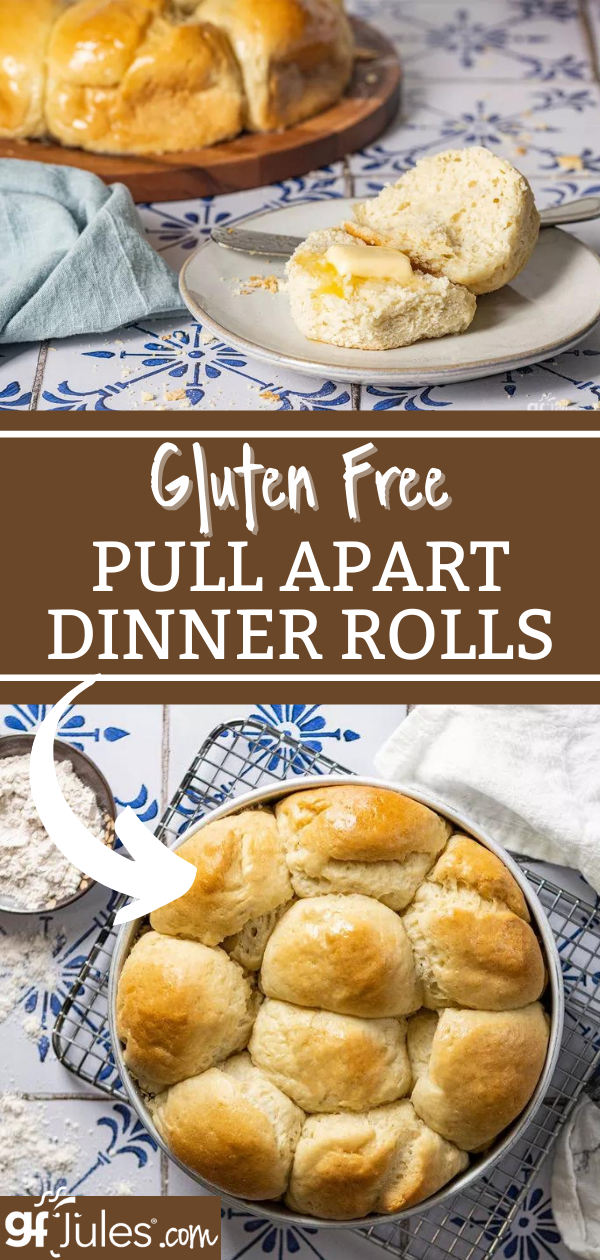
My favorite technique to make these gluten free pull apart rolls is to use an extra large ice cream / cookie dough scoop dipped in water before scooping the sticky dough. This recipe should make 9 large rolls.
Place in the pan with a little room to rise between them, but not too much. When the rolls can’t spread W I D E, they spread U P and get nice and lofty!

Then I go back and smooth the tops with a wet rubber spatula or clean, wet fingers.
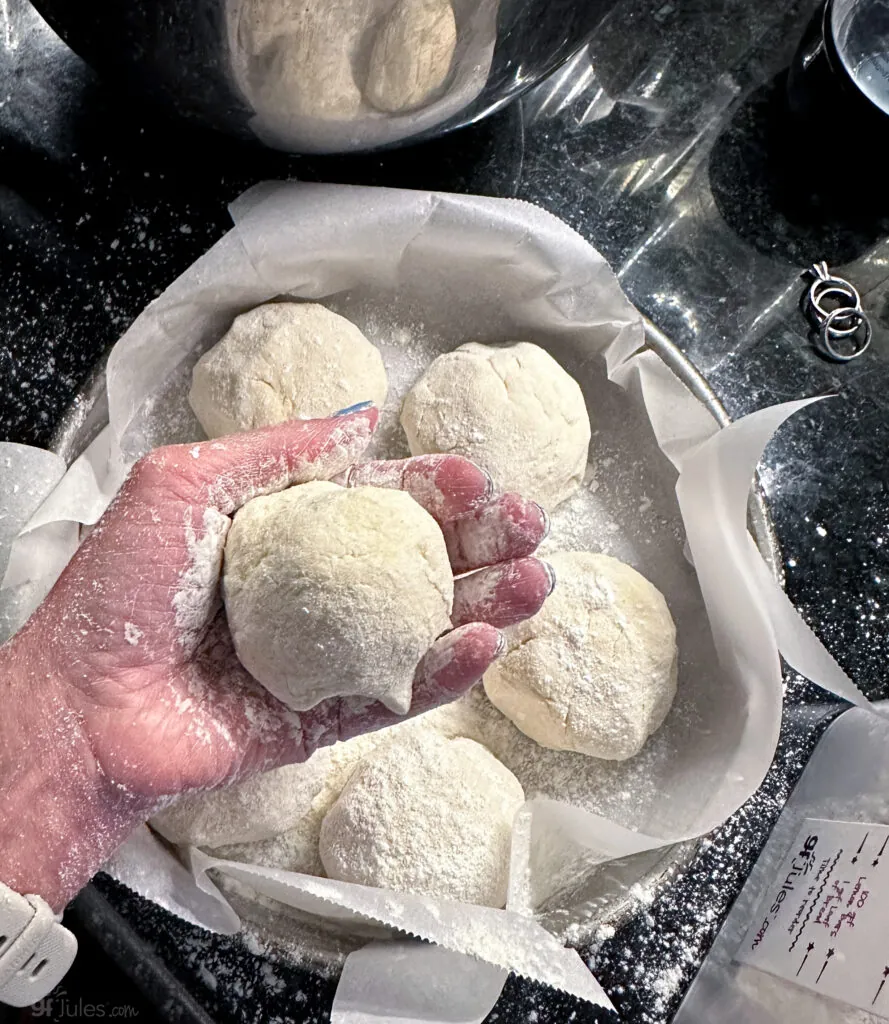
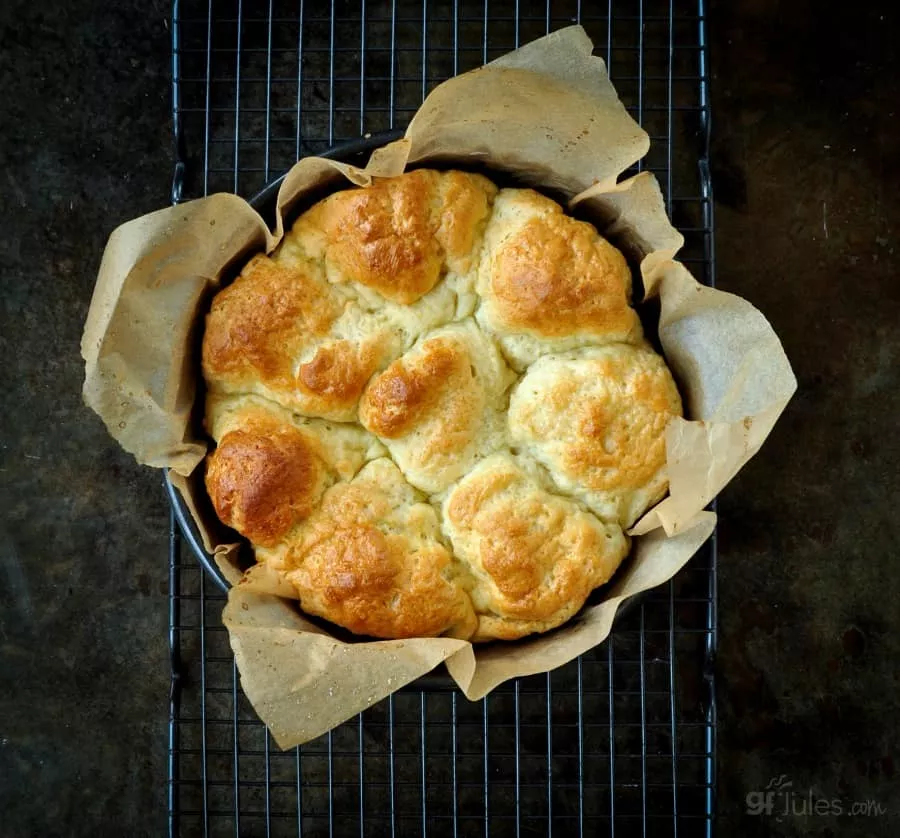
For even smoother rolls, take the balls and roll them in more gfJules Gluten Free Flour to smooth them well. You can also skip the ice cream scoop step and just spoon out handfuls of dough and shape by rolling in more gfJules Flour, as pictured.
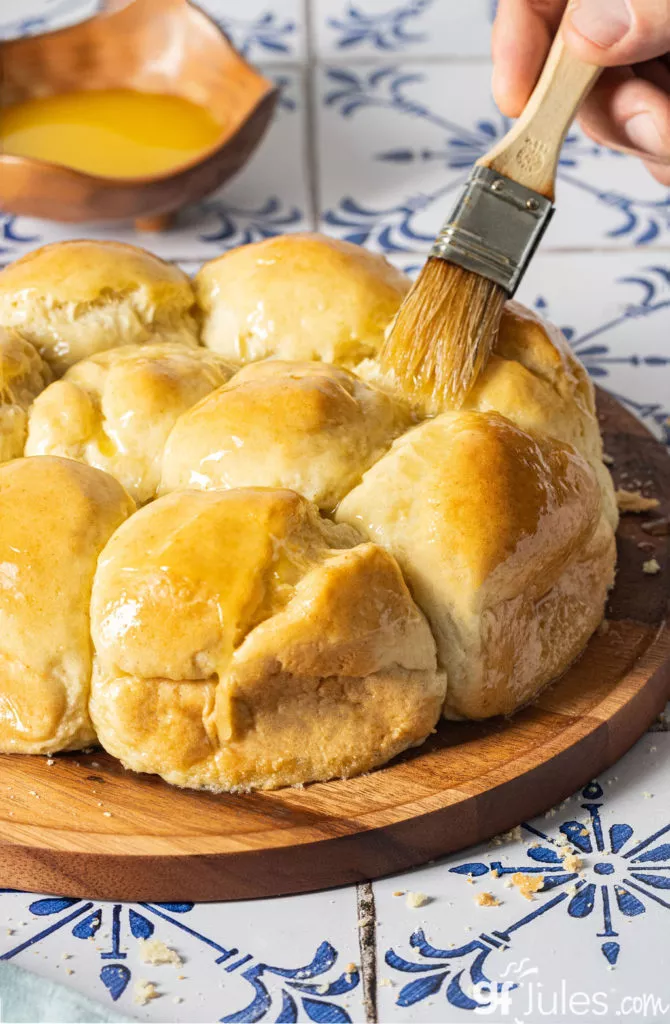
Before baking, brush on egg wash, oil, or milk for even browner tops.
The extra flour before baking leaves a nice floury edge to the rolls I also like, but that’s up to you!
In the spirit of sharing that is so ever-present this time of year, I share with you the Parker House style Gluten Free Pull Apart Dinner Rolls Recipe that has been passed around and shared from Michelle to me to Patrick and back again.
It’s fitting that these rolls are meant to be shared, too.
I published this recipe just in time for Thanksgiving a few years ago, so I’ve heard from tons of people who have made these rolls since then, and absolutely everyone has adored them.
They truly defy the definition of “gluten free bread” in every sense of the word. They are every bit as good as they look.
How Do I Bake Gluten Free Rolls at High Altitude?
If you live at high altitude, reader Diane C. offers these tips for making gluten free pull apart dinner rolls:
I used 7-Up the last time I made them. I know that’s not a new thing in baking yeast rolls, but the taste was just a bit better with the more subtle 7-Up than with the seltzer water and tonic water I’d tried before (maybe the brands of seltzer and tonic water I’d used?) I also made altitude adjustments. Nothing in the ingredients, but I reduce the temperature to 325 degrees and bake the rolls longer. We live at just above 6800 ft in elevation. It takes 40-45 minutes to bake them, but this was the only way to get them to bake evenly at this altitude. I took a batch to a potluck dinner tonight and people could not believe they are gluten free. I’ve been asked to bake them for another dinner tomorrow night and again for Christmas with friends. You’ve made me very popular with your wonderful flour blend. Thanks!
Reader Cydney C. adds these high altitude tips for this recipe as well:
Since it’s so dry here, (we sometimes get single digit humidity) I usually bag them before they completely cool, and the extra moisture keeps them for the next day. I put parchment paper between the layers so they don’t get soggy. Seems to work. We don’t have them for a long time, but I also usually undercook a few, package them the same as above, and pop them in the freezer for later use.
How Do I Make Gluten Free Rolls the Day Before?
And for those of you who want to make these gluten free pull apart rolls ahead of time — you’re an over-achiever! Just kidding — you’re actually super smart!
I’ve tried them a few different ways:
- baked fresh (best, of course);
- baked, cooled, wrapped and frozen (second best option);
- formed, refrigerated, risen then baked the next day (third best option)
Refrigerated Overnight Option:
For the overnight option, rise the rolls as the recipe specifies, then cover with oiled cling wrap then foil. Make sure it’s sealed well to keep moisture in, but don’t smash the rolls! Refrigerate for up to 24 hours. When ready to bake, remove to come to room temperature for 30 minutes while preheating the oven, then remove the foil and wrap before baking.
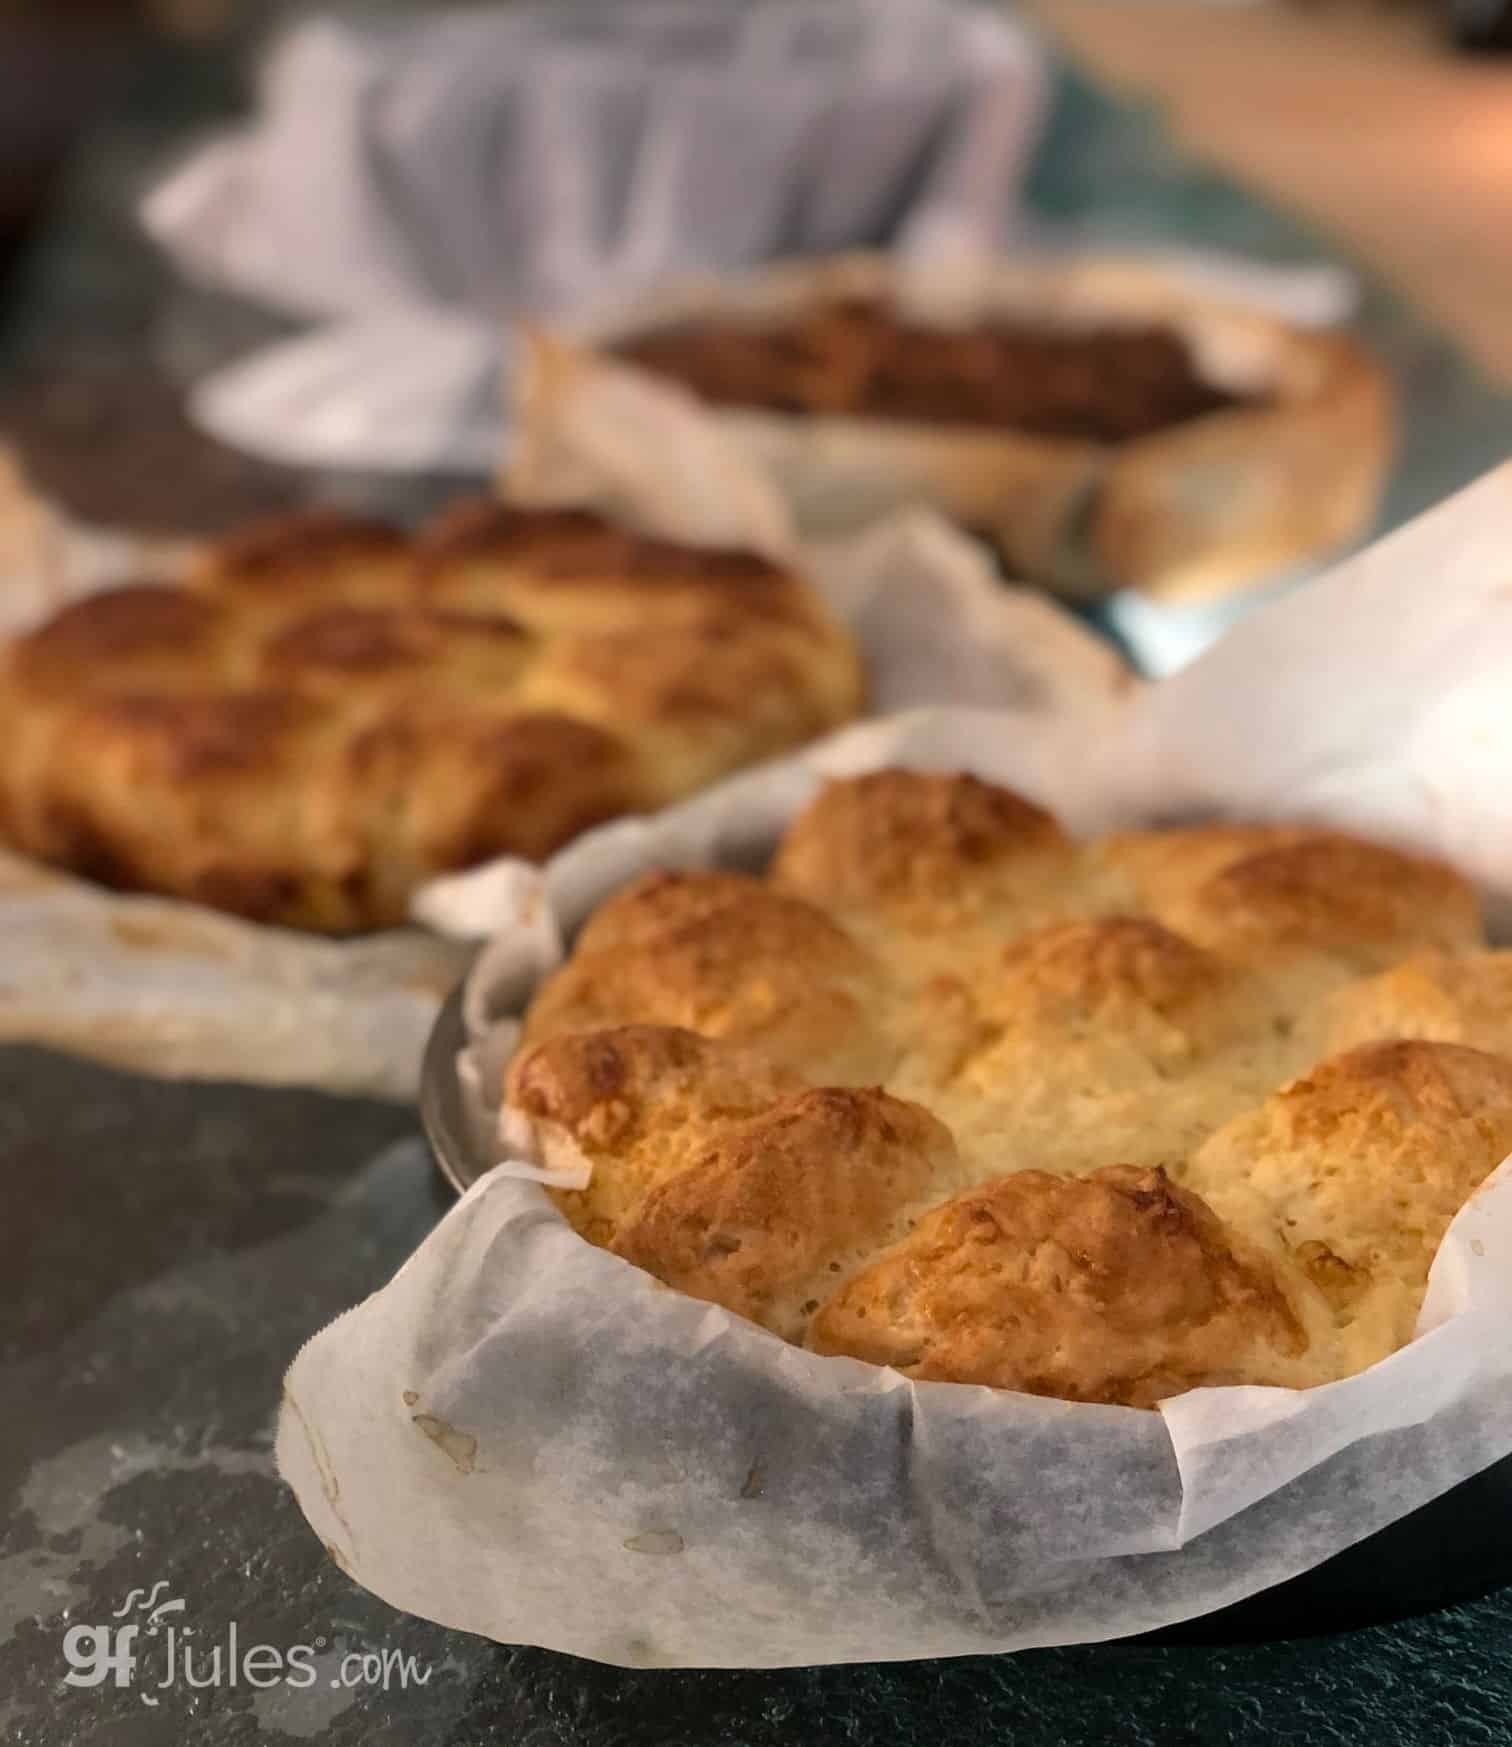
I think the refrigerated option would have worked better for me in this photo if I had a pan with higher sides — perhaps a springform. Wrapping the rolls in the pan and then refrigerating kept down the rise for me because the wrap was over the low sides of my pan, and thus too tight on top of the pan.
See my photos below … rolls in that order, front to back (baked fresh in front; baked then frozen in middle; refrigerated overnight then baked in back):
Reheat Gluten Free Rolls from Frozen Option:
If you decide to bake these rolls ahead of time and freeze them to serve later, allow time for the rolls to FULLY cool first. Wrap in two layers of aluminum foil then in two layers of plastic wrap, then place the wrapped rolls in a freezer bag in the freezer.
There are a couple options to reheat. Either set the rolls out from the freezer the night before to let them thaw, then warm them for a few minutes in the oven before serving (follow my instructions below). OR, reheat the rolls straight from the freezer.
Either way, when reheating in the oven, remove the plastic wrap and loosen the foil enough to spritz or dampen the top of the rolls with water (this will create steam when heated). Re-close the foil around the rolls and place them in an oven preheated to 400F for 10-15 minutes, or until they are fully warmed to a temperature of 190F and heated through.
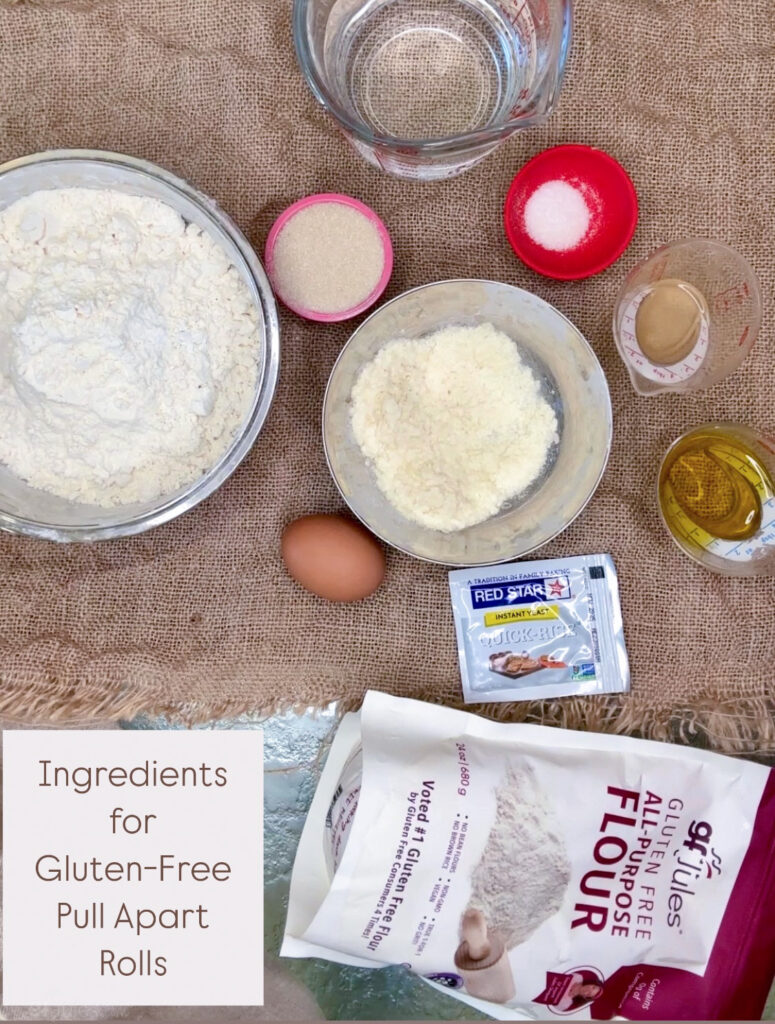
Gluten Free Bread Ingredients
The recipe is surprisingly forgiving. Even for those who haven’t baked much (or any) gluten free bread before. I’ve heard from enough of you now to know that it really is possible to follow these directions and bake delicious gluten free pull apart dinner rolls without a lot of stress or worry, so don’t let the idea of it stop you from trying!
And I know many of you have written in that you are lacking one ingredient or another, so I’ve tried to give you lots of different ingredient options (see notes in recipe card, as well). One that you cannot switch without experiencing major differences in the dough and the finished product: the gfJules Flour. It is THE critical ingredient because it’s the flour that holds the bread together.
It’s the flour that the recipe was created with and around. In gluten free baking, gluten free flour is all different; it’s not like regular wheat flour where one brand is virtually identical to another. Gluten free flour blends are all totally different, which means switching them up in recipes will yield totally different results.
Other Ingredient Options for Gluten Free Pull Apart Rolls
That being said, for many other ingredients listed, I’ve provided alternatives where I can in order to give you options because I really want you to be able to make this recipe. It’s that good!

If you’re having trouble finding instant or quick rise/rapid rise yeast, don’t worry. You may use active dry yeast in its place. Simply add it to a portion of the liquids called for in the recipe to proof first before adding to the rest of the mixture. (Read more about yeast and how to use active dry yeast in my article on yeast linked here).
Check out reader Tim Viets’s gorgeous gluten free Pull Apart Dinner Rolls made with my gfJules Flour and active dry yeast using this method (photo above).
Also, you CAN use actual mashed potatoes in place of dry potato flakes. Check out the recipe notes below for how to make that substitution.
I’ll leave you with one more reader’s comment:
Made them, loved them. Used the last one roll to make a sandwich out of. Been over 2 years since I’ve had a sandwich. Thank you gfjules. ~Beth M.

Can I Use gfJules Bread Mix to Make Gluten Free Pull Apart Rolls?
One more quick note: after many reader questions regarding using my gfJules Bread Mix instead of gfJules Flour in this recipe, I’ll add that you MAY make this substitution.
To use gfJules Bread Mix instead, measure out the bread mix as if it were flour, do not simply dump the whole mix into the recipe.
Gluten Free Pull Apart Dinner Rolls
Gluten Free Pull Apart Dinner Rolls


Ingredients
- 2 ¾ (371) cups (grams) gfJules® All Purpose Gluten Free Flour****
- 2 (4½) packs (tsp) quick rise instant yeast (e.g. Red Star® Quick Rise)**
- ¼ (56) cup (grams) granulated sugar
- 1 (5) tsp. (grams) sea salt or kosher salt
- ¼ (16) cup (grams) instant plain gluten-free mashed potato flakes (Idahoan® Original Mashed Potatoes; or Edward & Sons™ Organic)***
- 1½ cups seltzer water, club soda, or 7up/ginger ale OR 3/4 cup bubbly liquid + 3/4 cup milk of choice, dairy or non-dairy*
- 1 egg room temperature OR favorite substitute {I like using 3 Tbs (50 grams) aquafaba}
- 3 Tbs. extra virgin olive oil or other mild cooking oil
- 1 tsp. apple cider vinegar or lemon juice
- 2 Tbs. butter or non-dairy alternative, melted, for brushing on rolls
Instructions
- Spray one 8" or 9" round cake pan or pie plate lightly with cooking spray then line with parchment (makes it easier to remove the rolls). Bring all ingredients to room temperature.
- In a large mixing bowl, whisk together dry ingredients: gfJules Flour; yeast granules**; sugar; potato flakes; and salt.
- In a separate bowl, stir egg to mix. Add to it liquid ingredient*, olive oil and apple cider vinegar, then pour into the dry mixture while stirring or using the paddle attachment on a stand mixer at low speed.
- Increase mixing speed to medium and continue stirring for 2-3 minutes. The dough will become fluffier but will still be thick.
- Using a 2 inch scoop, place 8-9 dough balls into the prepared pan: one or two in the middle of the pan and the others evenly spaced around it. I find it is easier to remove the dough smoothly if you first wet the scoop with water or oil well before filling with dough. OR roll each ball gently in more gfJules Gluten Free Flour first.
- If needed, dip your fingertips or a rubber spatula into warm water and smooth the tops of the rolls, continuing to re-wet as needed so the dough doesn't stick to the spatula or your fingers.
- Cover lightly with parchment paper and allow to rise for 20 minutes. If your kitchen is cool, a good place to rise these is to turn your oven on to 200ºF and then turn it off when it has come to temperature. Place the rolls in the oven after it is turned off.
- Remove the rolls after rising in order to preheat the oven to 450°F. Brush rolls with 1 tablespoon of melted butter.
- Once the oven has come to temperature, place the rolls (uncovered) into the oven and reduce the oven temperature to 325°F convection. If your oven doesn't have convection, use 350℉ -- the rolls will not be as browned.
- Bake for approximately 20-22 minutes. The tops of the rolls should be golden, a toothpick inserted into a roll should come out with only dry crumbs, and the internal temperature of the dough should be 195°F or higher.
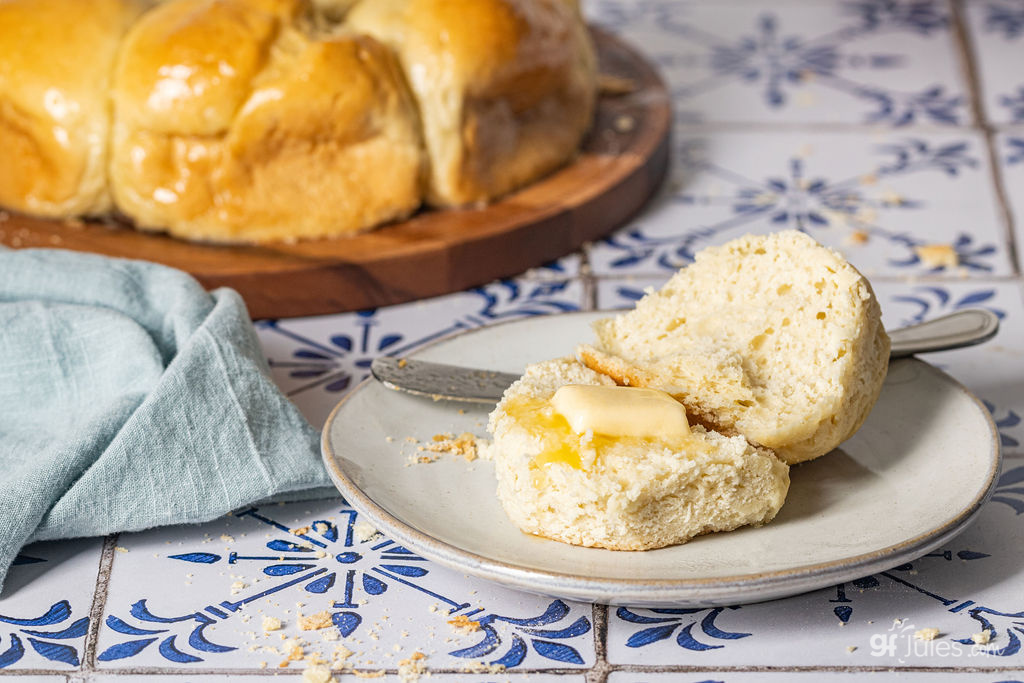
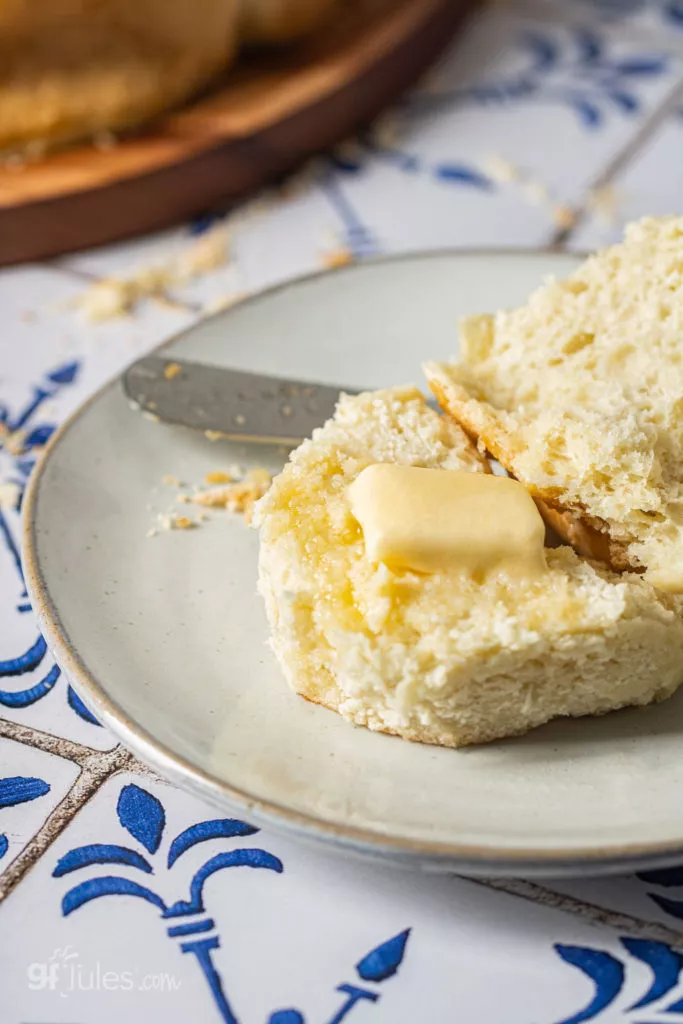
- Once fully cooked, remove rolls to cool in the pan on a wire rack, and gently brush on remaining 1 tablespoon melted butter just before serving. Serve warm.
Video
Notes
** Please keep in mind that nutrition information provided is per serving, which may vary. While we have taken care to provide you with the most accurate nutritional values possible, please note that this information may differ significantly depending on the exact ingredients and brands that you choose to use to make this recipe. Additionally, where options are given for ingredients, the resulting calculation may include all ingredient options instead of only one per line, skewing the totals significantly.
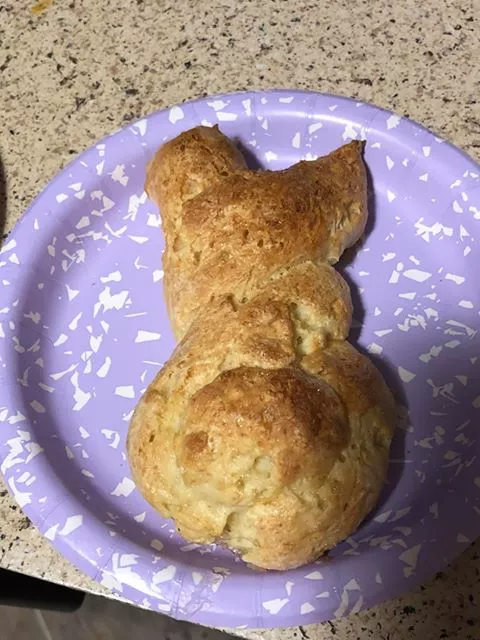
Reader Catherine Hopkins got creative with this recipe and my gfJules Flour and shaped these buns into an adorable bunny for Easter! How cute!!!
I hope you also get to try lots of recipes with my gfJules Flour and enjoy soft, never gritty recipes that last long after they come from the oven.
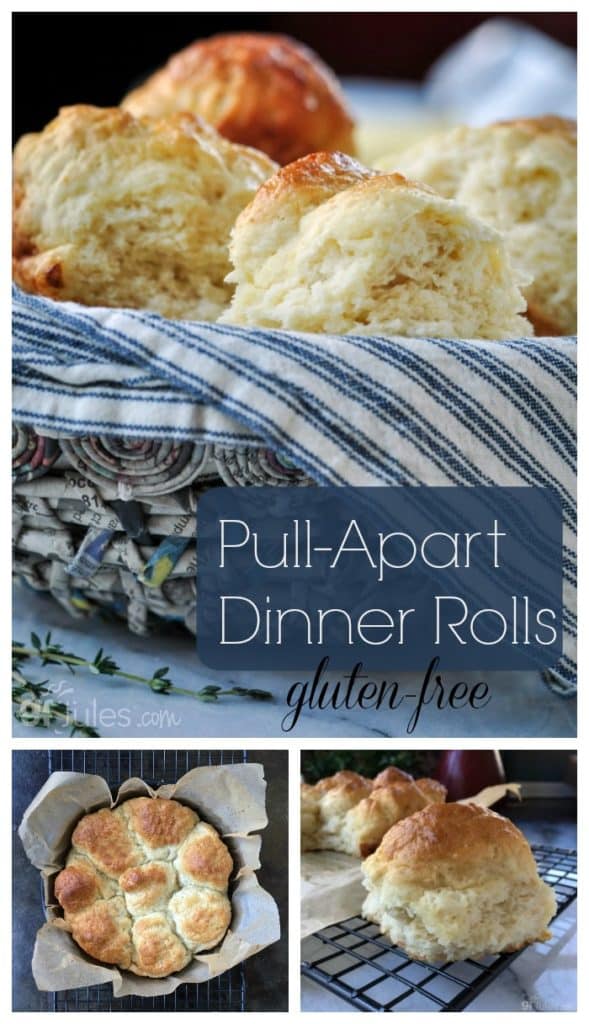
Pin for later!


Awesome and easy to make! Thanks for another great one, Jules!
Can I eliminate the sugar? Thank you!
Hi Rosemary,
You can eliminate the sugar, but you’ll still want to add a little something to feed the yeast. Can you add a bit of honey or agave or an unrefined coconut palm sugar? There is a touch of sweetness to these rolls which is nice.
~jules
We let the rolls rise and bake in muffin pans, they were golden and crispy on the outside and soft on the inside. We will definitely make this one again.
Oooooh I like that idea, Paula! So glad you all loved the recipe! I’ll have to try it in muffin pans sometime!
~jules
This is the first time I have used your flour or recipes but this is the BEST gf recipe I have ever made in 5 yrs. They are delicious, soft, fluffy rolls. I can’t wait to try more recipes. And so easy to make!
That is fantastic to hear, Kim! I’m so glad you didn’t give up on gluten free recipes and products ever tasting great. No compromises needed! May all your baking from here on out be happy!
~jules
Thank you! These are the best gf bread!/rolls I ever had since being Gf. I found that spraying a little cooking spray on scoop the dough come out easy and top are nice and round with no jagged tops to smooth. My husband said they were light fluffy.
Easy to make it’s a keeper.
Oooh nice tip, Patty! Thanks for sharing!
So glad you both love these rolls – they are a favorite in our house, for sure!
~jules
I can’t wait to try this recipe. I love Jules gf flour mix . I couldn’’t believe how much better my cookies were. They stayed soft until they were gone. My baked goods will all be made with Jules gf flour from now on. Thank you so much for this wonderful flour Jules.
Oh Shirley, I’m so happy that you’ve tried my gfJules Flour and are loving it! It does keep things fresh longer and makes recipes so much easier to make. I can’t wait to hear how you love these rolls, too!
~jules
So delicious!!! Great recipe!! It was a hit with my family!!
Oh my, what a wonderful gf Dinner Roll – everyone says these are as good any roll – BUT THESE ARE DELICIOUS! Made just as instructed in recipe and these little GEMS turned out just perfect! Thank You for all your Hard work – my 13 year old granddaughter is learning to deal with being Celiac – you have taught us gf does not have to taste like cardboard – Thank You! Happy Holidays! Yes we did use gfjules All Purpose Flour.
Oh Cindy, it makes me so happy to know that your family isn’t settling for crummy tasting gluten free. Your granddaughter will grow up being both aware of avoiding gluten and choosing great gluten-free! Wishing you all a very happy holiday as well!
~jules
Is there a way to rate this 10 stars? I made these rolls for dinner for the first time and I was amazed at the taste and texture of the rolls. They were light and airy and had a great taste. I have several family members who are gluten intolerant or celiac and they were all equally impressed. I have tried numerous brands of GF flour and I will be a repeat customer for sure.
Oh Cheryl, I’m so happy to hear that! It’s such a sweet baking victory to be able to make amazingly soft gluten free bread that others want to eat, as well! Congratulations and may all your baking from here on out be happy!
~jules
I’m an ass…….. they came out perfect….. if I knew how to delete that stupid comment and one star I would ….. *walk of shame*
LOL Nicole you really made me laugh out loud with this comment! I’m so glad you baked them off and let the magic happen. Sometimes gluten free doughs can be disconcertingly wet (although I avoid using the term you used – not very appetizing!), but the end result is what counts. Thanks for coming back to let me know they turned out perfectly, despite their humble beginnings. 🙂
~jules
Followed this exactly, used a scale ,the whole schebang. They came out like gooey snot balls. I’m pretty bummed out.
Hi Jules.
I am new to the gluten free scene. My daughter-in-law is gf as well. Wanting to make the pull apart rolls for Christmas. I have a question. Do I need to weigh the ingredients in grams? Looking forward to the pull apart rolls. Thank You!
Hi Beth, you do not need to weigh the ingredients, but that’s one way to be sure you’ve got the exact amount you need. Check out this recipe for more baking tips: https://gfjules.com/converting-recipes-gluten-free-flour/
Also, make sure you have my gfJules Flour on hand because this recipe turns out beautifully with that blend, but not so much with other mixes.
Let me know if you ever have other questions – I’m here to help!
OH, and here’s another great article for you since you’re new to GF: https://gfjules.com/going-gluten-free/
~jules
Making these for the third time since thanksgiving! Life changing! I can’t thank you enough for these!
Oh my gosh, these look so PERFECT! I have to give them a try! 🙂
Yes! They’re a huge favorite – I hope you love them too!
~jules
Mine turned out very dense/heavy. Could I have overworked the batter in the mixer?
Those look so flaky. The potato flakes are an interesting add to these rolls which I bet adds a fab texture.
It really does add to the nice chew in these rolls, Kortney. Hope you enjoy the recipe!
~jules
Hi, Jules –
I have your flour on hand and will be getting more in the future. Great product!
Made these in the past with Michelle’s flour and they were a hit then; I’m sure these will be even better. My Christmas dinner problem is quantity. Can this recipe be doubled or even tripled without a problem?
Any further suggestions re keeping them fresh for a day or two?
Thanks.
Hi Pat, so glad you’re loving my gfJules Flour! I actually just doubled this recipe for Thanksgiving and they turned out fantastically, so I know that’s will work just fine for you. I have a 7 qt. mixer and it wouldn’t have held any more dough if I had tried to triple it, so maybe make a double and then a single batch? Happy baking!
~jules
I made these and they looked decadent!! I was disappointed that they had a funky aftertaste. I used better batter and pellagrini sparkling water. They were ok with jam on them for breakfast. I was a bit disappointed.
I am not giving up on this will try water and lemon next time. I have always had success with yoir recipes!!
The variable here is Better Batter since that blend is quite different from mine. Usually you need more liquid when using recipes calling for Better Batter, and perhaps that was the aftertaste? I have only tried this recipe with my gfJules Flour, so it’s hard to tell, but definitely there’s no funky aftertaste with it. Glad you’re not giving up – it’s a great recipe!
~jules
I made these for the first time today. I did not have club soda or sparkling water so I used water and lemon juice. They were so delicious! Even the gluten eaters in my family loved them!
That’s so wonderful, Rachel!!! We made them again for Thanksgiving as well, and people preferred them over the gluten rolls people brought. That’s a win!!!
Hope you had a great Thanksgiving!!!
~jules
I made these for Thanksgiving hoping they would be as good as yours. For some reason they came out with more of a biscuit texture. They are delicious but nothing like yours. I don’t know what I did wrong. I would definitely try making these again in hopes they would be like yours.
Hmmmm. Did you make any substitutions? Did you use yeast?
~jules
No substitutions. I followed the recipe. I used yeast
Did they rise like my pictures show? It’s odd that with yeast they would turn out biscuity – makes me wonder if the yeast was totally effective. They should have smelled yeasty and had an open texture and not have been dense at all.
~jules
They did rise and they smelled yeasty. They looked very much like yours going into the oven and when they were baked they looked like yours. They just came out very dense and crumbly. I will try again. Thanks for trying to help me figure this out.
Perhaps next time leave them covered longer in the oven and be sure not to overbake. If they were crumbly, it’s likely they were overbaked or the oven was too hot. Good luck next time!!
~jules