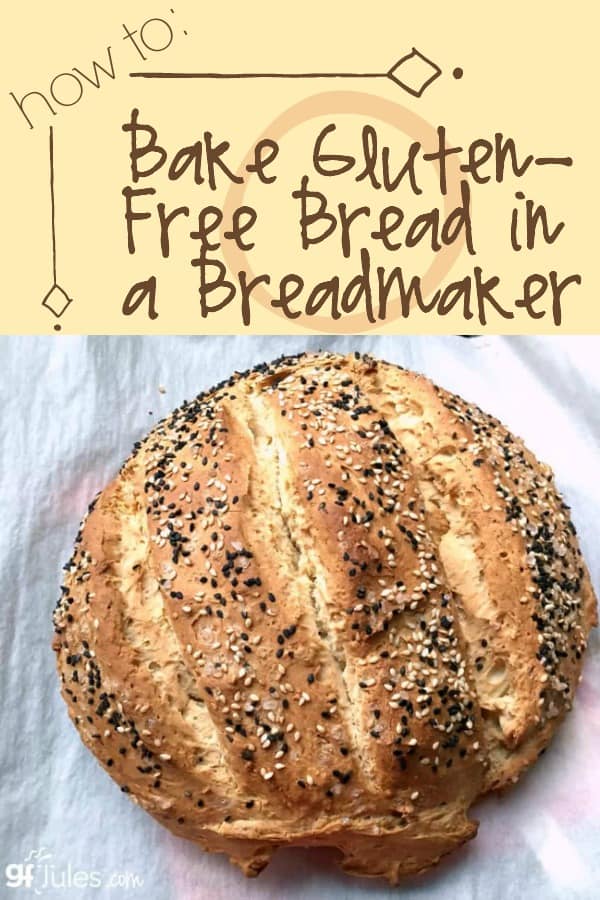
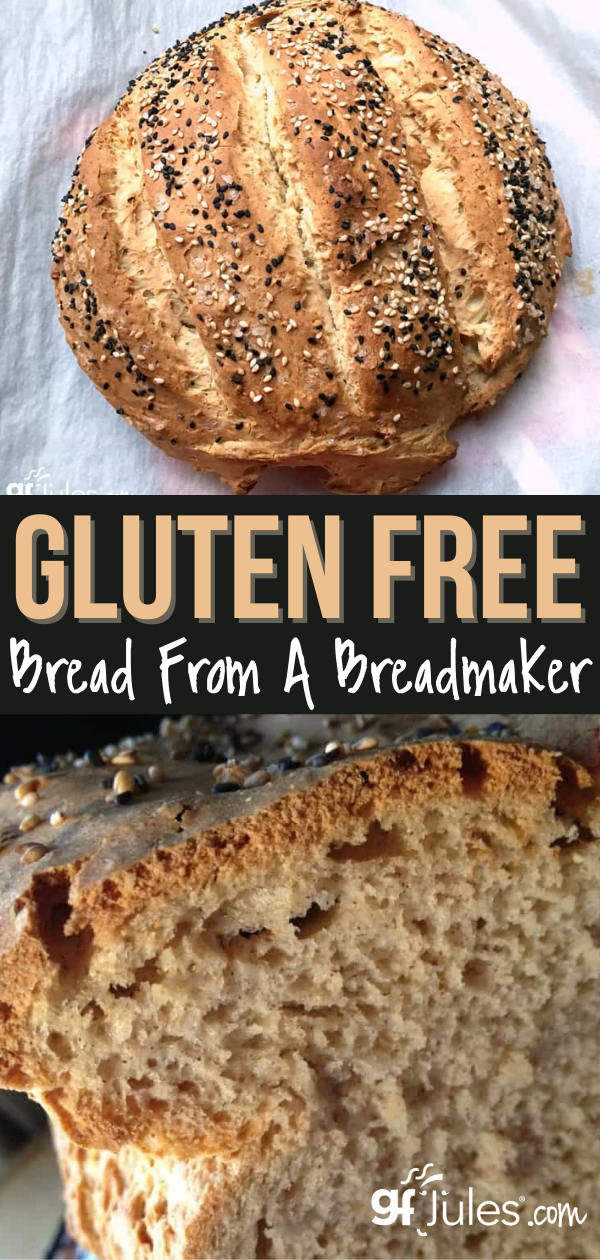
Baking Gluten Free Bread in a Breadmaker
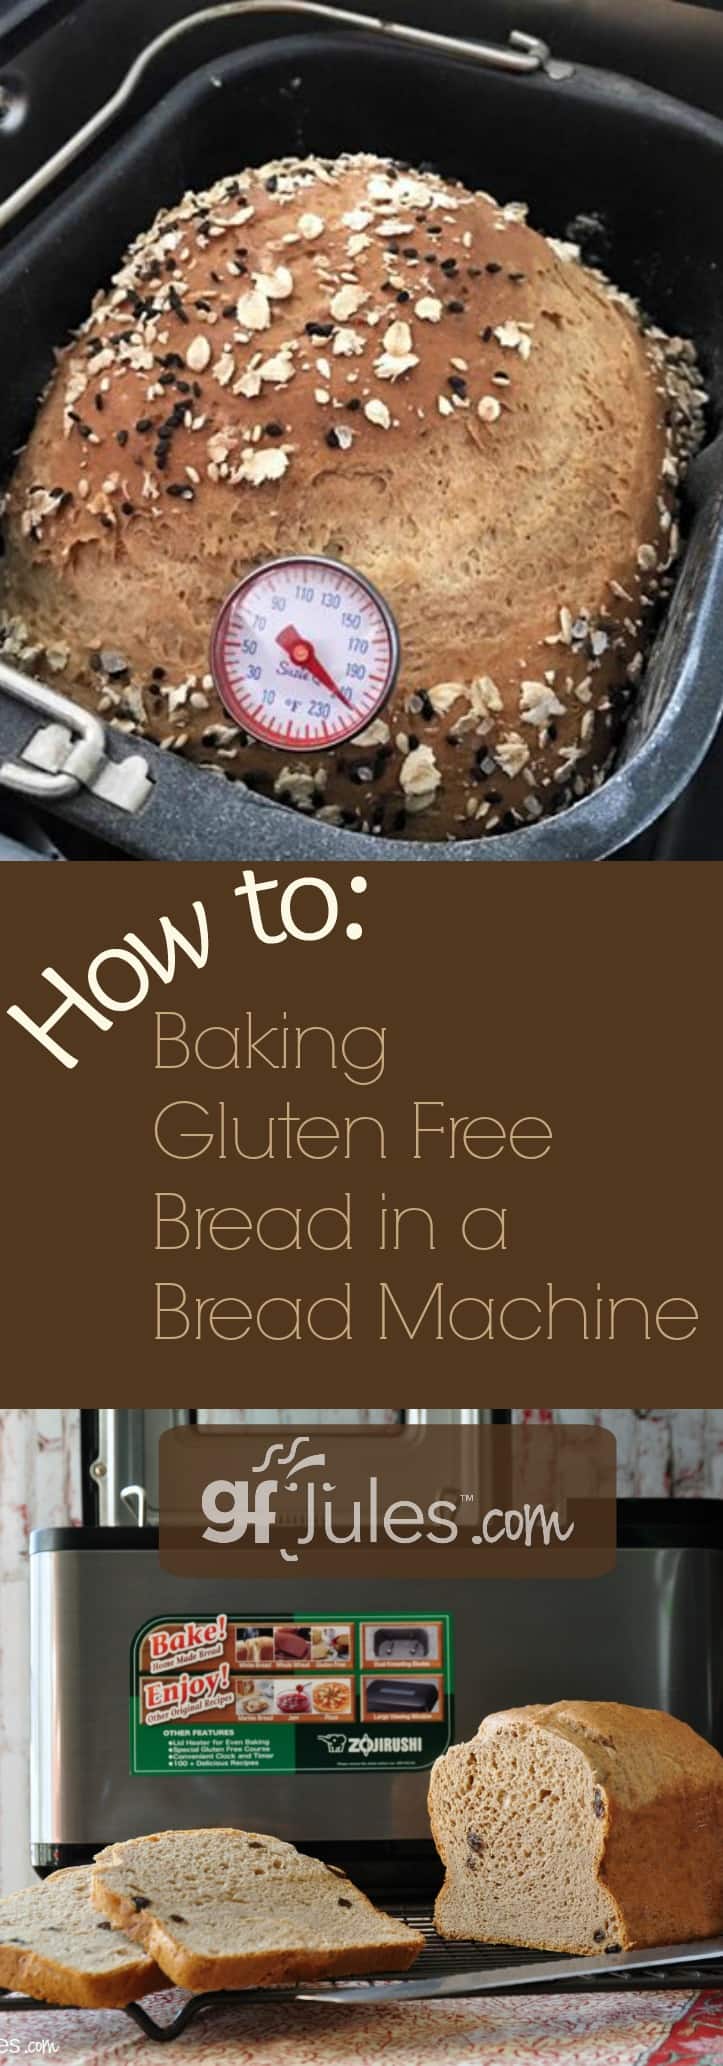
Baking gluten free bread in a breadmaker can be an easy entree into baking gluten free bread from scratch. Add the ingredients, push the button and GO! Let the bread machine do the heavy lifting.
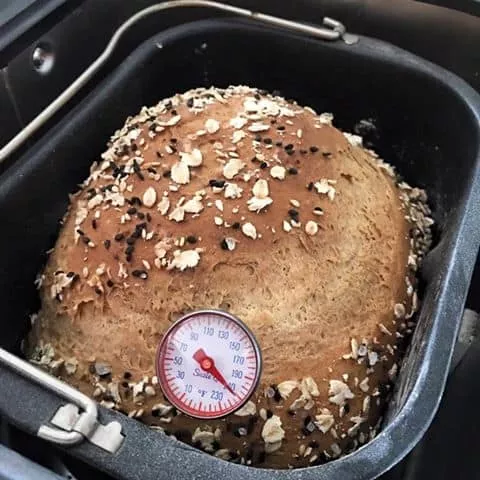
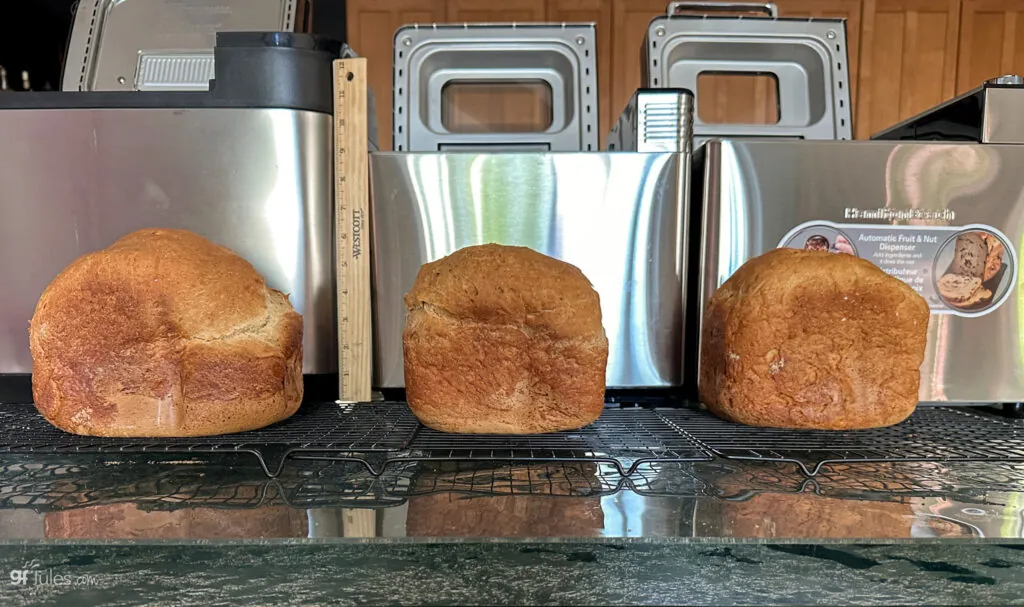
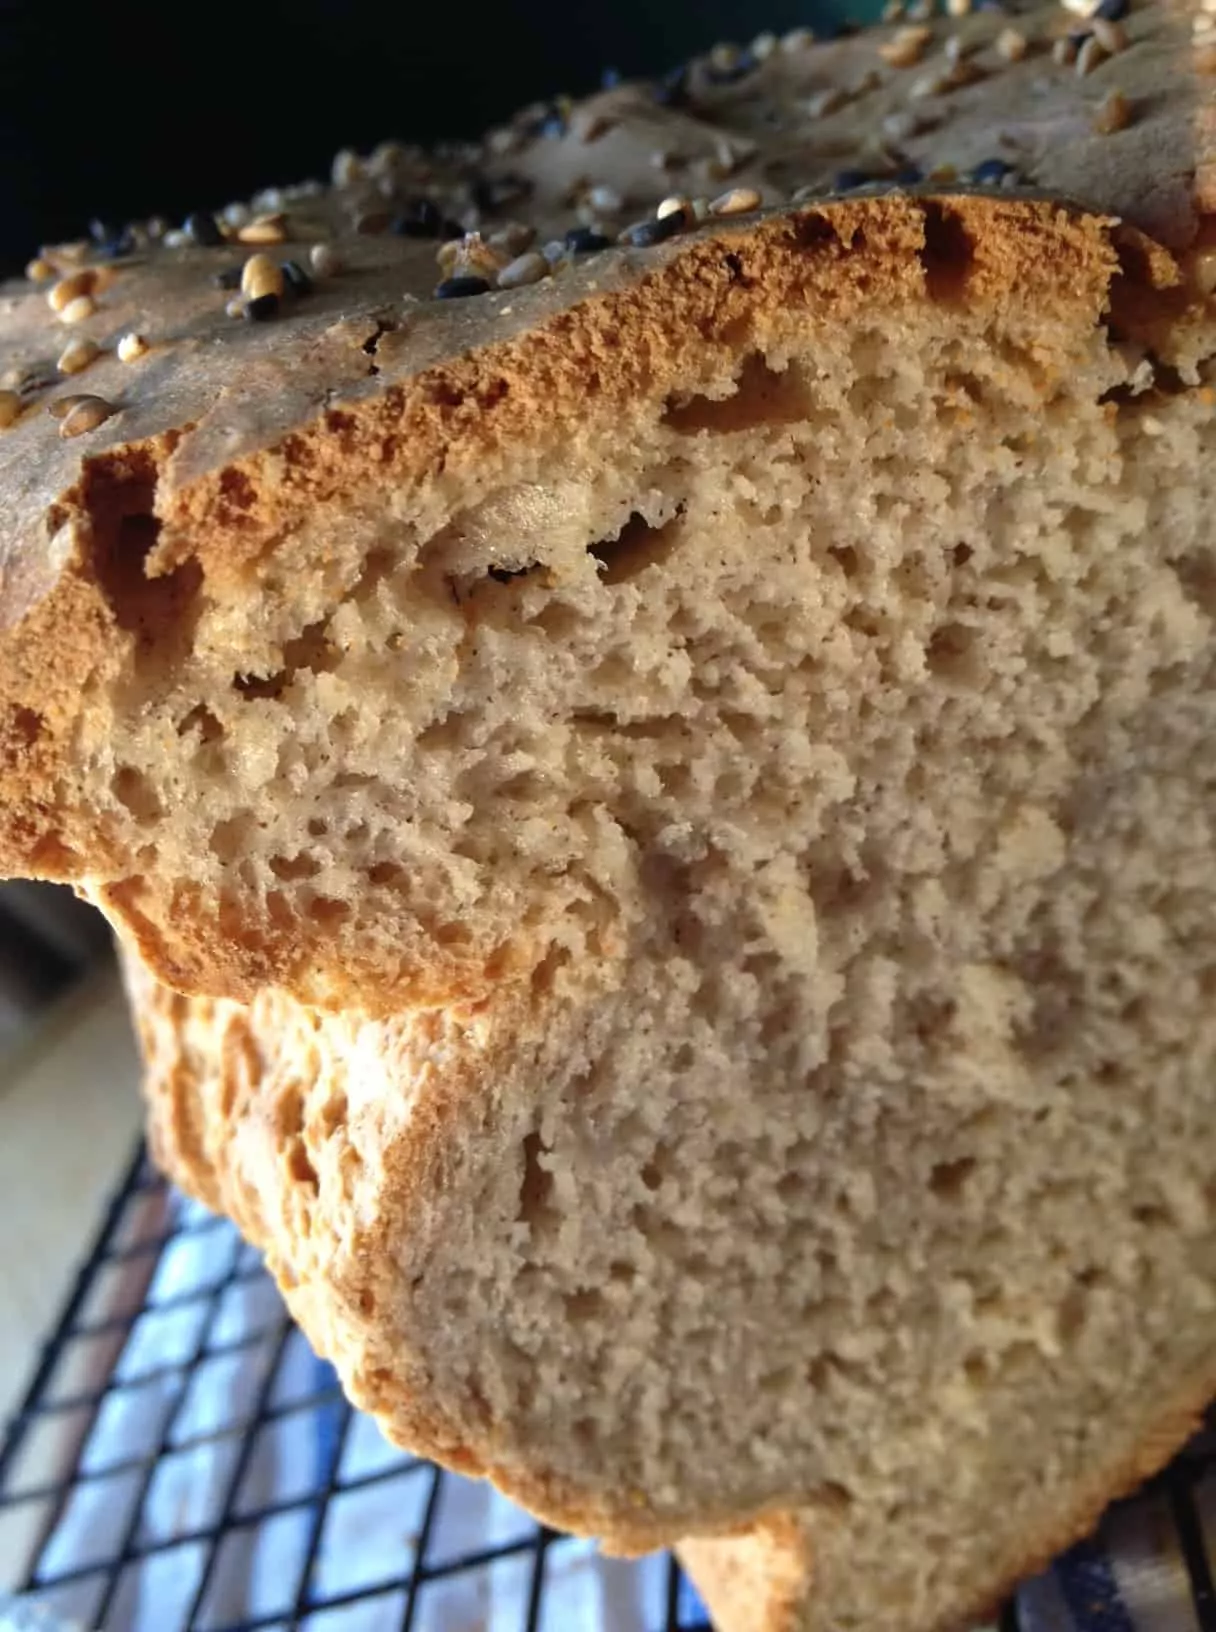
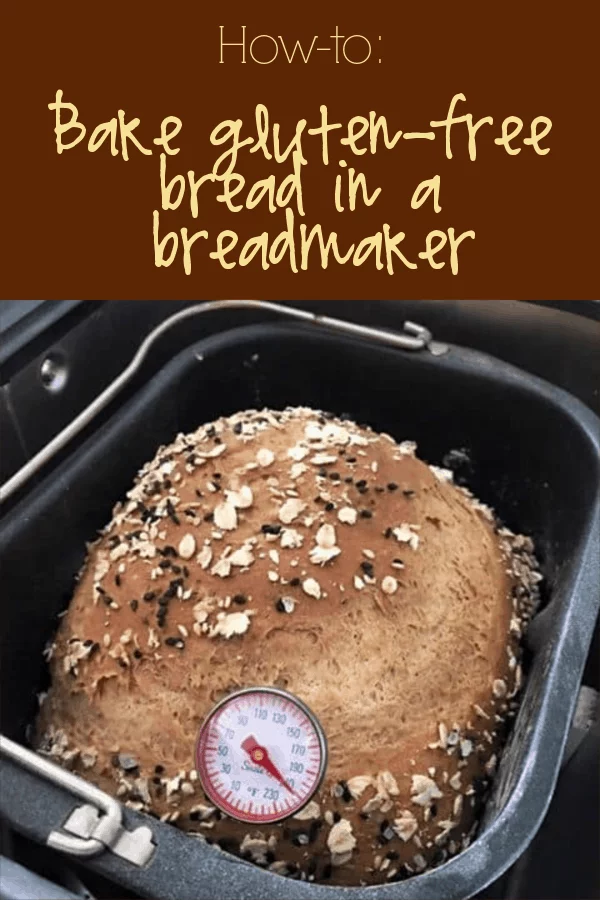
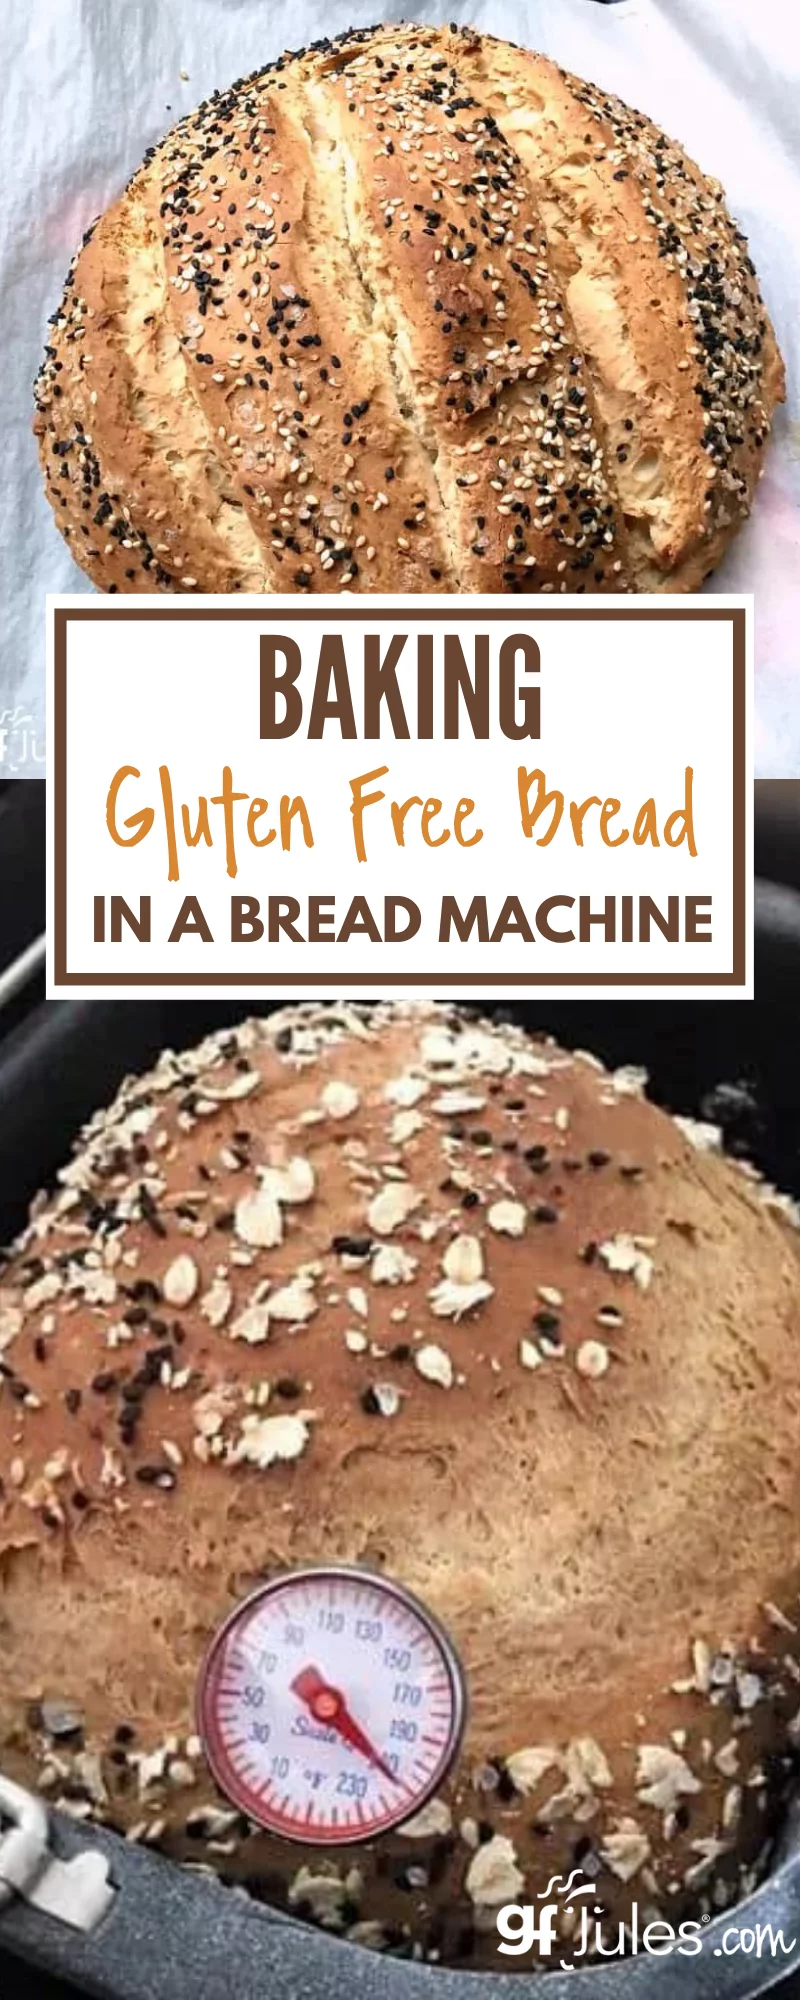
Using an easy gluten free bread mix makes things even more of a breeze. (The loaves pictured below are all made with my gfJules Bread Mix, which was just voted #1 Gluten Free Bread Mix again in the 2024 Gluten Free Awards – for the seventh time!)
 But which gluten free bread maker is best? Does it have to have a gluten free setting to bake gluten free bread? What gluten free bread recipes work best in bread machines? Read on for answers.
Hop to my Reviews of Best Bread Machines for Gluten Free Bread
All about Gluten Free Bread Machines
For anyone leery of baking gluten free bread from scratch, and for those who don’t have a stand mixer, a bread maker may be your new best friend.
Since the hardest part is often just finding the patience to wait for that yummy nirvana of heavenly yeasty bread aromas to permeate every room of your home, beckoning you to make a sandwich or slather a warm fresh-baked slice with butter … it’s easy to see why gluten free bread machines are so well-loved!
BUT … don’t hesitate to try baking gluten free bread from scratch if you don’t have or can’t afford to buy a gluten free bread machine. The homemade gluten free bread recipes on my site are all designed to be made without a bread machine, though many may be made in a bread machine, as well. And you don’t have to be a bread baking expert to bake them — I promise!
Some of my favorite gluten free loaves are baked in my oven, and some recipes don’t even require a bread pan! Gluten free sandwich bread, challah, gluten free bread sticks, 10 Minute Gluten Free Focaccia … are just some of the amazing homemade gluten free bread recipes on my site that can be made easily without a breadmaker.
Here are some great homemade gluten free bread recipes for bread machine:
- Easy Gluten Free Sandwich Bread or Beer Bread in Bread Machine
- Gluten Free Sandwich Bread in Bread Machine
- Gluten Free Cinnamon Raisin Bread in Bread Machine
- Gluten Free Pumpernickel Bread in Bread Machine
- Savory Gluten Free Italian Bread in Bread Machine
Tips for Making Gluten Free Bread in a Bread maker:
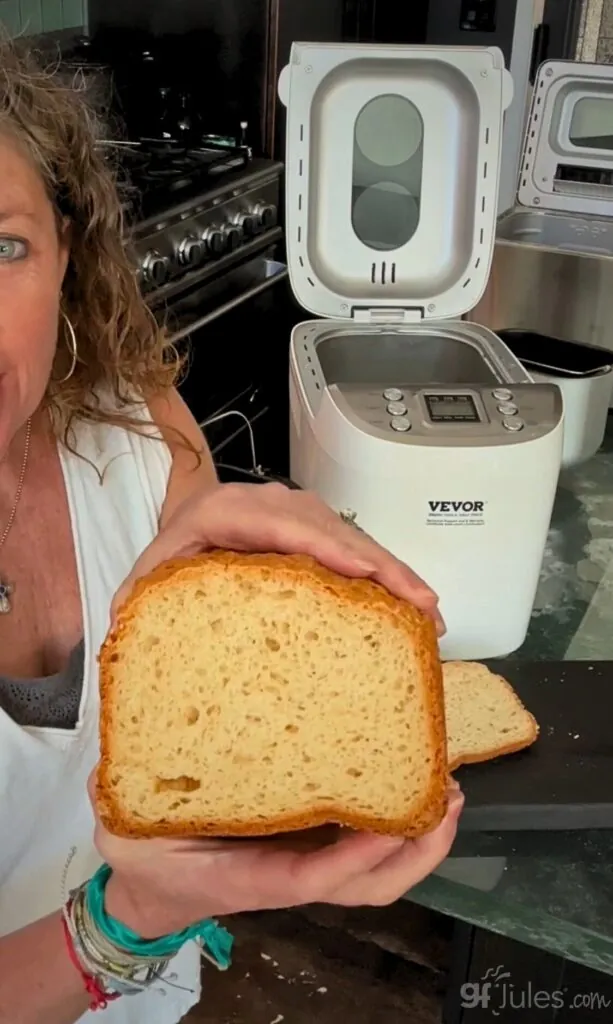
1- You don’t have to have the most expensive breadmachine to have the best bread. I travel with my bread makers for many cooking classes, and I won’t risk a big investment being in the hands of the TSA. So I tend to prefer mid-range bread makers like this Vevor for travel. You can usually find this machine for under $100.
HOWEVER … not all bread machines are created equal. Even those that have a gluten free setting. Check out this video to see if your bread machine is going to do a good job on baking your gluten free bread:
I truly love the loaves my reliable, two-paddled Zojirushi® turns out; I don’t risk traveling with it because it is a costlier machine. You can read about the Zojirushi as well as my preferred mid-range and travel machines in my gluten free bread machine reviews.
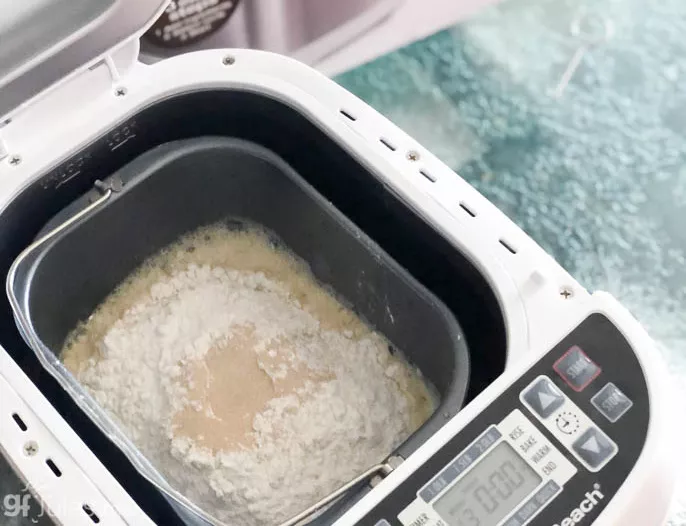
The process of baking gluten free bread in a bread machine is the same, no matter which model you use: liquids first, then dry ingredients, then yeast. Here’s a quick video showing you how:
(The short video above shows bread being made with my gfJules Bread Mix; to make with a scratch recipe, simply use the ingredients in this Gluten Free Sandwich Bread or Dinner Rolls Recipe)
2- You don’t have to have a bread maker with a gluten free setting to bake gluten free bread. But it helps. If you have an older bread machine without a gluten free setting, make sure it’s totally clean from any gluten residue. If there are scratches on the pan or the paddle, buy new ones because they could house gluten left behind from the last loaf.
If you are in the market for a new bread maker, buy one with a gluten free setting. Check my review of gluten free bread machines though, as they are not all good for baking gluten free bread; just because a machine has a gluten free setting, does not necessarily mean it will produce a good loaf.
3- Using bread makers without a gluten-free setting. Read your manual to find out if it will allow you to, and how to override the pre-programmed settings.
How to Program Your Bread Machine for Gluten Free Bread:
1. a 20-minute mix cycle
2. a 40-minute rise cycle
3. a 1-hour bake cycle
Do not allow the machine to do a “punch down” or second rise! Those are settings specific to gluten breads, and they will damage your gluten free loaf.
4- Always bring ingredients to room temperature before mixing gluten free bread dough. For eggs, heat a bowl of water and put the un-cracked eggs in the bowl to bring them to room temperature.
5- Always put liquid ingredients into a bread maker pan first. Dry ingredients go on top. If you can whisk the dry ingredients together before pouring them into the pan, that is best.
6- Keep a rubber spatula handy and help the bread maker out a bit during the mix cycle. Go around the pan with the spatula to help the ingredients incorporate. Th mixing paddles on bread machines don’t always get the dry ingredients off the sides of the pan, so using a rubber spatula can help. You’ll know after first use if your machine needs a little help mixing or not.
If you don’t want holes from the paddles when you remove them after baking, once the bread is mixed and before the rise, reach into the dough and remove the paddles; use the rubber spatula to help clean them off and smooth the top of the bread before rising.
Note: it’s totally fine to leave the paddle inside the loaf as it bakes — it’s purely aesthetic whether you want a hole in the bottom of the loaf or not. With most machines, there is only one paddle, so only one small hole in the bottom center of the loaf.
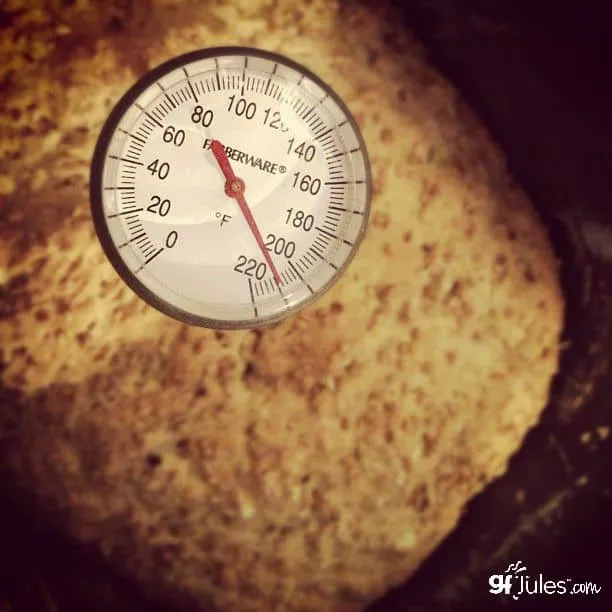
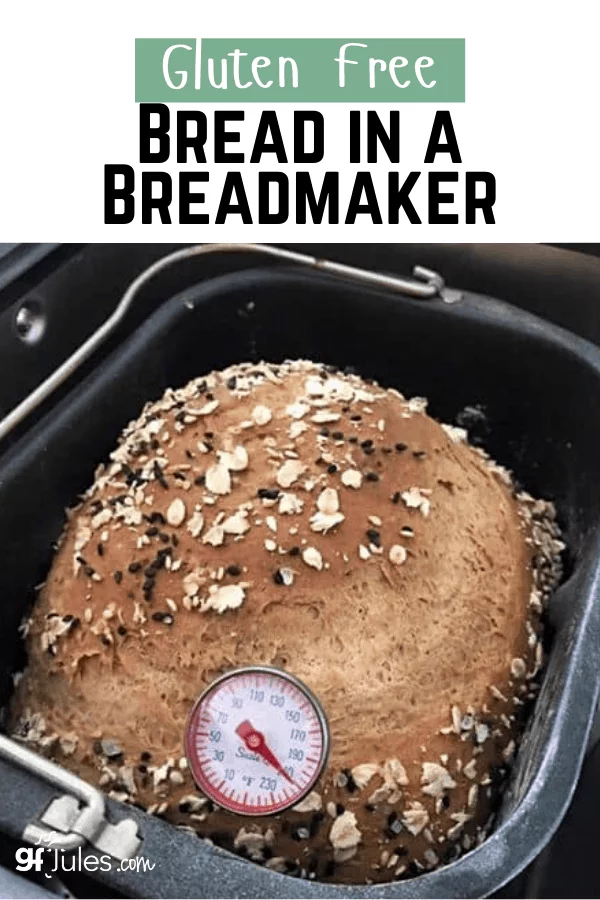
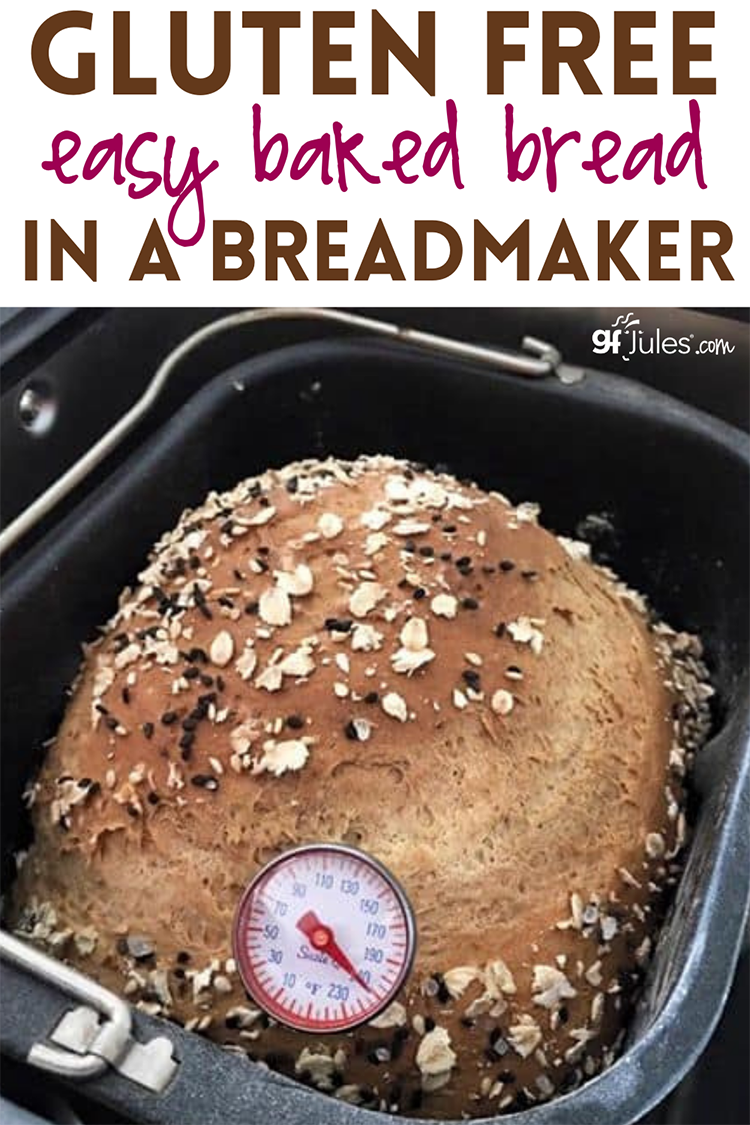
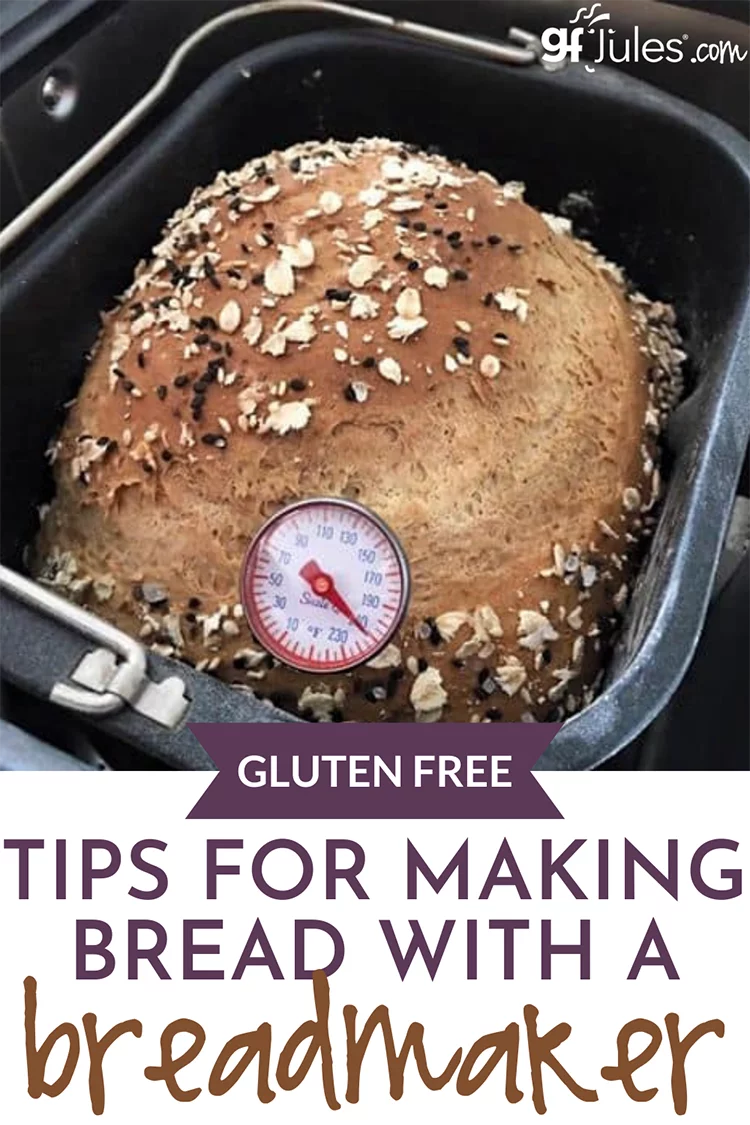
7- Buy an instant read thermometer. They’re not expensive but make all the difference in helping you decide if your gluten free bread is really fully cooked. Always take your bread’s temperature before you take it out of the oven or the bread maker. It might look and smell done, but if it’s not over 205° F, it’s not done in the middle. Add extra time to your bread maker or put the bread maker loaf pan into your oven on 350° F for another 5-10 minutes (keep taking its temperature).
8- Let your bread cool in the pan for about 5-10 minutes. Lay the pan on its side for a few minutes, then shift to the other side for a few minutes. Gently remove it from the pan after it has cooled a bit, then cool completely on a wire rack before cutting (if you can resist!).
9- Store fully cooled bread in a zip-top bag on your counter – Squeeze the air out of the bag first, then seal. Depending on the recipe and ingredients, it should stay fresh that way for a few days. Remember: this is homemade bread, not commercially-made, processed bread loaded with preservatives, so it will naturally be softest and taste freshest the first day or two. In France, people still buy fresh baguettes every day — there’s a reason!
10- Never refrigerate your breads or you will dry them out! If you can’t finish the whole loaf before it starts to get dry, you can slice the bread and freeze it in a zip-top freezer bag so you always have bread handy. Put parchment or wax paper between the slices to make separating the frozen slices easier. Then, just toast to enjoy! Or, use leftover bread that’s past its prime in homemade gluten free French Toast!
Bonus #11 – If you really want a tall, fluffy loaf of bread, use a carbonated beverage like gluten free beer, club soda or ginger ale! Check out the height of my gluten-free beer bread! This is my favorite, reliable from-scratch gluten free sandwich bread recipe which can also be made with carbonated liquids.
CLICK HERE TO GET A FREE COPY OF JULES’ “GLUTEN FREE BREAD BAKING” eBOOK (A $9.95 VALUE)
*Some links in this post may be referral links. If you do decide to purchase a product at a retailer after following my link, I may receive a small commission, at no additional cost to you, which I use to pay for web hosting and services for this blog. Read my disclosure policy here.


 (75 votes, average: 3.56 out of 5)


Jules, is there a way to make gf bread using the delayed start on a bread maker? (I used to love waking up to the smell of baking yeast bread when I could eat wheat.)
In the meantime, I will try your recipe tomorrow. I’m looking forward to it. Thank you!
Hi Cheryl, it all depends on your breadmaker. If it has a delayed start, absolutely! In hotel rooms when I travel sometimes I put everything in my machine and then set my alarm for 5 am or some ridiculously early time (!) and just get up to press the start button. The heavenly smell of bread wakes me gently a couple hours later! You can also mix the dough and then just use the bake feature on your machine the next morning. Letting the dough sit overnight gives it more of a sourdough flavor!
~jules
I am new to gluten free baking. I live in Long Beach, MS. Are your products available in any stores locally?
Hi Anna, welcome! My products are available in some select stores around the country, (go here to look), but honestly, most people just order on line because we deliver right to your door and you have full access to my entire product line. Here’s the link to my store: https://shop.gfjules.com/.
Since you’re new to gluten free, I’d also like to point you to this article: https://gfjules.com/going-gluten-free/
There are loads of other articles and resources on my site, as well as the #1 voted gluten free products and 435+ free GF recipes! I’m here to help, so email any time with questions: support@gfJules.com.
Happy baking!
~jules
Hi I have a mini Zo and tried your gluten free bread recipe on quick setting but it did not bake to 205 degree :(. Any suggestions?
Thank you
Hi Ivy, I’m not familiar with the mini Zo, but if the bread machine doesn’t fully bake the loaf in the middle, add time on the “bake setting” until the temperature is reached. If your machine doesn’t have a pure “bake” setting, then preheat your oven to 350 and remove the pan from the machine when it’s done baking, then place into the preheated oven. Bake for 5 or 10 minutes and check again (depending on how far it has to go); repeat as necessary. Here’s more info that should help: https://gfjules.com/baking-gluten-free-bread-in-a-breadmaker/
~jules
you were very helpful thank you
Great! Best of luck with your gluten free bread baking!
~jules
I bought an Oster CKSTBRTW20, and I realised it does not have a gluten free program. Any suggestions?
Thanks!
Hi Agustina, I just looked up that manual (here’s the link) and I’d recommend using the dough setting and once that’s done, using the bake setting, which is already set to 1hour. If the dough setting doesn’t allow for rise time, then let it just sit in the bread machine for 30 minutes to one hour after mixing in the dough setting. Let me know how it goes!
~jules
Hi! Your blog was instrumental in my buying the model of the Zojirush with the gluten free option. Ive been using it to bake regular (non GF) bread for my family and last night tried the Zojirushi recipe for GF Raisin bread. But as I was putting the ingredients in and following the recipe, it looked to me like there was so much more liquid than there was flour. The recipe calls for brown rice flour, but I swap this out for a combination of oat flour and buckwheat flour. I do this often in baking without any issue. But I don’t think that was the problem, because it was still more related to the ratio of liquid to flour. It calls for about 2 and 1/2 cups or so of potato starch in addition to the flour, but as you know potato starch doesn’t have a very substantial feel and it just seem to go right down into the liquid. During the knead cycle I opened up the machine to check on the bread and it was just a soup mixture. When I put the raisins in, they all sunk to the bottom of course because there was actually no dough to speak of it was just a liquid. So the bread really did not turn out well. What could have gone wrong? It seems that all the recipes that are featured in that accompanying guide for gluten free bread all call for brown rice flour and potato starch, basically the same combination. I would appreciate any advice!
Hi Elizabeth, after re-reading your comment I’m now guessing that you were using a recipe that came with a book for the machine, perhaps? I never look at those recipes so I’m not sure, but it sounds like that might be where the recipe came from. I am not a fan of brown rice flour, nor of recipes that only use one or two flours, like it seems like this one was. Sometimes when you add gluten free flours together to make a bread, the mixture is more like a batter than a dough, but it shouldn’t be a soup! I think your intuition was right that these ratios were off. Have you looked at my gluten free cinnamon raisin bread recipe? I would recommend trying it for a contrast, and for an even easier, more reliable way to bake great gluten free bread in your bread maker, just use my gfJules Gluten Free Bread Mix. It won #1 gluten free bread mix again this year, and works great in this machine. I use it every time I’m doing a cooking class on gluten free bread because I know it will turn out great and because it’s so easy!
I’d love to hear what you think when you try it – I hope it helps you to love your machine and to also love baking gluten free bread!
~jules
Which machines do you know of which allow you to create your own program for how many rises and length of baking, etc — to do what you recommend for GF bread??
Len
Hi Len, the Zojirushi seems to be the friendliest when it comes to programming. I like this one: Home Bakery Virtuoso.
~jules
I have a Hamilton beach and can’t find anyway to change the setting for that. I have made 3 loafs of bread in my bread machine. They taste great last one was a little dry but good. On my gluten free setting it takes 3hr and 32 mins for 1.5 loaf of bread. What cycle should I use. Thinking the quick cycle.
Thank You anyone that can help
Hi Monika, if the bread machine is turning out good bread, I wouldn’t mess with anything! 🙂 If you want to check the settings for quick cycle, you will want to make sure there is a rise cycle because sometimes that setting is for quick breads (not yeast breads) and there is no rise time. I hope that helps!
~jules
I love my Hamilton Beach breadmaker but their gf setting is useless. Multiple blends just mess it up. I just use the basic cycle to blend for 10 minutes, shut that cycle off, then heat for 1 minute, rise for 20 minutes, and repeat the heat and rise until my loaf gets about 3 inches from top of pan then set it to the bake cycle only for 1 hour. Perfect loaf every time. One day I’ll get a programmable machine, but as long as this machine holds out, I’ll continue.
Sounds like you’ve developed the perfect work-around, Pete! Thanks so much for sharing your method!
~jules
I have a Hamilton Beach and I don’t see a ‘heat’ setting–you say you heat for 1 minute? Then heat and rise repeatedly. Are you heating it in your bread machine? My question is how? Thanks for your answer.
Hi again David – I’m not sure what “heat” setting you’re referring to? Sorry – more details??
~jules
Hi Jules!
My wife was recently diagnosed as celiac. I’ve been doing my best to support her and have been converting all our favorite recipes to gluten free and trying a lot of new ones.. Your website has been a great resource. Thanks! I recently bought a Zojirushi BB-pac20. This week I tried making a couple of loafs of the brown rice bread. I was disappointed with the results. I know I shouldn’t expect a fluffy loaf, but the loaf was very dense and did not rise much at all. I followed the recipe to the best of my ability. I’m a novice so I may have done something wrong. I made sure I let the liquid ingredients get to room temp and used the default GF mode. The loaf only rose to about 1/3 to 1/2 the height of the pan. Did I do something wrong or is this the best I can expect? I’m willing to try different recipes and even buy your mixes, but I don’t want to waste a lot of time if I’m doing something wrong, so I thought I’d practice with a basic recipe. Please give some advice to this “newbie”. Thank you so much!
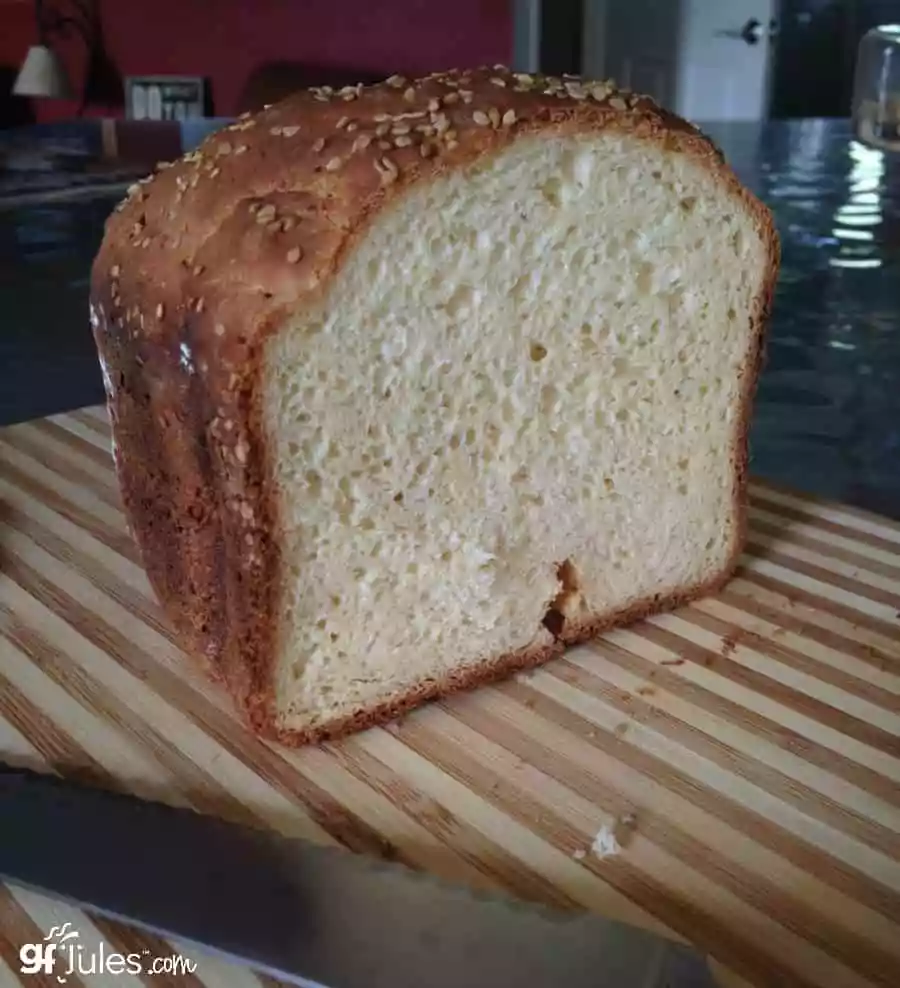
Hi Dan, you sound like you’re doing all the right things, and starting with a basic recipe is a good idea, but a brown rice bread is never going to turn out like you hope. I would recommend starting with a mix to get the hang of things, so you do know what you can expect. There are lots of pictures of my bread mix baked in a breadmaker on my site, and at the top of this article is a photo of my gfJules bread mix as it should look baked in that Zojirushi. I also like programming that particular machine for a homemade mode where it only mixes/kneads, rises and bakes. For some reason, the GF mode on the Zojirushi still has a punch down and second rise which never helps a GF loaf, so I program around that and the loaves I make are fluffy and soft and certainly rise.
It saves time and money to use the mix because it actually works! and turns out a loaf that you and your wife will both enjoy. Once you get some good loaves with my bread mix, you’ll know what you can expect and can play around with other recipes if you like, knowing you can come back to the mix if they don’t turn out as well. I hope this info helps – you’re doing a great thing to help your wife bake gluten free. She’s a lucky lady!
~jules
Thanks Jules! I’ll give one of the bread mixes a try and use a custom program instead of the GF program mode.
Dan
Best of luck – let me know how it goes Dan!
~jules
I have a Zojirushi mini bread machine that doesn’t include the GF settings. Which alternate settings would be the best for baking GF bread in that machine? I used the Quick baking course and the outcome is not that good. I appreciate any suggestion. (Quick baking includes 20 min kneading, 14 min Rising, 7 min stir down and second rising, 35 min stir down and third rising, 52 min baking).
I live at 3500 feet, aka high altitude, and have had to adjust recipes for brownies and such due to this. What changes do I need to make for baking with the T-Fal bread machine to prevent the bread from rising too fast or coming out dry?
Hi Renee, great question! I’ve baked my gf bread at 7300 ft with no issues, so I would hope you wouldn’t have any either, especially using the T-fal. Check my high altitude baking tips for some more ideas, but you can always dial back the yeast if you find that it’s rising too fast. I’d also recommend starting with milk (dairy or non-dairy) as the liquid instead of a carbonated beverage. Let me know how it goes!
~jules
When using the zojirushi bread machine, do you choose regular or quick on the gluten free setting? Thanks!
Hi Caitlin – I use the gluten-free setting or program my own according to the settings I outline in the article. Does that make sense?
~jules
I’m gonna try this one. My family has always loved bread.
Btw is it okay to use normal yeast instead of bread machine yeast?
Thank you
Hi Melanie, I’m glad you’re going to give it a go! You may use regular dry yeast instead of bread machine or quick rise yeast, you’ll just want to let it rise a bit longer.
Happy baking!
~jules
Hi Jules. Have been using your flour for years for my daughter, but now I’m also GF. I just bought a breadmaker on Prime Day – SKG brand. Looking through the comments above you were concerned about a 2 lb loaf instead of a 2.5 lb loaf. But the TFal breadmaker you recommend only has a 2 lb loaf. Is my new one with only a 2 lb option going to be a problem? Thanks!
Hi Nancy, what a smart thing to buy on Prime Day! You should be good to go with my bread mix and that T-fal, but I would highly recommend using an internal/instant thermometer at the end of the bake cycle to make sure it’s done. Here are some more tips if you haven’t seen them yet. I can’t wait to hear how you like it!
~jules
Can you use the Bread mix with fruit? And if using a bread machine when do you add the berries?
Thanks.
You can mix in berries, nuts, seeds, herbs … whatever you like. If you want them mixed into the bread, add toward the end of the mixing cycle; if you want them on top of the bread, add once the mixing cycle is done and it begins the rise cycle. Enjoy!
~jules
I’m wondering if you could use kambucha as a replacement for fizzy drink and the sugar? Or will the probiotics react against the yeast??
Hi Kim – what a great question! While I haven’t tried it yet, I would think it would still work out just fine, although much/many/all? of the benefits of kombucha would be gone once cooked, the flavor would still be yummy!
~jules
I got the Oster Expressbake Breadmaker CKSTBRTW20 for Christmas from my Grandma and I’m really excited. However, I’m trying to figure out how to override the programs like you suggested and I’m not having any success. I don’t know if it is possible to override them on this machine. I know the Oster company makes another breadmaker that has a gluten free setting, but it would be a bummer to have to ship this one back and pay extra for the other. Any suggestions? Much appreciated.
Hi Tia, that’s a tough one. If the machine won’t let you override and program a manual setting and it has no GF setting, it will have a punchdown and then second rise cycle which you don’t want. It looks like at least one reviewer wasn’t pleased with its results on gluten-free breads. I would also be concerned that it bakes “up to” a 2 lb loaf. Using bread recipes like mine and my bread mix too, it’s best to have at least a 2 1/2 lb capacity. I checked Amazon and it looks like there’s a Hamilton Beach one with GF setting that’s in the same general price range (I don’t have any experience with this model though). The T-Fal that I have and love is more expensive, but sometimes I see it for sale at a cheaper price. I guess I would say since it’s brand new and you want your grandmother to have the most success with the least hassle, it might be better to just return it and get one that is made for GF breads. I hope this information has been helpful — happy baking!!!
~jules
I bought that Hamilton Beach one a month ago and I haven’t been able to get anything but a dense loaf out of it. After reading this article, I know the reason. The gluten free cycle has 2 kneadings. For a 1.5 lb loaf, it’s 9 min. first kneading, 25 min. first dough rise, 18 min. second kneading, 35 min. second dough rise, 1 hr. 10 min. third dough rise, 55 min. bake.
It doesn’t have a custom setting option (didn’t think I needed it since it has a gluten free setting) so I was wondering if you think using the dough setting (20 min. first kneading, 30 min. first dough rise, 40 min. second dough rise) and then the bake option (1 hr. bake time) would work better than trying to use the GF setting. There aren’t any other settings close to your recommendations above.
Any help is appreciated, I can’t return it anymore so this one just has to do for now.
Hi Audrey, I’m glad you read my bread maker post and the cycles and their purposes made sense to you. Your idea to use the dough then bake setting could work; my only question is why two rise cycles? Is there a punchdown in between? If so, that would be problematic. Do you have a stand mixer? If so, you can always just mix the dough yourself and then put it into the bread maker pan to rise and bake. Otherwise, give that dough + bake setting a try and see how it goes. I’m not sure what recipe or mix you’re using, but don’t discount that as the problem, either. Ingredients — particularly gluten free flours — are all very different and yield very different results, so make sure you’re using something with a proven measure of success.
Best of luck and let me know how it goes!
~jules
Thanks for responding, I actually don’t know if there is a punch down in between. I’ve never used that setting and it doesn’t say why it has two rises. I’ve never used a bread machine so I don’t know if this one is just weird or what. I will try it out and see what happens. I’ll let you know how it turns it out!
A grand experiment! Keep me posted!
~jules
I have the same Oyster brand bread machine. After reading this post and doing research on the two models and gf or not gf settings, it looks like the Dough setting is the closest to time of the kneading/rising time of the GF setting on the newer machine. Any of the other settings force the “punchdown” so, I wouldn’t recommend using them.
I will be trying tonight to use my gf mix to make a pizza dough using just the dough setting.
If that goes well, I’ll continue to use the dough setting and just bake the bread in the oven (which is what I usually do anyway with a longer loaf pan).
I rarely bake in the bread machine, but now having to go GF if I can at least have it keep making great dough I can transfer to the oven, I think it’ll work out well.
Hope that helps someone!
Thanks for sharing, Kate!
~jules
I have celiac and am new to bread making. I just bought the same Hamilton Beach for the gluten free setting. The timetable for cycles is still the same as you wrote above. Have you figured out how to have success or should I return my bread maker? I intended to use brands of GF bread mixes. The recipes in the book use ingredients I’ve never heard of or don’t know where I would find them. Thanks
Hi Vicki, if it’s not too late to return it, I would suggest that. I just had another reader write in that she just bought this machine and it didn’t work well for GF breads at all. We went over the settings and it’s not programmed accurately for gluten-free breads. She ended up getting a credit for the machine because there is a design flaw in the way it’s programmed. It’s so odd – like they have no idea how gluten-free breads actually work! Check out this article I wrote reviewing a couple others of my favorite machines. The T-fal seems to be the cheapest, no-fail way to go, but the Zojiurushi bakes great GF breads, too. I definitely wouldn’t use the recipes that came with a bread machine because I’ve never seen one that works well for GF and they all seem to use gritty rice flour. I hope this information helps!
~jules
Hi
I bought a Hamilton Beach I live in Edmonton Alberta Canada and I also had several fails with the gluten setting as it has 2 punch downs I did send them a message on this issue but had no response
back. I returned it and bought a Sunbeam with a gluten setting that only has one kneed a rise and a bake no second anything. Going to give it a try as they are part of the oseter family. I can not get your flours here in Canada but we have a place called the bulk barn going to try there bread mix or there all purpose flour. Also robin hood puts out a all purpose gluten free blend has anyone tried that one at all Please advise.
Hi Kathy, I’m glad you returned the machine, as I don’t know that you’d have much success with those kinds of settings and gluten free. We are going to be selling my flour in Canada in the next month or so, so make sure you’re on our email list so you hear about how and when you can get my flour! Happy baking!!
~jules
thanks Jules. I just bought Pamela all purpose flour to try but it tells me not too use gluten setting not sure why have u heard anything on this flour or anyone that can help
I am on your email list
Hi Kathy, I don’t know anything about that flour or about what you’re referring to that it’s telling you about gluten settings. As I mention in this article, I would recommend not using gluten settings on a bread machine so that the machine won’t punch down the bread because that will cause it to deflate and bake up flatter and without airiness. Here’s some more information on gluten free flours – perhaps that will help you to evaluate that flour. I hope that helps!
~jules
I just tried my Hamilton Beach for the 1st time with my Anna’s bread mix (Gluten free.) It did not raise enough and now I know why–the 2nd kneading is killing it . And how can there be 2 different rises after the 2nd kneading??? Why don’t they just say there is a 1hr and 45 min rise after the 2nd kneading instead of a 35 min 2nd rise followed by a 1 hr and 10 min 3rd rise? I will try the dough setting (20 min kneading, and 30 min rise) then let it set for 30 mins. then use the bake setting which is 1 hr. What an epic failure on Hamilton Beach’s part!! I am pissed.
Hi David, I don’t understand these companies making machines and not spelling out exactly what the settings are. That’s why I really like the machines I recommend in this article because they really seem to do the trick. Bottom line for gluten-free: Knead/Mix; Rise; Bake. Any other punching down or second rises … that’s ALL for gluten and does damage a gluten free loaf. If the machine is new, you should try to return it and get one of the ones I recommend. I don’t know much about Anna’s mixes, but I know they work great with mine. Best of luck!
~jules
Help!!!!
I have a step-son with Down’s syndrome that was recently diagnosed with celiac disease. I purchased the Zojirushi BB-PAC20 thinking I could make his gluten free bread and regular bread for the rest of the family. I’m now thinking this is not going to work because of cross contamination. Any feedback would be appreciated.
Hi Maria, if you have a brand new machine without any scrapes or deep grooves in the paddles or pan, you should be fine to use it with a very thorough cleaning in between. The scrapes or grooves can hold crumbs that are hard to remove but could contaminate the bread. With the Zojirushi, you need to be especially careful to remove the paddles and clean everything very well — the paddles are sometimes hard to remove, but you need to go to the extra step because crumbs can definitely hide there. Here is another article with more information on avoiding cross contact — I hope that helps!
~jules
Hi. I’m looking to make low-carb, gluten free bread in a bread maker. I have recipes for hand-made but not the trifecta of machine, no gluten, and low-cal. Any ideas?