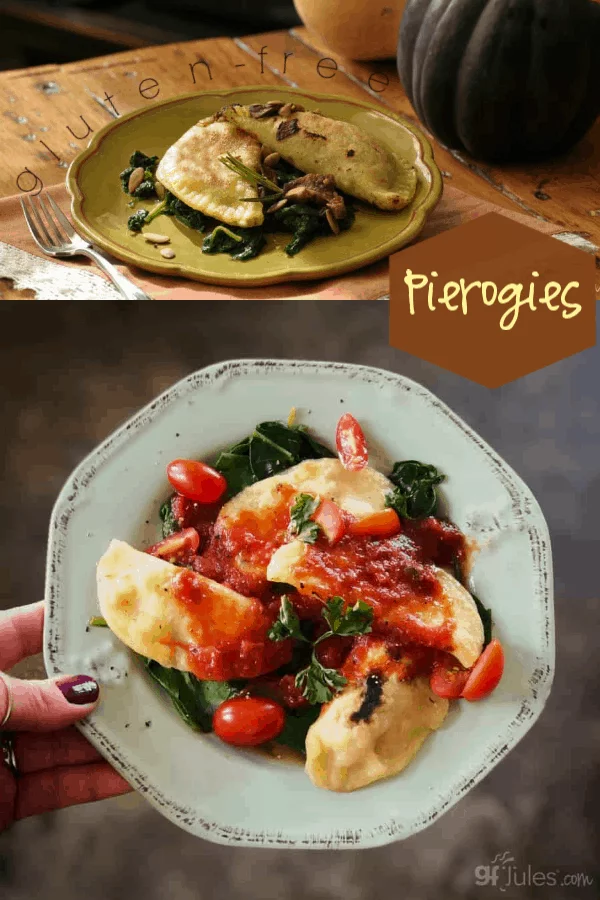
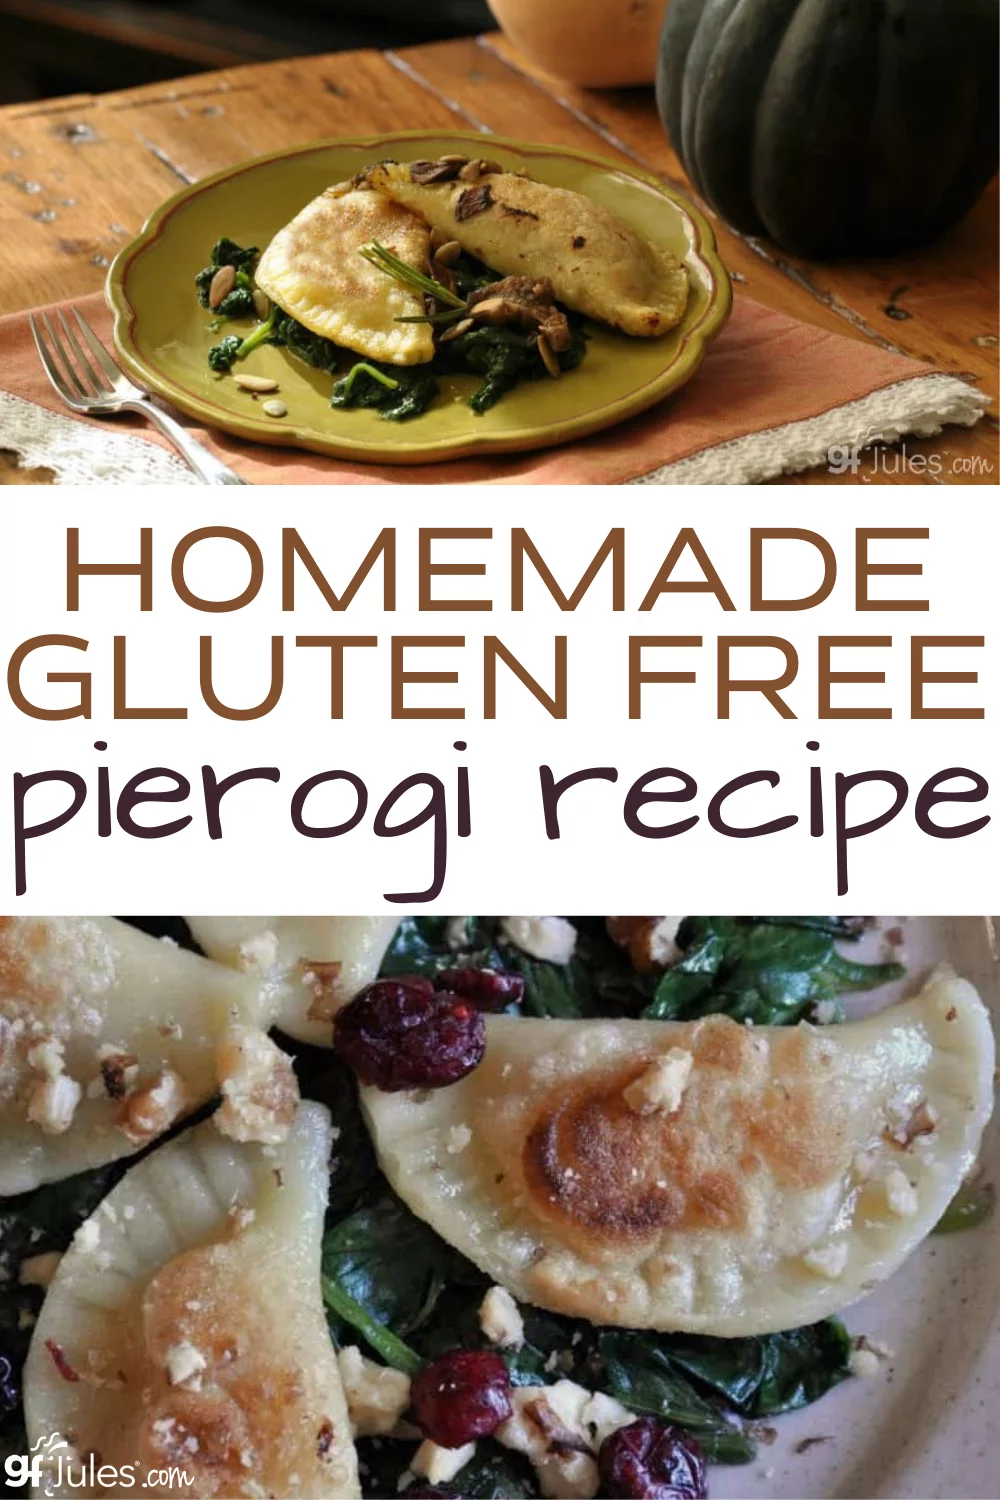
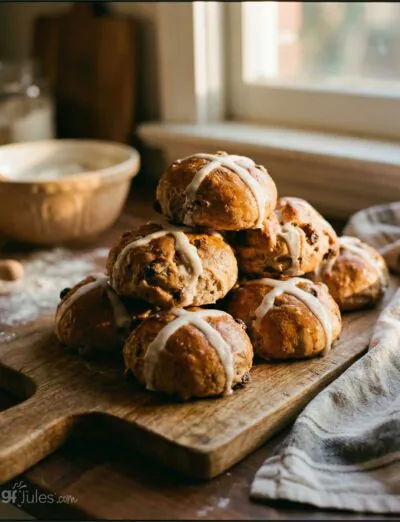
Meet the gluten free pierogi: delicious pockets of gluten free dough stuffed with yummy fillings like mashed potatoes and cheese, sweet potatoes, sauerkraut or even Irish Colcannon. Actually, these gluten free pierogi are stuffed with anything you like, because they’re your homemade gluten free pierogi.
These traditional Polish dumplings (not traditionally gluten free) are boiled then baked or pan fried, and served as a main dish or as an appetizer.
I have even filled these gluten free pierogi with sweet potatoes and sprinkled them with cinnamon and sugar as a sweet after supper treat.
THAT’s how easy and versatile this dough is to work with, when you use my gfJules Flour to make it.
Best pierogie recipe ever! My whole family switched to the GF version once they tried these – and they’ve been making pierogies for three generations! These freeze well, just don’t overlay them or they will stick to each other.~A Luvrly Life (Pinterest)
The key here really is my award-winning gfJules Flour. It adds stretch to all kinds of doughs like this gluten free pierogi, or gluten free ravioli, gluten free pie crust, gluten free puff pastry and more, so they don’t fall apart and the dough is a dream to work with.
And because my gfJules Gluten Free All Purpose Flour is not made with gritty or funky tasting flours, the fillings really shine in this clean, light pasta recipe.
It makes baking and cooking EASY and makes recipes reliable. And now that we have gluten free pierogi in our lives, we can stuff them with anything that inspires us!
You have changed my life for the better over and over! Thank you so much
Pierogies are amazing as are all your recipes that I’ve tried. ONLY gfjules products for me. (Live and learn)
Just want to comment that as a new baker your videos are so helpful. The best.~Mary Pat

Why Make Gluten Free Pierogi
In Fall of 2009, I was in Pittsburgh giving a lecture at the Center for Digestive Health and Nutrition’s 3rd Annual Conference on Celiac Disease, and teaching gluten free cooking classes.
I was repeatedly asked for recipes for homemade gluten free gnocchi and gluten free pierogi.
First, second and third generation eastern Europeans all over the world wax nostalgic at the thought of this comfort food, so you’ll understand the urgency for a gluten free recipe if you’re one of those who also finds themselves unable to eat gluten.
I have already published my amazingly easy recipe for gluten free potato (or sweet potato) gnocchi, so I thought I would tackle the pierogi while it’s still bitter cold outside and we are all craving yummy foods like these to warm us from the inside out!
Pierogi is also a Christmas tradition for many, and no one should have to go without treasured food traditions on the holidays!
How to Make Gluten Free Pierogi
This gluten free pierogi recipe is not difficult, but it does involve several steps, so I’ve laid them out below with several in-process photos to help those who are following along on their tablet, phone or pc while making the recipe.

Don’t miss my gluten free pierogi making video! It’s super old and retro. Try not to laugh at me! But the principles are the same, and it’s shows how easy the dough is to make (this recipe video is so old it’s made with my flour back when it was called Jules Gluten Free Flour!)
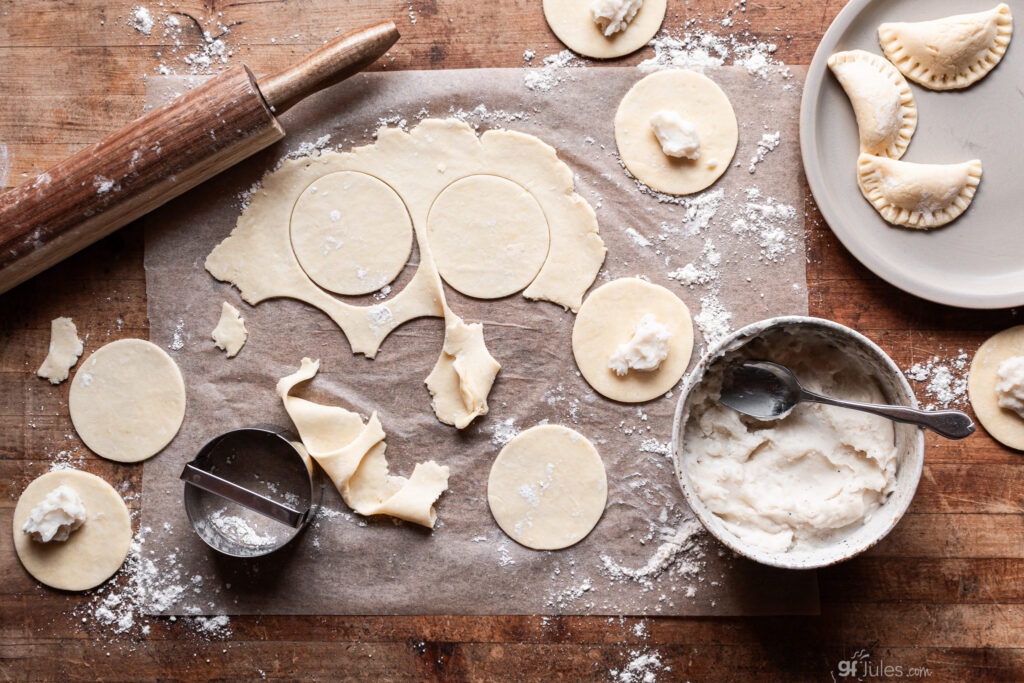
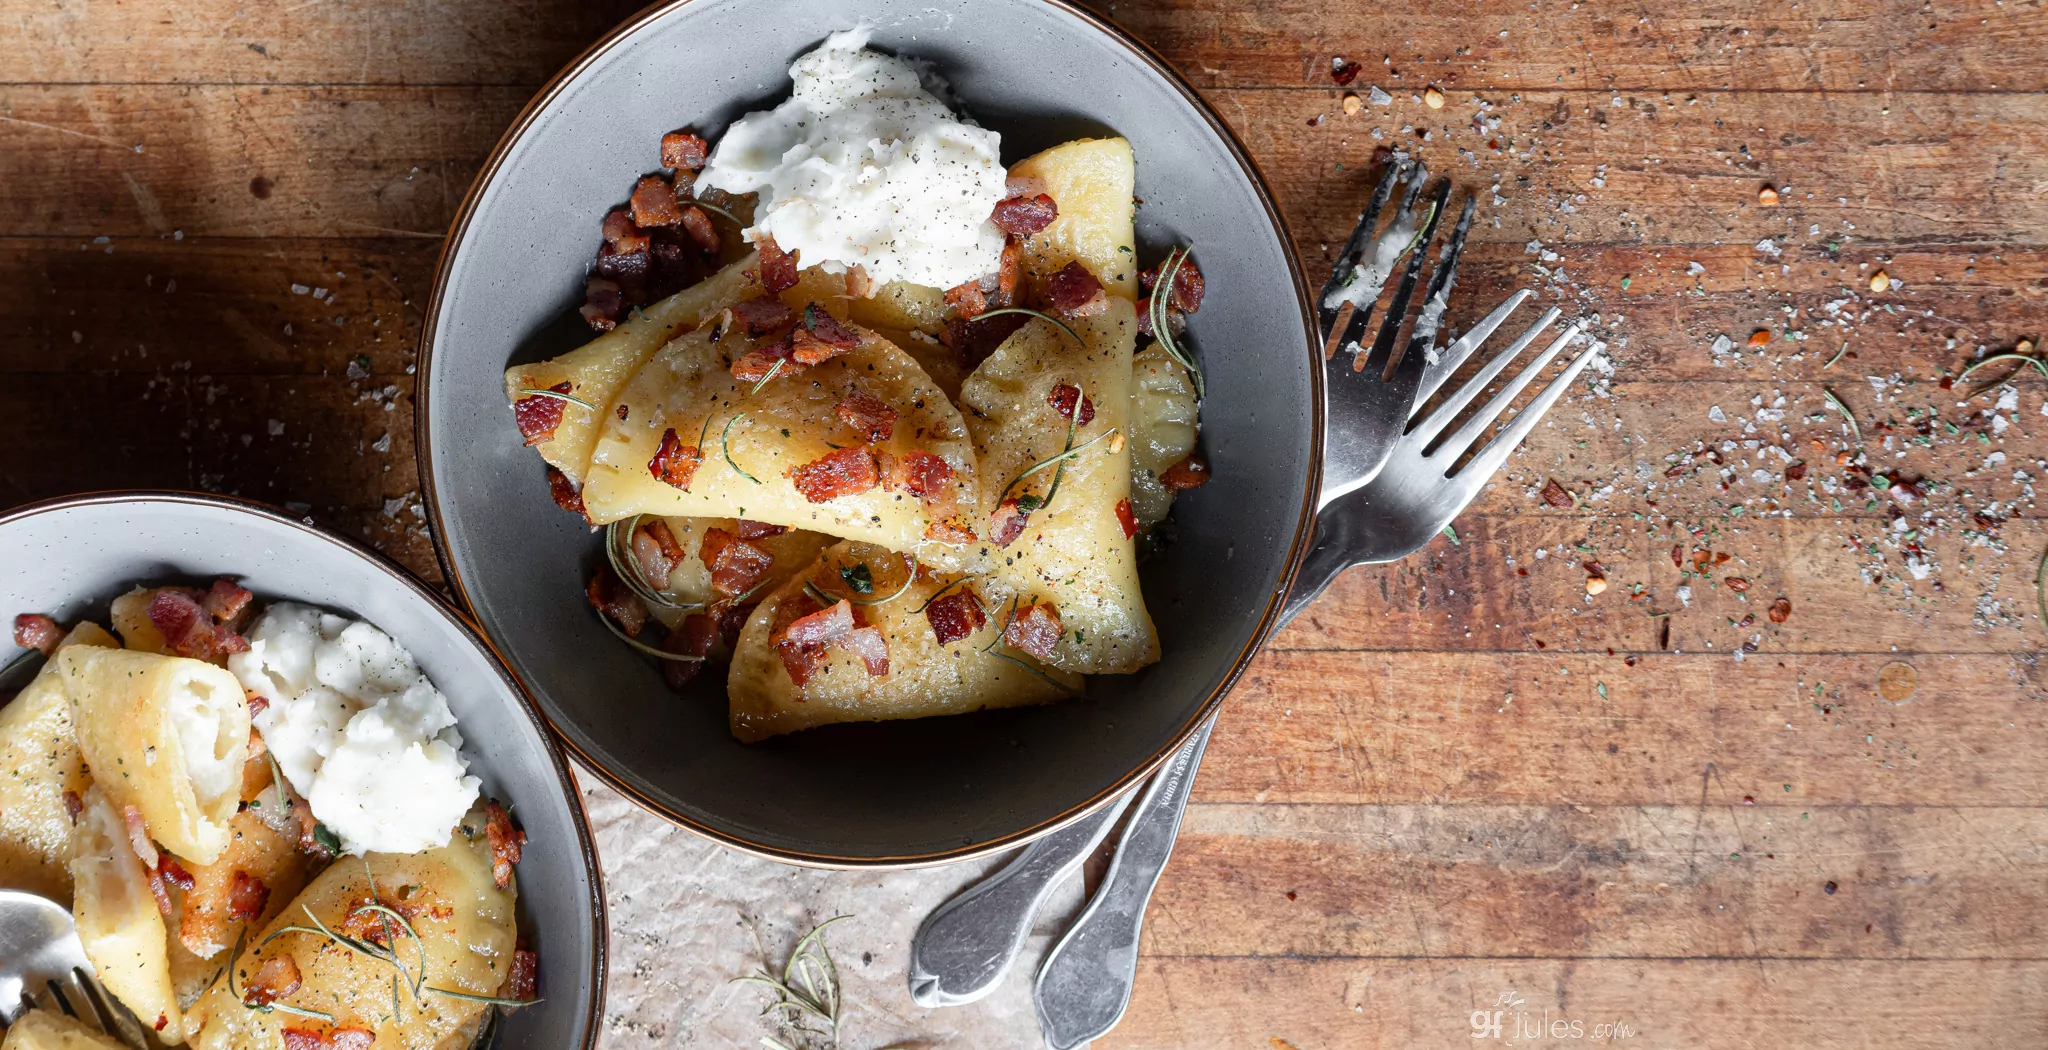
To recap though, simply use a round cutter like a biscuit cutter and cut out your gluten free pierogi dough. Then place a dollop of filling towards one side of the circle. Wet your finger and go around the outside of the dough circle so that the dough will stick to itself when pressed together.
Fold the dough over itself to form a crescent shape and press together, then seal well by pressing with the tines of a fork. That’s it!
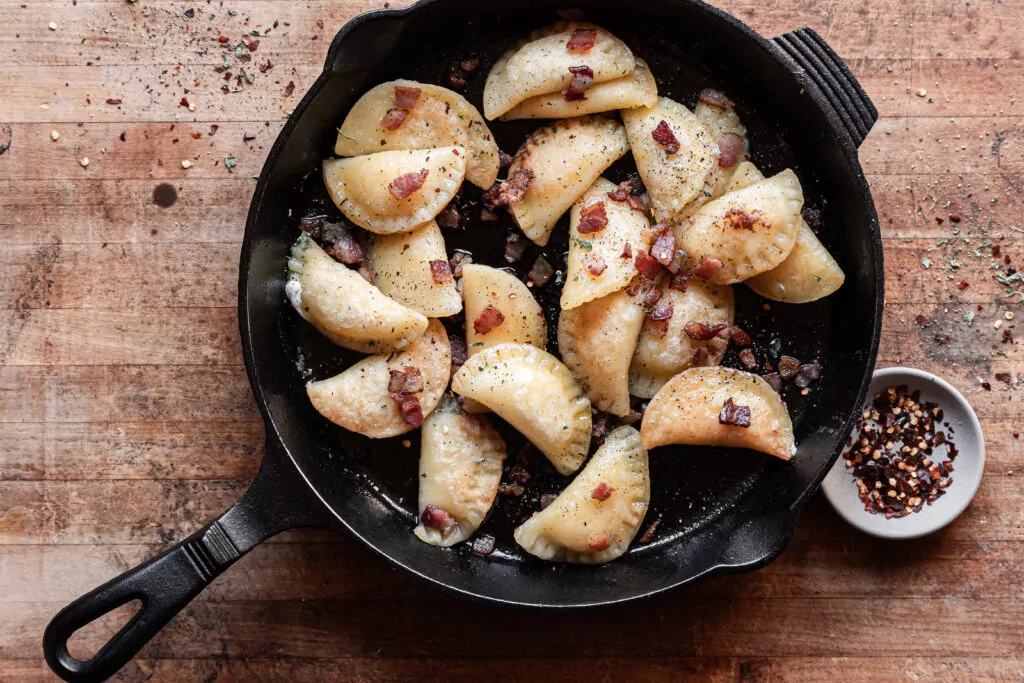
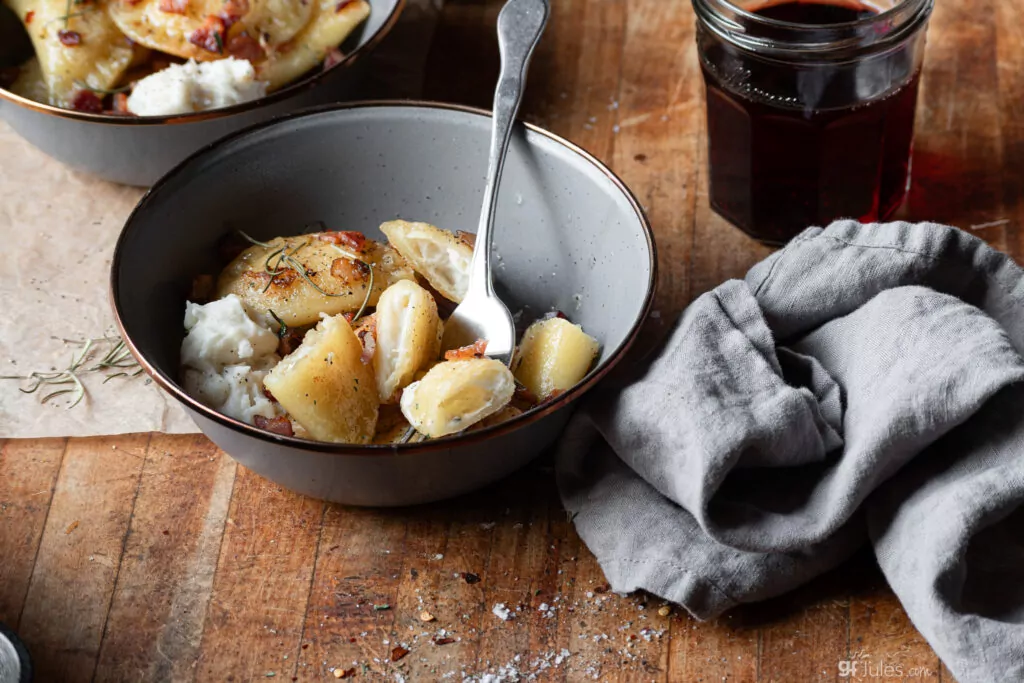
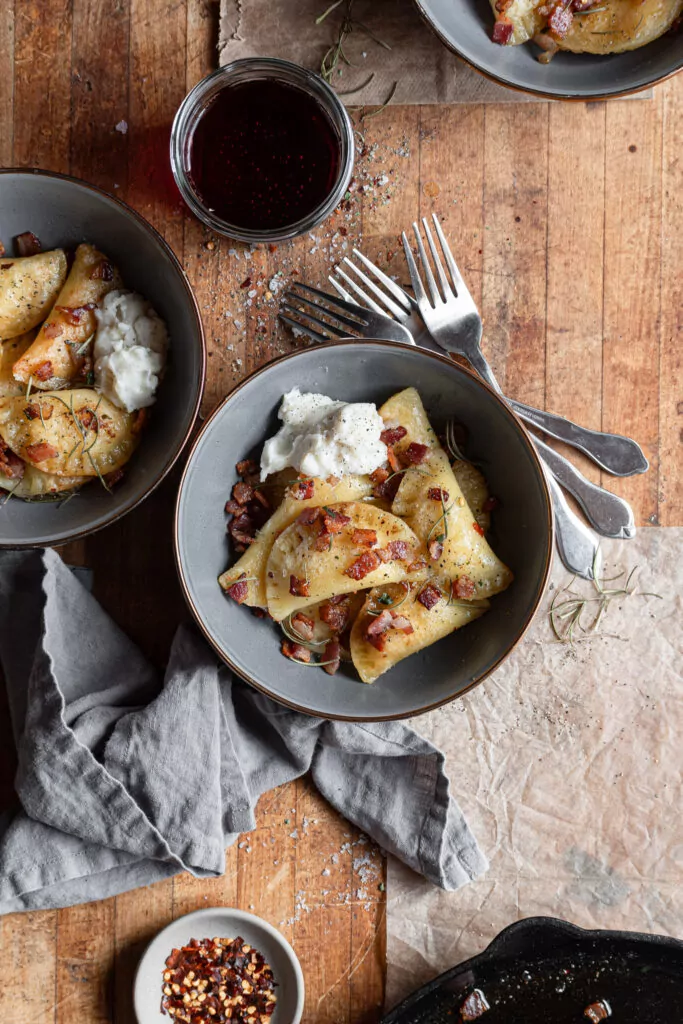
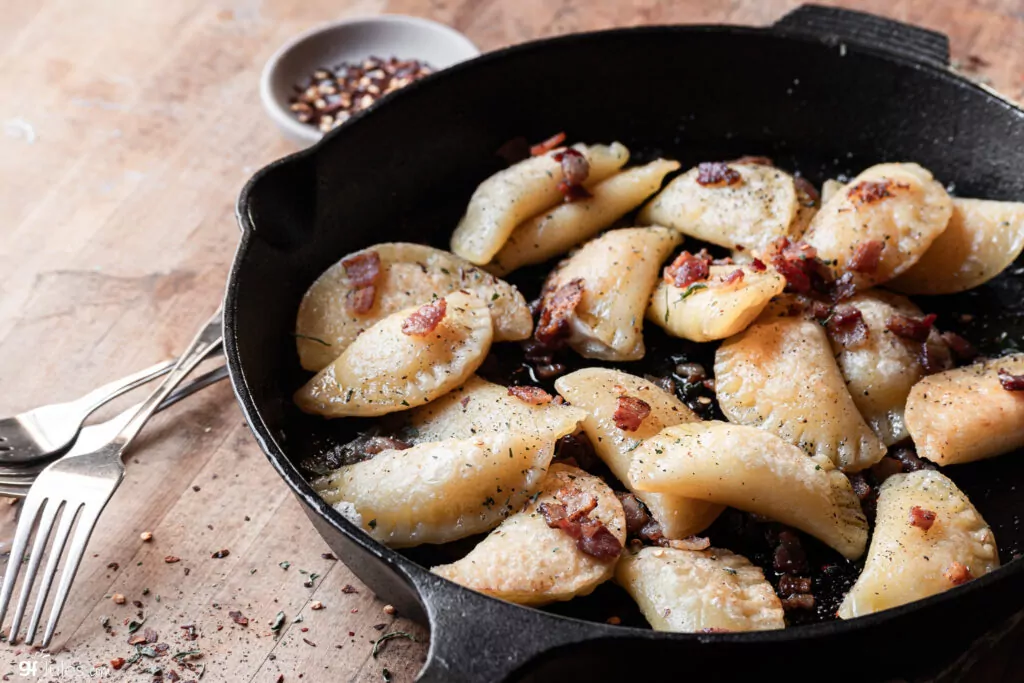
Boil and then pan fry if you like, or don’t if you don’t!
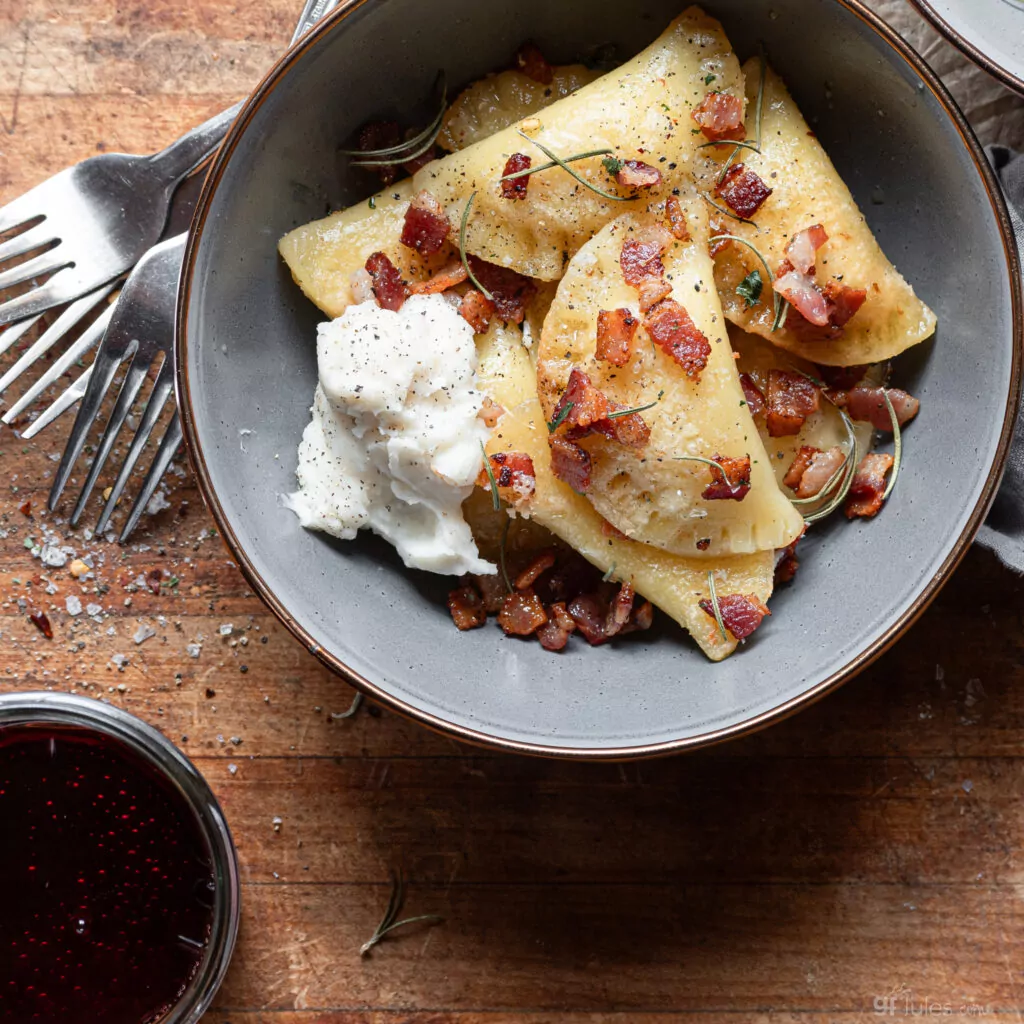
Serve with your favorite sauces or sides. I can’t emphasize enough how versatile this recipe is, and how much you can vary the flavors to suit your tastes and your meal!
If you’d like to make these ahead and freeze for later, parboil them only until they begin to float, then drain them and allow them to cool. Place in a freezer bag with parchment or wax paper between them so they don’t stick to each other. When ready to serve, place frozen pierogi in boiling water and boil another 7-8 minutes, or until cooked through.
I can’t wait to hear about what you serve with your gluten free pierogi! Please leave a comment and a photo, and if you love this recipe, please leave a 5-star review!
Gluten Free Pierogi Recipe

Gluten Free Pierogi Recipe

Ingredients
- 2 cups (270 grams) gfJules™ All-Purpose Gluten-Free Flour
- 1/2 tsp. salt
- 1/4 cup extra virgin olive oil
- 1 large egg or egg substitute
- 1/4 cup sour cream dairy or non-dairy alternative (vegan sour cream or plain vegan yogurt)
- 1/4 cup +/- very warm water
Instructions
- In a large-bottomed bowl, whisk together the gfJules™ All Purpose Gluten Free Flour and salt. Whisk together with a fork. Form a well in the center and pour the oil and cracked egg (or substitute) into the well.
- Gradually begin stirring the flour in with the wet mixture in the center. Meanwhile, pour 1/8 cup of water on top of the dry ingredients and stir that in as well. As the dough gets too dry, add in the additional 1/8 cup water; add more water as needed to get the dough wet enough to hold together well in a ball. Continue stirring with the fork until all the liquid is completely integrated. The dough should hold together without being overly wet and sticky.
- Gather the dough into a ball and wrap tightly with plastic wrap. Set out on the counter for at least 30 minutes while you prepare your fillings like mashed potatoes or sweet potatoes.
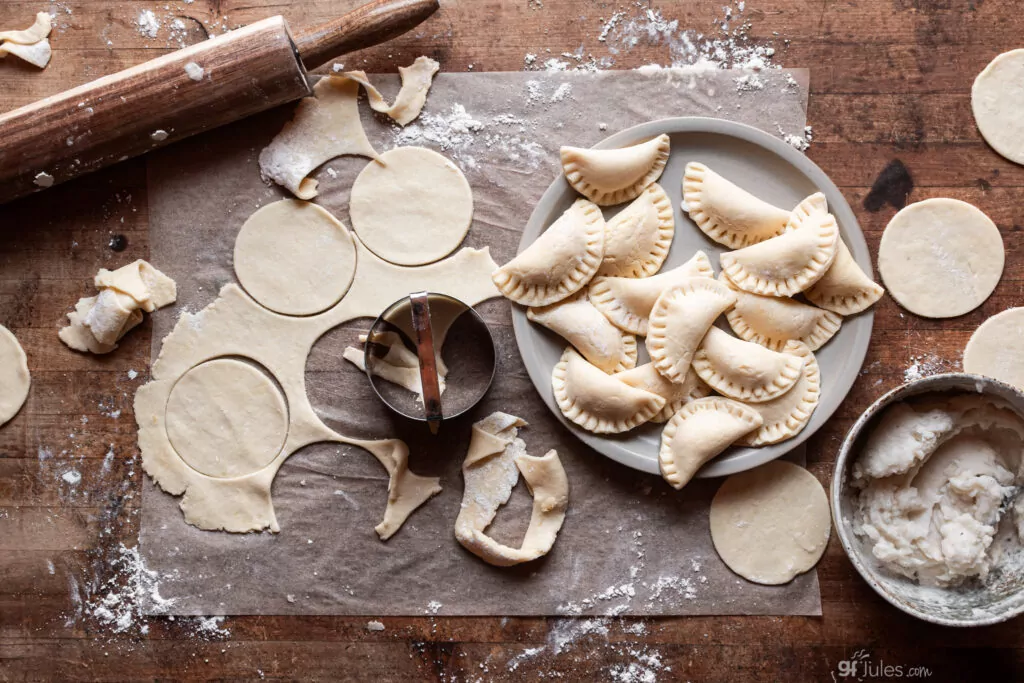
- Begin rolling the dough by rolling gently in one direction, then in the other, to form a 1/8 inch thick round of dough. Don't make the dough too thick, but if it's too thin, the fillings will break through.
- Scoop out a marble-size ball of your prepared filling and place it just off the center line of one pastry circle. Press each ball into a longer shape, more like the last knuckle of your index finger, so that the filling will fill the cavity of the crescent formed by folding the dough over itself.
- Dip your finger in water and lightly dab around the edge of each pastry circle to wet it, helping one side to adhere to the other when folded over the filling. Fold one side of the pastry over the filling, forming a semi-circle. Press gently, being sure to seal the edges, then press again lightly with the tines of a fork. Set each formed pierogi aside and cover with a damp towel until ready to boil.
- Bring a large pot of water to boil and gently submerge each pierogi in the boiling water. Put only as many pierogi into the pot as can boil without crowding (I boiled 6 at a time). Stir once in awhile, if necessary to prevent them from sticking together. Once they begin to float, boil another 5 minutes – total boil time should be approximately 6-7 minutes.
- Remove with a skimmer or slotted spoon to rinse and drain. Try not to let the pierogi touch while they are draining, so that they will not stick to one another. Repeat until all pierogi are boiled.
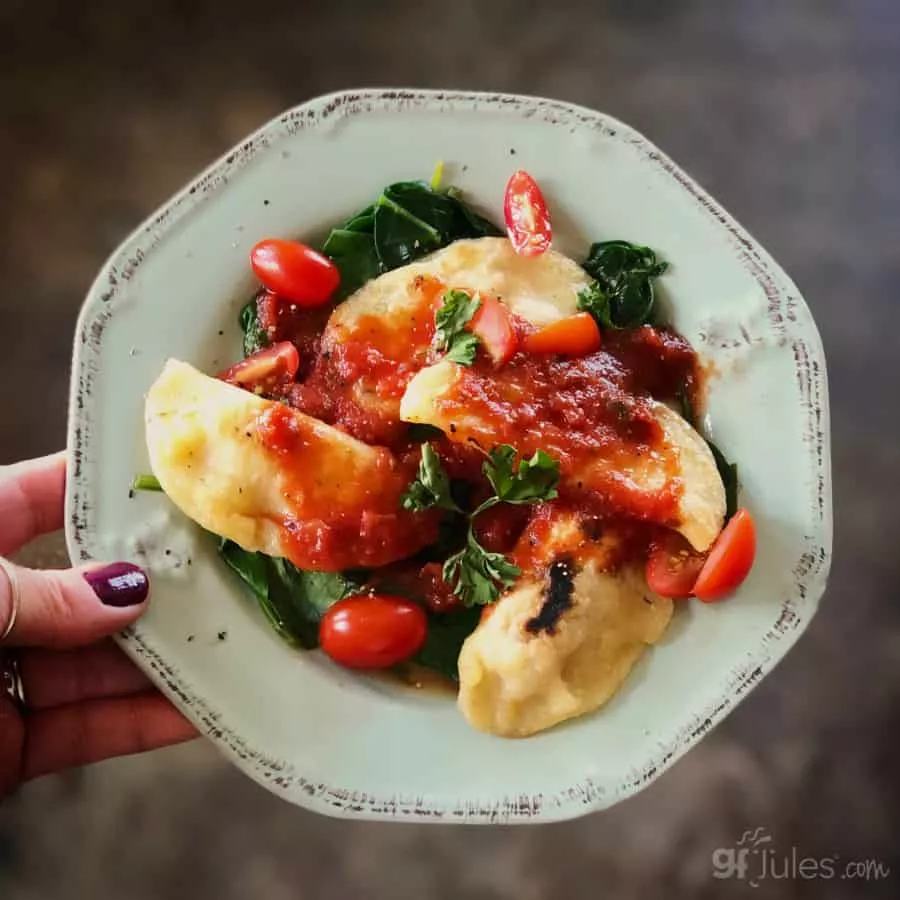
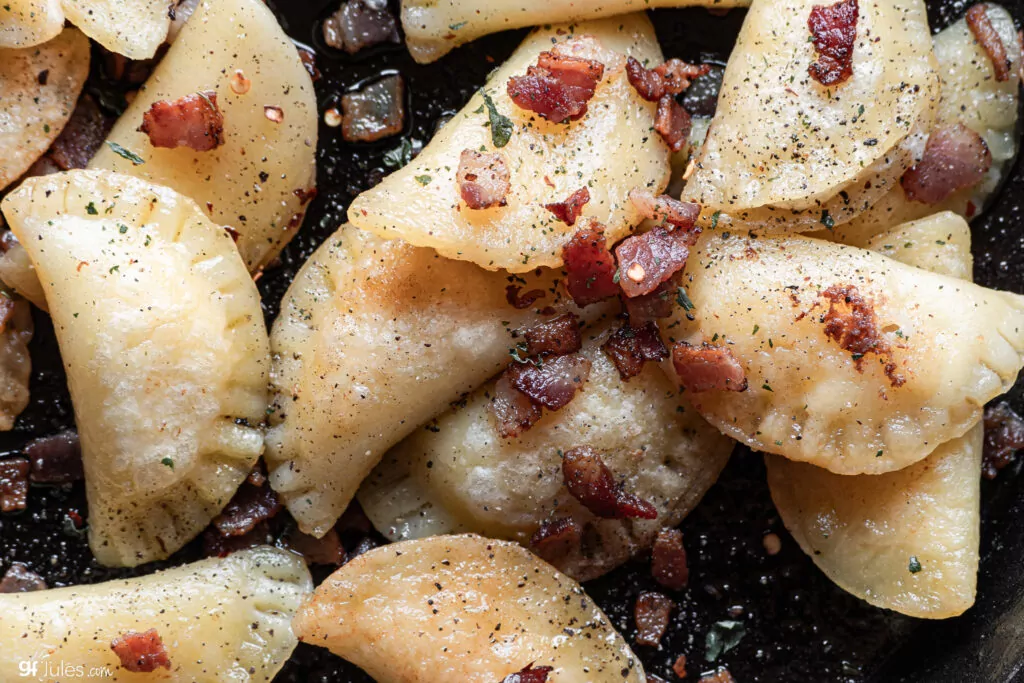
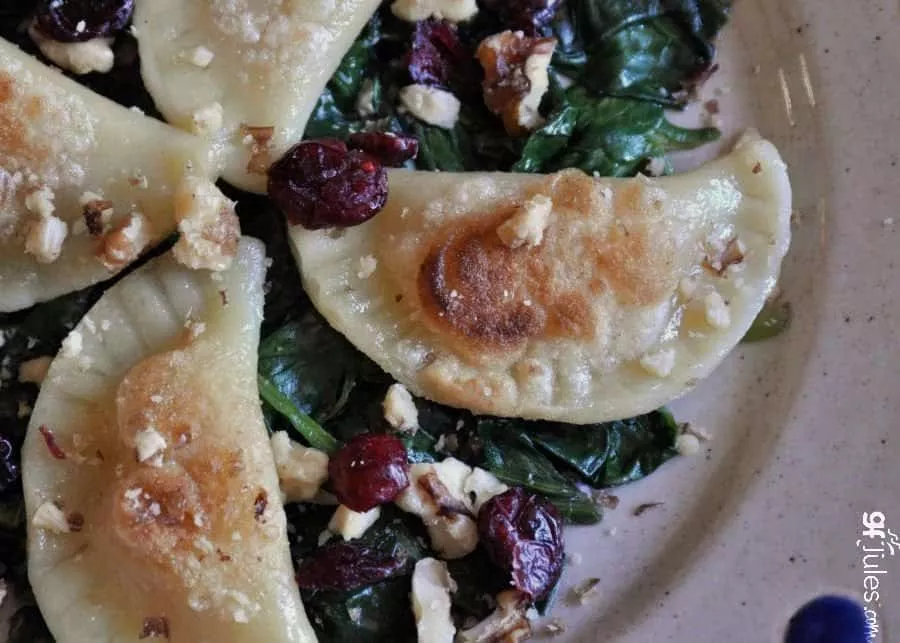
- Serve at this point, or pan fry in butter or non-dairy alternative until slightly crisp. Serve alone or atop a bed of wilted spinach with walnuts, craisins, raisins, chopped apples, or any other accompaniments that suit you. Also try serving with my Onion-Mushroom Sauté (as pictured in the banner at the top of this recipe).
Video
Notes
** Please keep in mind that nutrition information provided is per serving, which may vary. While we have taken care to provide you with the most accurate nutritional values possible, please note that this information may differ significantly depending on the exact ingredients and brands that you choose to use to make this recipe. Additionally, where options are given for ingredients, the resulting calculation may include all ingredient options instead of only one per line, skewing the totals significantly.
Recommended Products
Any links to Amazon may earn me a small amount from qualifying affiliate purchases; this amount goes to fund this blog and does not cost you anything additional.

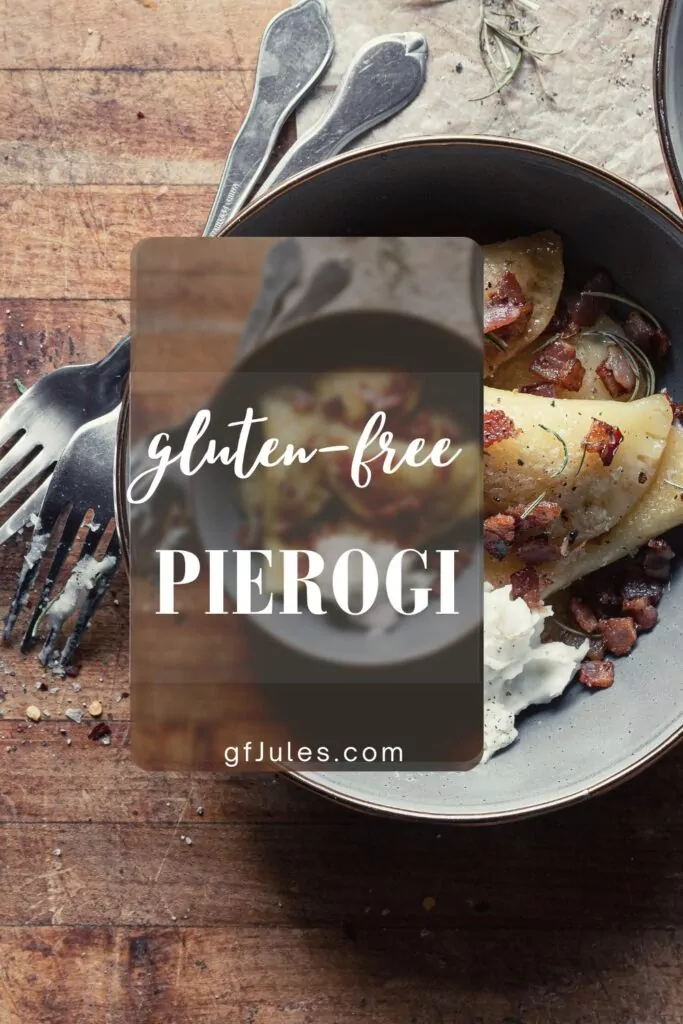
Pin it for later!


Gluten free pierogi dough. Can you pre make a pierogis and flash freeze too eat another day?
Hi Diana, yes – check the tips in the recipe about freezing. Usually I parboil and then freeze with parchment or wax paper between them. It works great!
~jules
will this recipe work for Asian dumplings, wontons and dumplings?
I would recommend just using my gluten free wontons recipe instead! Cut to the chase!!! It’s amazing — you’ll love it!
~jules
Thanks again, Jules for a wonderful gluten free perogi dinner! There is no gf flour that compares to yours. And we would be lost without your videos.
Happy New Year!!
You are so welcome, Elaine! Thank YOU for taking the time to drop me a note and let me know how much you enjoyed the gluten free pierogi! It makes it all worthwhile to hear from folks who put my recipes and gfJules Flour to such good use!! Happy New Year to you, as well, and may the new year bring you much happy baking!
~jules
My son was diagnosed with celiac over the summer. He looks forward to our tradition of pierogies on New Year’s Day. He was so upset that he wouldn’t be able to have them this year. I’m glad that I found this recipe. Can these be made ahead and frozen? If so, should I freeze them pre-boil?
Thank you!
Hi Will – I’m so happy your son will not have to give up any special food traditions! He and all of your family will love these pierogi when made with my gfJules Flour because the dough is so pliable and there is no “gluten free” taste or texture! I have made them many times and frozen them but what I do is to par-boil them then freeze them. So, once they start to float, or after about 3-4 minutes, go ahead and remove them to cool. Then put parchment or wax paper between them to prevent them from sticking and put them all in a freezer bag. When you’re ready to serve, put them into boiling water and boil for another 7 minutes or so. Test one first to be sure the insides are fully cooked and hot before removing them all. Enjoy!
~jules
You have changed my life for the better over and over! Thank you so much
Pierogies are amazing as are all your recipes that I’ve tried. ONLY gfjules products for me. (Live and learn)
Just want to comment that as a new baker your videos are so helpful. The best
Aw Pat, thank you! What a sweet note – I sincerely appreciate you taking the time to let me know how much the recipes and my products have helped you! I am trying to add more and more videos whereever I can. I totally understand how helpful they are. I used to do more Facebook Live videos and post those where folks would log in and watch as I made the recipes in real time, but anymore people seem to want short short short! videos, so I’m trying to make those and the editing takes more time than the recipes do! LOL Anyway, I’m doing my best! If there’s a particular recipe you really would like a video for, let me know and I’ll add it to my list!
So glad you’re enjoying the pierogi!!
Happy baking!
~jules
Oh my goodness! I miss pierogis SO much! I hope to find time to try these. You should consider selling them already made – I would having a monthly standing order shipped to CA. 🙂
LOL I will take that under advisement, Tara!! Luckily these are pretty easy to make, especially after you make them the first time and get the hang of it. I think you’ll be surprised at how simple they are! Maybe you will want to start your own gluten free pierogi shop! 😉
~jules
Hello Jules! Thank you so much for creating and posting this recipe. It’s been nearly two decades since I’ve had pierogis, so finding your recipe was such a treat! I followed the recipe step by step, with the exception of using the King Arthur Measure
For Measure gf flour. I must have done something wrong as the dough was crumbly and didn’t stay together that well when I put the filling in it. The overall taste was of flour, although the delicious filling helped slightly offset the flour taste. What can I do differently next time? Thank you!
Hi Frances, I’m so pleased that you found my gluten free pierogi recipe after such a long time of going without!!!
As for the crumbly dough, I doubt you did anything wrong; I think it was the flour blend that you used. All gluten free flour blends are SO different. It’s a falsehood that we all have when baking gluten free, thinking that most flour blends are interchangeable or at least are good enough quality to be able to be used in recipes that are challenging like this pierogi dough. Here the dough needs to be able to stretch and pull around the fillings and not fall apart, which is where my gfJules Flour is quite different. It’s light and fine and not gritty so it is wonderful in all kinds of fine pastry applications, but it also adds stretch to doughs like pierogi so it will not fall apart. I would love to see how you fare with this recipe simply making the switch to this blend. Here is more information on the difference between all kinds of flour blends to help you see why they can make such a huge impact on recipes. Here’s a link to my blend to learn more.
Hoping for a better outcome and delicious gluten free pierogi next time, Frances!
~jules
Delicious. I filled them using the smaller handpie press with potato/sauteed onion&saurkraut/butter/Velveetta cheese/small cube of cheddar, salt/pepper. First time I just mixed it all up and used the medium press; it was good, but less is more. Making the dough step by step is better. These were perfectly tender and the whole family (only me GF) said they were delicious.
I wanted to mention that this recipe yielded 35 small pierogi. I’m exhausted. 🙂
I bet!! But so worth it for authentic gluten free pierogi that looks and tastes THAT good!!!! Congrats on this recipe success!!!
~jules
Beautiful picture, Donna!They look absolutely perfect!!! Maybe since everyone loved them so much, they’ll chip in and help you next time!!!!
~jules
Making these for my several gf family members however I have many who are not gf, can I use this recipe with regular flour ? Thanks ron
Hi Ron, they will love it with my gfJules Flour — no need to make two separate ways! But if you really want to make it another way, you should be able to make the same recipe with regular flour. If there are any differences at all it would be with moisture so add liquids slowly in case you don’t need as much; you can always add more but you can’t take it away!
~jules
I made both this morning and both turned out wonderfully. I have to make both because some family members won’t even try gf and since they are for Easter I thought why not. I fried one of each and really no difference, great recipe 👍👍
Ron
That’s great to hear, Ron (about the fact that there was really no difference between the gluten pierogi and the gluten free pierogi made with my gfJules Flour … not the part about the family members who won’t even try foods that are gluten-free!). I’m glad it worked out in the end!!! Happy Easter!!!!
~jules
Can I use a pasta roller
Hi Julie – yes! You can definitely use a pasta roller to cut the gluten free pierogi dough.
~jules
Absolutely LOVE this pierogy recipe Jules! Slick and easy to make! Thank you for bringing these back into my life.
Happy New Year to you and your’s!
So happy you love this gluten free pierogi recipe, Alice!!! And happy New Year to you, too!!
~jules
These were so easy to roll, cut, and stayed together while boiling. I used Kite Hill vegan sour cream and Country Crock vegan butter pan crisp. Perfection!
Oh yum – these gluten free pierogi did turn out well, Mikaela! Thanks so much for sharing a photo!!!! (You’re making me hungry!)
~jules
I used gluten free almond flour it was very sticky. I only was able to make 10, which then fell apart while being boiled. Where did I go wrong? I failed… but I feel like it was something I did. The ball was very sticky, and I couldn’t even use my roll pin.
4 stars because I think it was my error
Hi Alan, thanks for your comment and for being interested in trying again! I highly recommend you read this article on gluten free flours. ALL gluten free flours are VERY different and using almond meal in place of my gfJules Gluten Free All Purpose Flour is going to yield ENTIRELY different results that, you’re right, will be sticky and fall apart. The good news is that it’s not something you did, beyond choosing the wrong flour, that is. 🙂 You can fix this! Just make the recipe as written with my gfJules Flour and you’ll be enjoying delicious homemade, authentic gluten free pierogi in no time!!! Check out some of the comments to this pierogi recipe for more affirmation that it’s truly possible when you use my gfJules Flour. There’s no sense in wasting another minute of your time or another dime on products that won’t work for you, when you know what you can do to make it work right. I can’t wait to hear how it goes for you next time, Alan!
Love this recipe Jules! No need to try any other recipes! When I make them I always freeze some.
So smart, Debby – it’s a blessing to always have some of these delicious pierogi in the freezer! Glad you’re loving the recipe!
~jules
I have been gluten free for many many years but recently discovered within the last three years that I have additional sensitivities such as dairy, egg and more. I have never had success making gf pierogies until I tried this recipe Jules. I simply love the flour and have had much success also with using the piecrust pastry recipe—again with the flour. I do not live in the US so it is a little harder to have it shipped here but I am determined that no matter how hard, I will keep ordering it and using it. I am now a very very happy person! Thank you for sharing all of your recipes and helpful aids in cooking and baking and also for coming up with this formula for such a wonderful flour.
Oh Alice, I’m thrilled to hear that! My wish is for others living gluten free to be able to have their favorites again without compromise! I’m so happy you’ve found success and now are feeing inspired rather than deprived. Thank you so much for sharing your experience with me. May all your baking be happy!!!
~jules
At what point in the process would you freeze them? After you boil or after you stuff? Thanks!
sorry just read the other comments!
Oh great – glad you found your answer. Enjoy!
~jules
Can sour Cream be substituted by yogurt?
Hi Esther, yes, yogurt will work in place of sour cream. I’d suggest a thicker yogurt like greek yogurt, but plain yogurt of any kind will do. Enjoy!
~jules
Haven’t tried these yet but read that they can be frozen. Can I freeze them after boiling and pan frying them? Then just warm them before serving. This is what I do with my regular pierogi.
Hi Stephanie, yes absolutely! I give instructions in the recipe, but basically you’re par-boiling them, then laying between parchment or wax paper and putting in a zip-top freezer bag when cooled. Then you take them from the freezer to a boiling pot to finish cooking before serving. Enjoy!
~jules
Can you freeze GF pierogies? Would you freeze before or after cooking?
Thank you!
Sorry I just read the previous comments. Thank you. I see that I can freeze them. Just use some wax paper so they don’t stick!
Yes – wax paper is a great trick here! Enjoy!
~jules